


Learn to crochet for beginners -
The Beginner's Guide 2025
Crocheting is no longer an old-fashioned hobby. It has developed into a trend that connects generations and opens up creative possibilities. Whether summer crochet tops, decorative accessories or practical everyday helpers such as reusable dishcloths - the variety is impressive. With this crochet guide for beginners, learning to crochet is effortless. The most important basics are explained and supplemented with helpful tips and easy-to-implement crochet tutorials that lead you step by step to success.
History of crochet:
From the hunt to DIY fashion
Crochet has had a fascinating journey through the centuries. Originally, hunters in various cultures, from Egypt to China, used crocheted nets to catch their prey. These early techniques, a mixture of crochet and weaving, had little in common with today's needlework. Interestingly, crochet was considered a status symbol of the middle class in the 18th century, while the elite rejected it. It was not until Mademoiselle Riego de la Branchardiere published crochet instructions in 1840 that the art of crochet became accessible to the wider classes - a step that laid the foundations for modern crochet culture.
The basic equipment for learning to crochet
Finding the perfect crochet hook
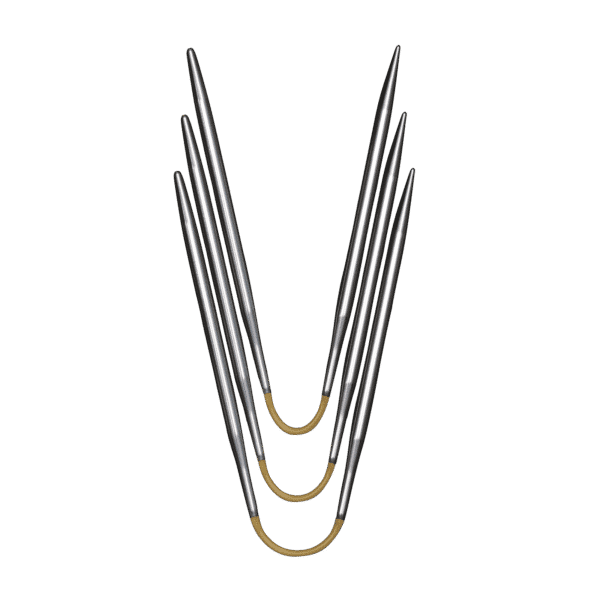
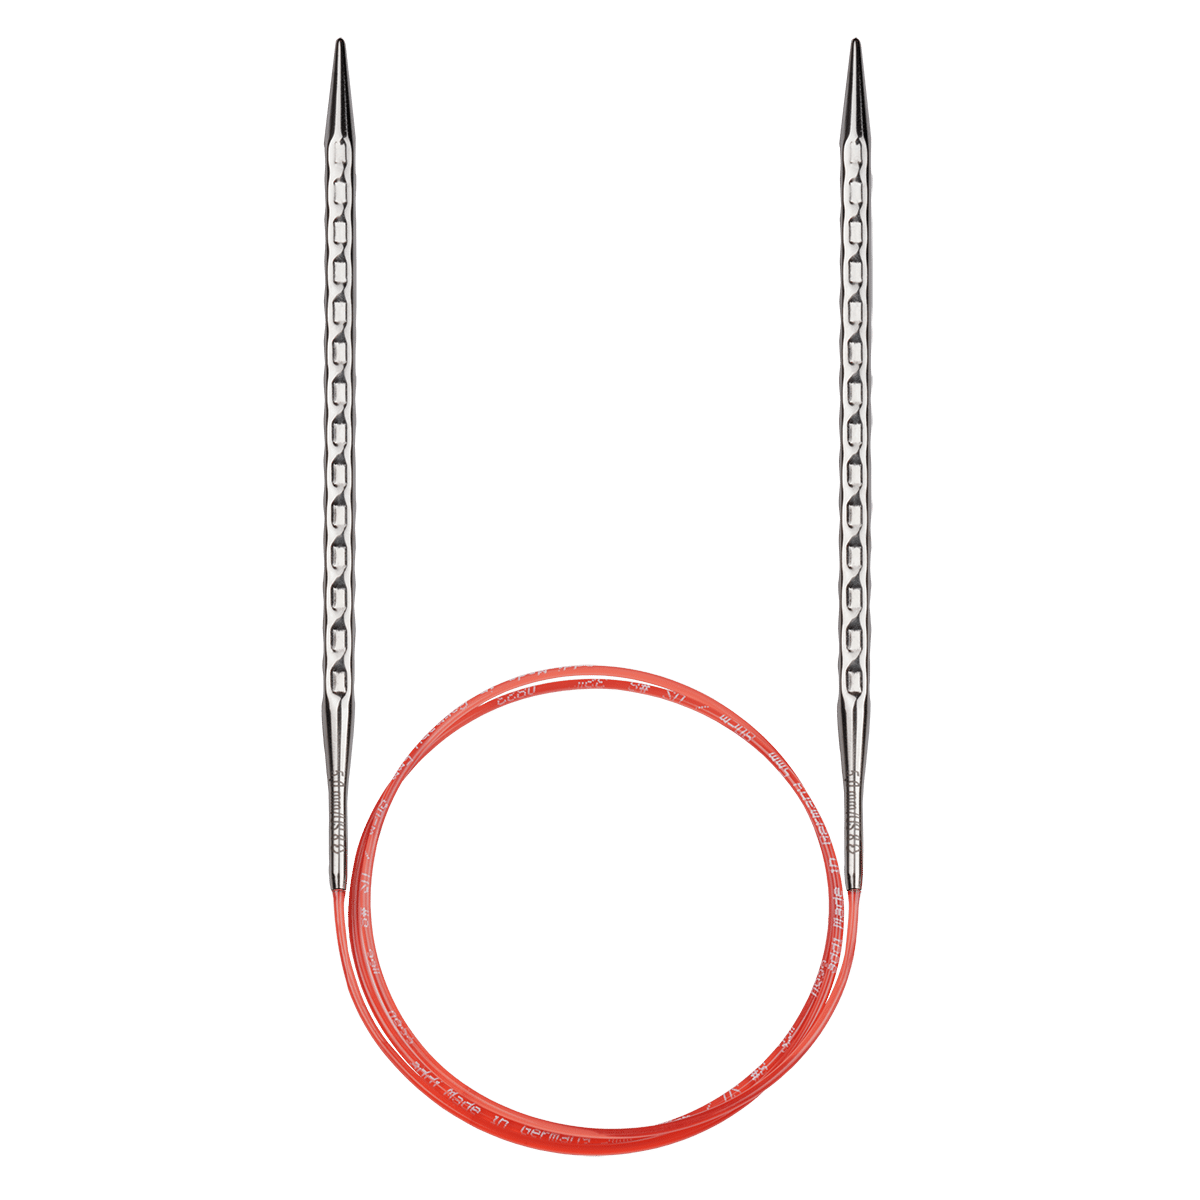
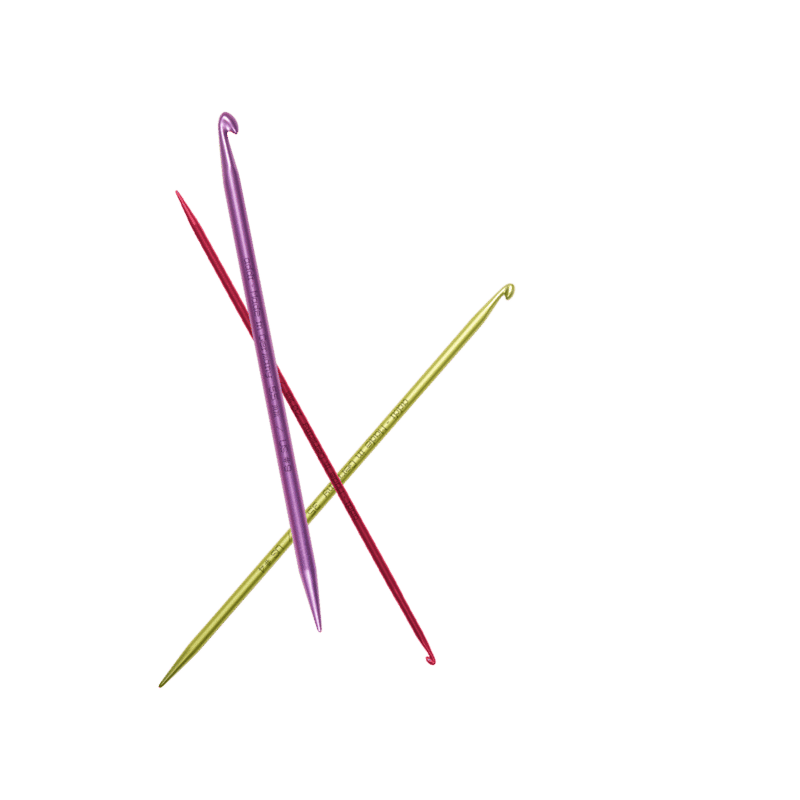
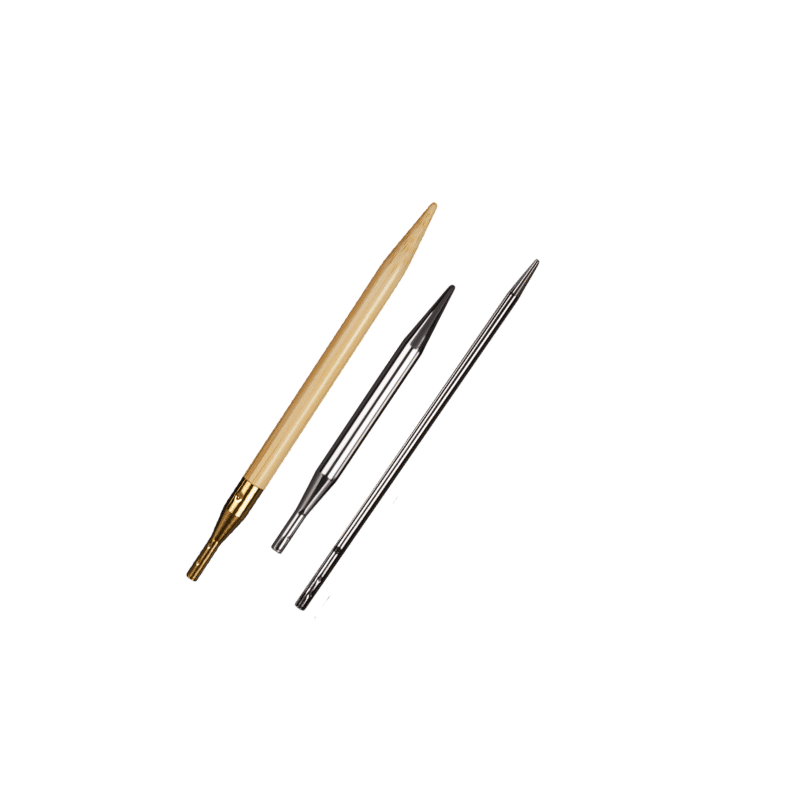
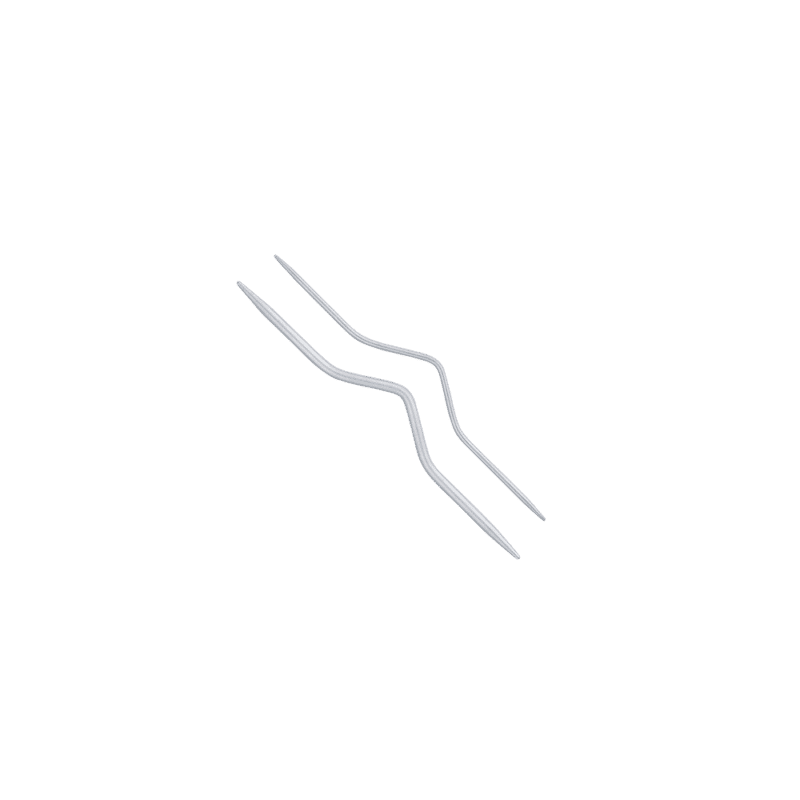
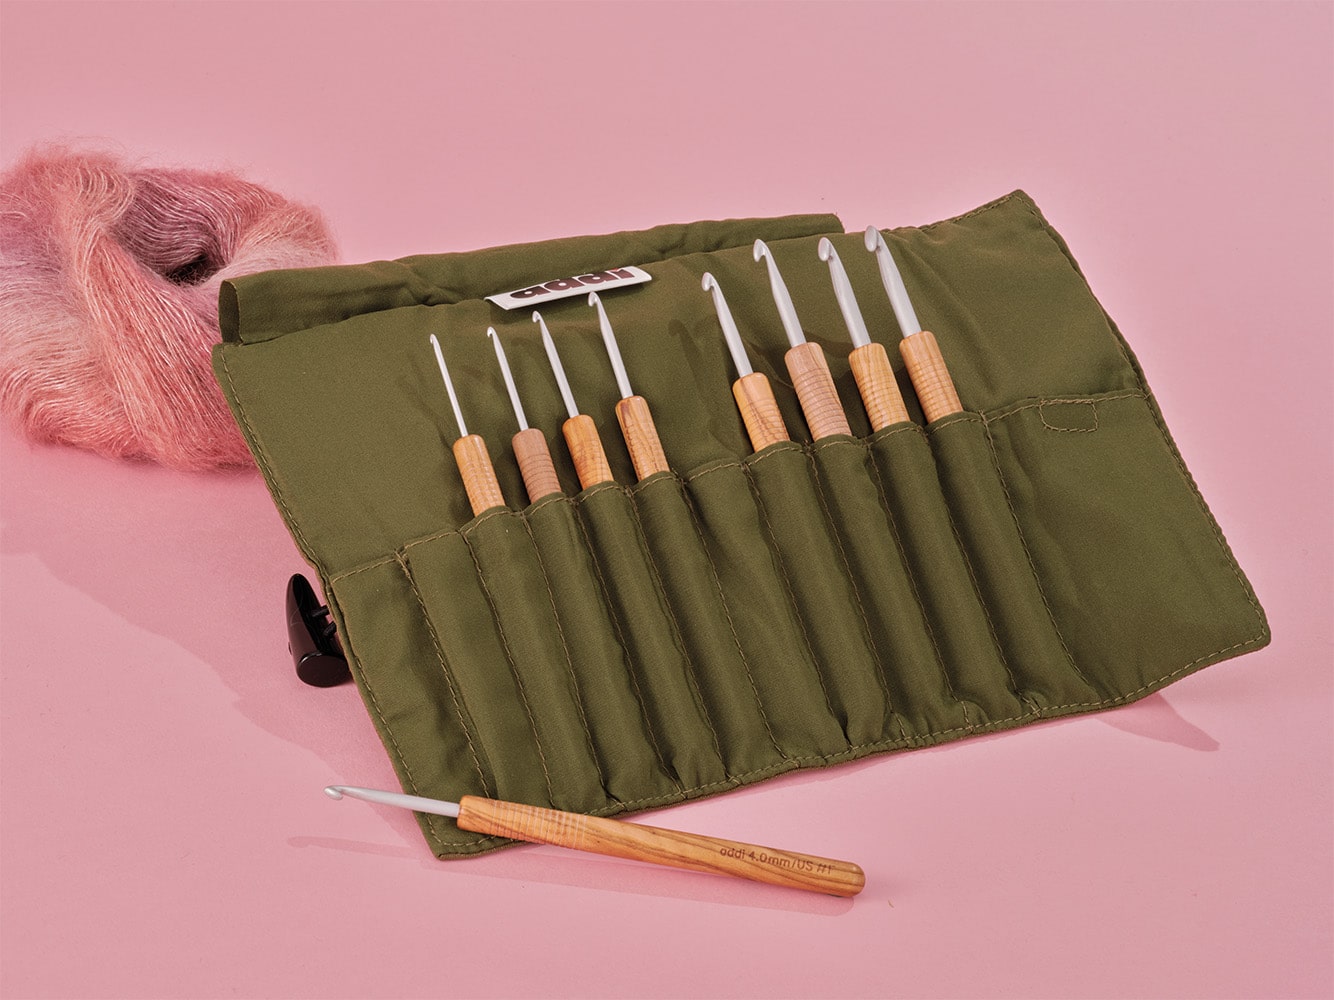
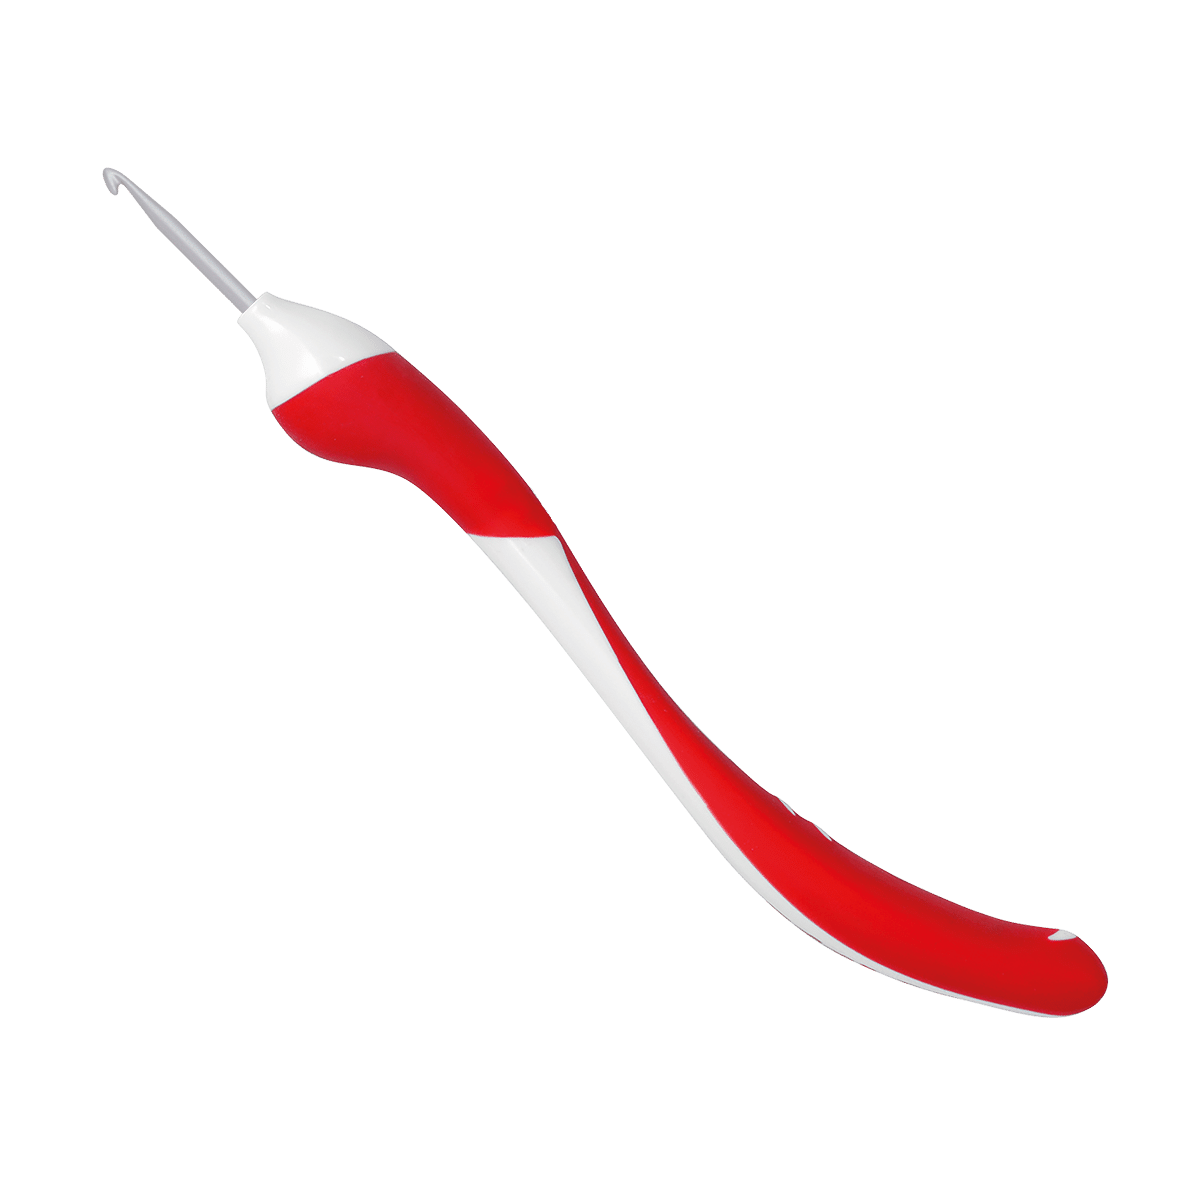
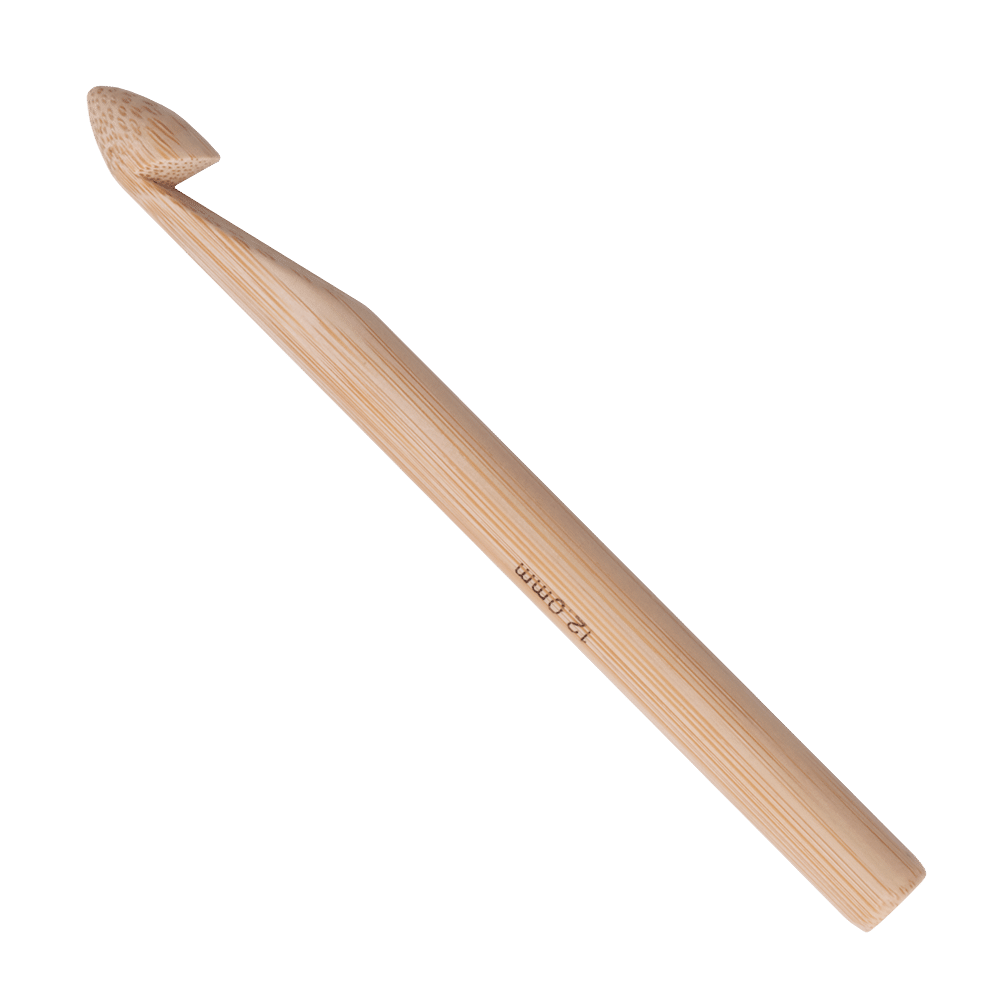
addi offers an extensive range of high-quality crochet hooks, made in Germany of course, from various materials - metal, plastic, bamboo and olive wood. From ergonomic models such as the addi Swing crochet hooks to special hooks for Tunisian crochet, such as the addiTun, there is a hook for every technique.
Choosing the right crochet hook depends not only on the material, but also on the handle. There are crochet hooks with a handle (plastic or wood) and models without a handle. It is particularly useful for beginners to try out different crochet hooks to find out which one fits best in the hand and offers the greatest comfort
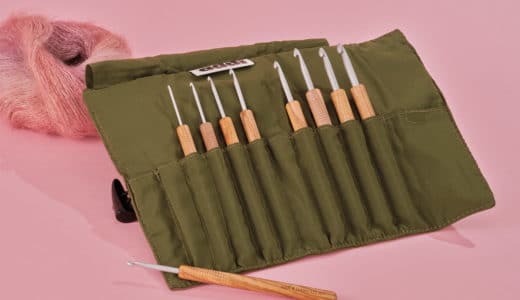
Once a preferred needle has been found, a complete needle set can be a good investment. Such a set offers different sizes and allows for a flexible project selection. The choice of material can have a big impact on working comfort: Wooden needles feel warm and easy to grip, metal hooks glide particularly easily through the yarn. Plastic needles are an inexpensive alternative. addi offers a large selection of surface structures and grip variants.
Crochet hooks for beginners from the addi range:
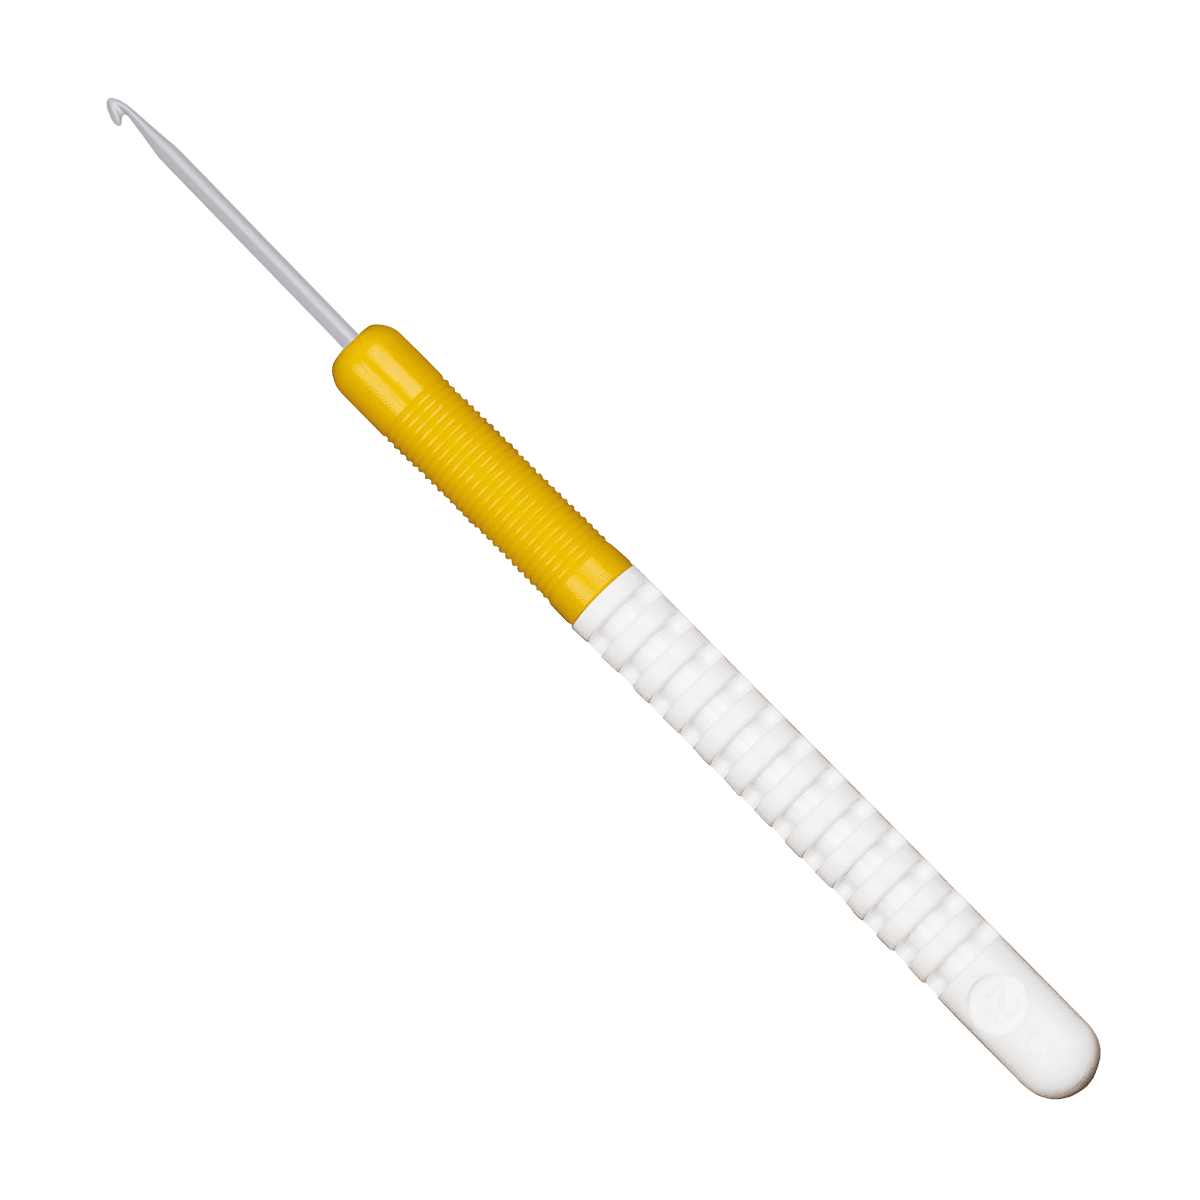
- addiColour crochet hookHandy handle made of recycled plastic, combined with a high-quality metal head. Each gauge has its own color.
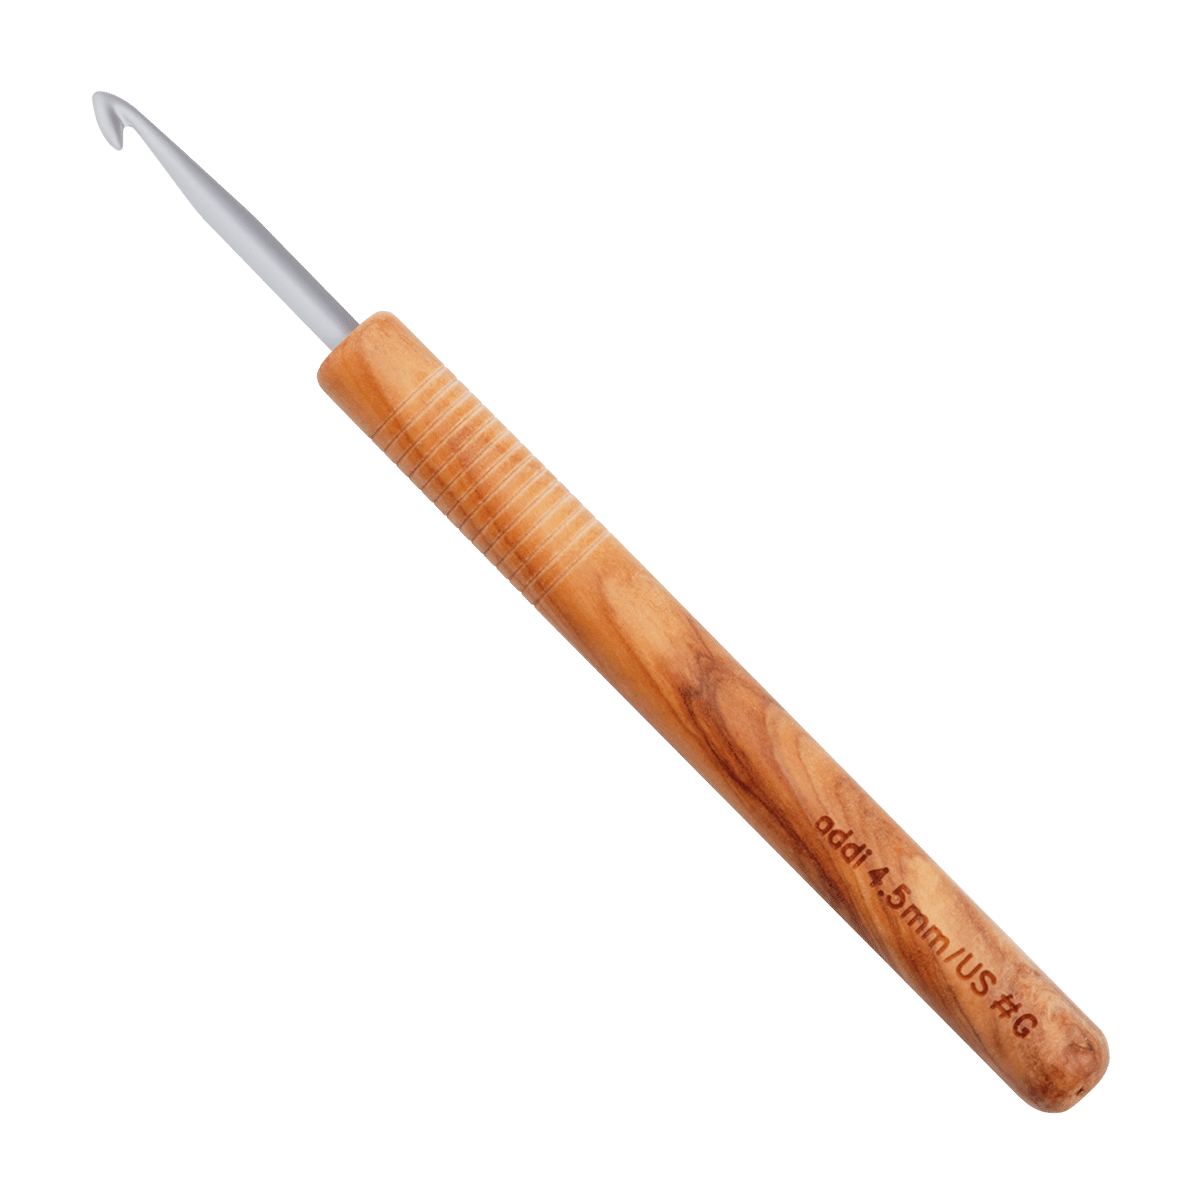
- addiNature olive wood crochet hookThe olive wood handle with its beautiful grain is natural, light and particularly comfortable. The head is made of metal.
- addiPur crochet hookHandleless, minimalist and finished in silver or gold, these metal hooks are a convincing quality choice even on a small budget.

Finding the perfect crochet hook
addi offers an extensive range of high-quality crochet hooks, made in Germany of course, from various materials - metal, plastic, bamboo and olive wood. From ergonomic models such as the addi Swing crochet hooks to special hooks for Tunisian crochet, such as the addiTun, there is a hook for every technique.
Choosing the right crochet hook depends not only on the material, but also on the handle. There are crochet hooks with a handle (plastic or wood) and models without a handle. It is particularly useful for beginners to try out different crochet hooks to find out which one fits best in the hand and offers the greatest comfort
Once a preferred needle has been found, a complete needle set can be a good investment. Such a set offers different sizes and allows for a flexible project selection. The choice of material can have a big impact on working comfort: Wooden needles feel warm and easy to grip, metal hooks glide particularly easily through the yarn. Plastic needles are an inexpensive alternative. addi offers a large selection of surface structures and grip variants.
Crochet hooks for beginners from the addi range:
- addiColour crochet hookHandy handle made of recycled plastic, combined with a high-quality metal head. Each gauge has its own color.
- addiNature olive wood crochet hookThe olive wood handle with its beautiful grain is natural, light and particularly comfortable. The head is made of metal.
- addiPur crochet hookHandleless, minimalist and finished in silver or gold, these metal hooks are a convincing quality choice even on a small budget.


Which crochet hook size is the ideal one?
The choice of needle size depends on both, the yarn used and the project in question.
- Thinner needles (2.0 to 3.5 mm/ US #B-E) are ideal for fine yarns and detailed work
- Medium sizes (4.0 - 5.5 mm/ US #G-H) are suitable for almost everything from clothing to decoration.
- Thicker needles (6.0 mm/ US #J and higher) are suitable for very thick and bulky yarns and quick projects such as XL bags, giant cuddly toys or home accessories.
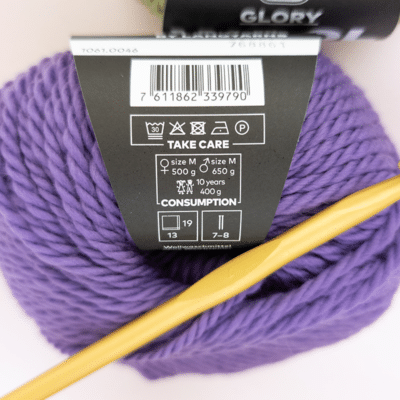
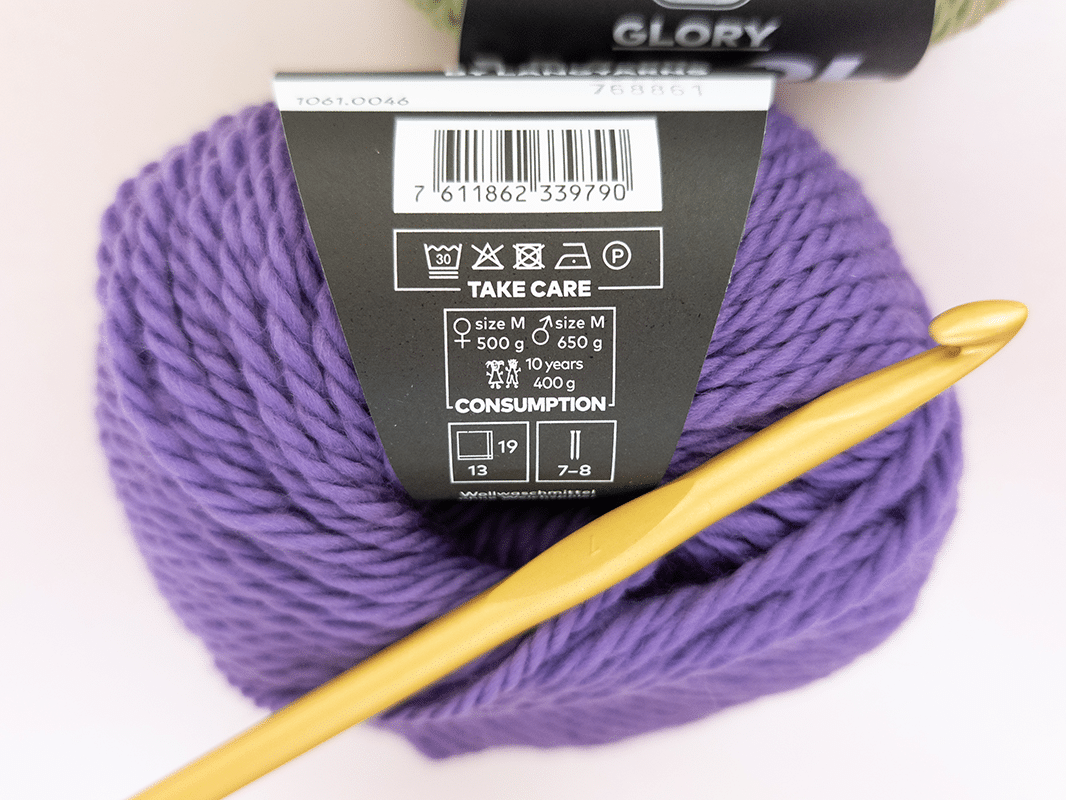
A look at the yarn banderole will help, as the recommended needle size is usually indicated there. Needle and yarn should match.
For beginners, a medium needle size of 4 to 6 mm is particularly recommended, as many projects can be realized with this size. If you want to try your hand at amigurumi, it is best to use a 2.5 mm needle.
It is important to choose a needle that is not too small or too large for the planned project in order to achieve an even stitch pattern.
In our hook guide Crochet hooks for beginners you will find a detailed description of materials, needle sizes and the different areas of application.
Which crochet hook size is the ideal one?
The choice of needle size depends on both, the yarn used and the project in question.
- Thinner needles (2.0 to 3.5 mm/ US #B-E) are ideal for fine yarns and detailed work
- Medium sizes (4.0 - 5.5 mm/ US #G-H) are suitable for almost everything from clothing to decoration.
- Thicker needles (6.0 mm/ US #J and higher) are suitable for very thick and bulky yarns and quick projects such as XL bags, giant cuddly toys or home accessories.
A look at the yarn banderole will help, as the recommended needle size is usually indicated there. Needle and yarn should match.
For beginners, a medium needle size of 4 to 6 mm is particularly recommended, as many projects can be realized with this size. If you want to try your hand at amigurumi, it is best to use a 2.5 mm needle.
It is important to choose a needle that is not too small or too large for the planned project in order to achieve an even stitch pattern.
In our hook guide Crochet hooks for beginners you will find a detailed description of materials, needle sizes and the different areas of application.
Practical tools for crochet beginners:
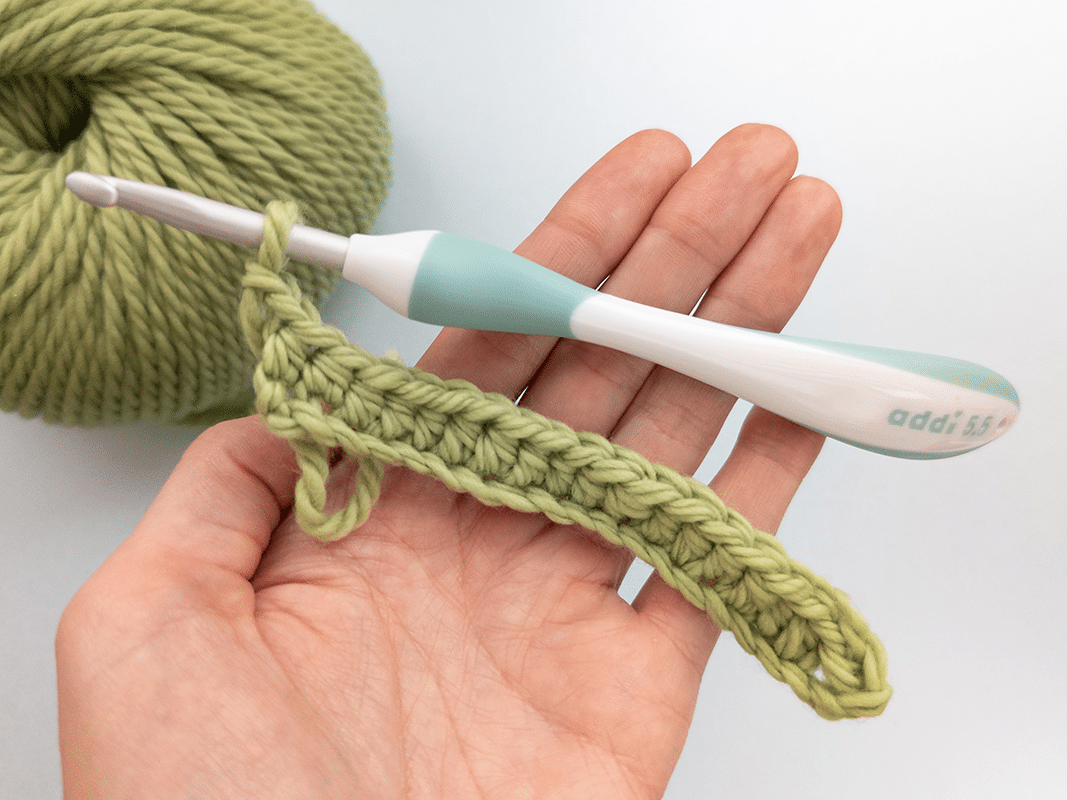
Wool: Thick, smooth yarn with cotton or wool is particularly beginner-friendly. It is easy to work with and the stitches are easy to see.
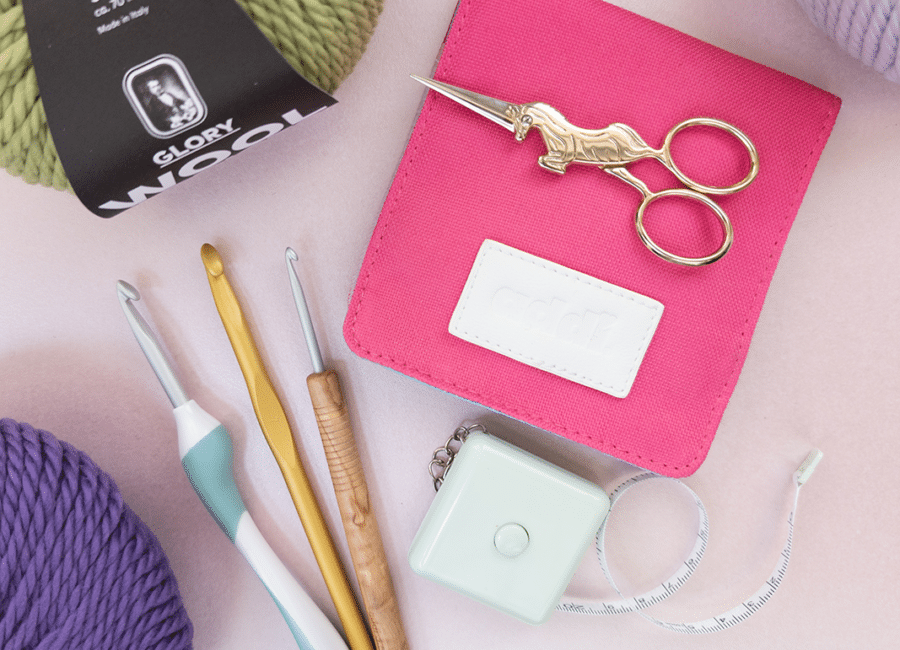
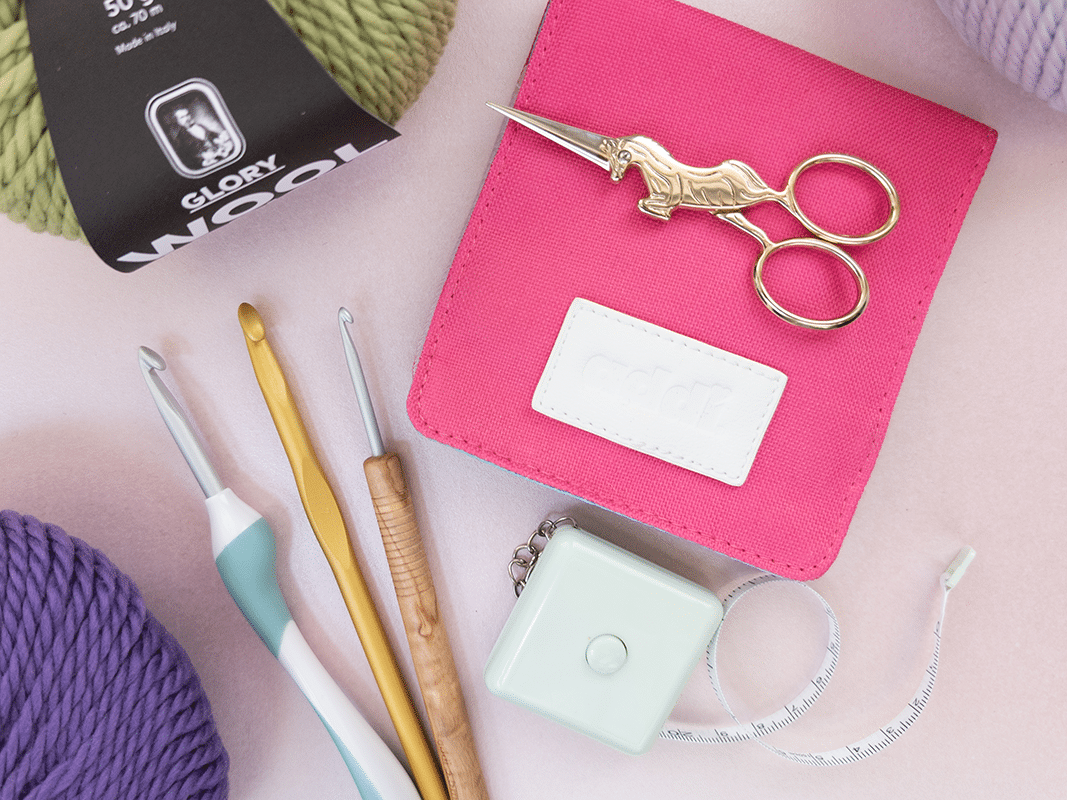
Accessory case: The practical, small addiUnicase accessory case incl. scissors, sewing needle and measuring tape fits in every project bag.
or scissors: a small Scissors, like the addi-Goldmarie, is perfect for cutting yarns cleanly.
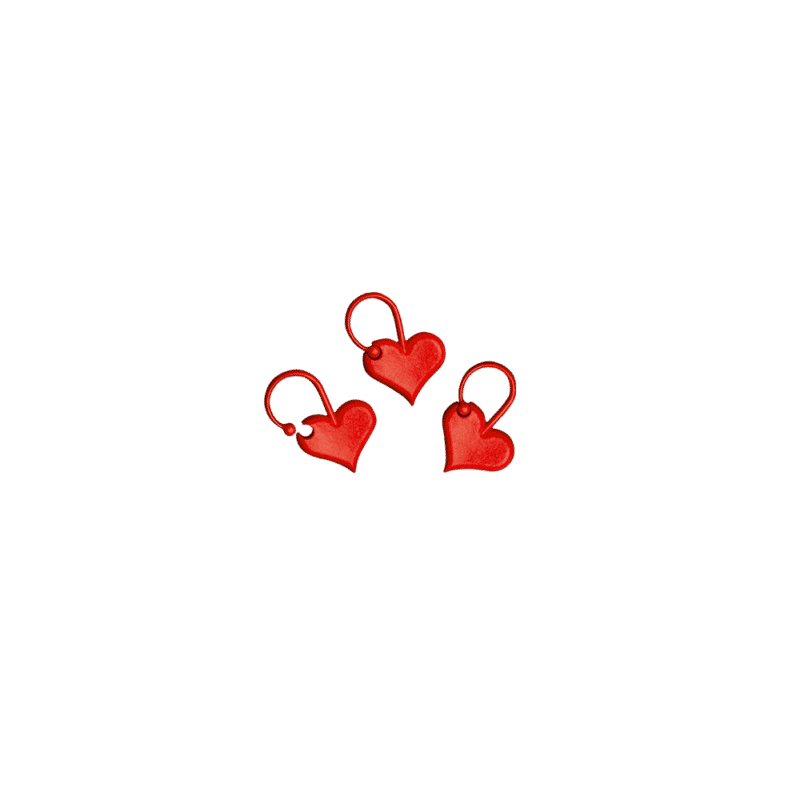
stitch marker: The addiLove stitch marker. Practical for marking stitches that are important. Alternatively, paper clips or a different colored yarn can also be used.
Learn basic crochet techniques
If you want to learn to crochet, a fundamental knowledge of the basic techniques is crucial for success. We have compiled the most important types of stitches and basic crochet techniques here. For crochet beginners, it makes sense to go through the content step-by-step in the order given.
You should know the following basic techniques:
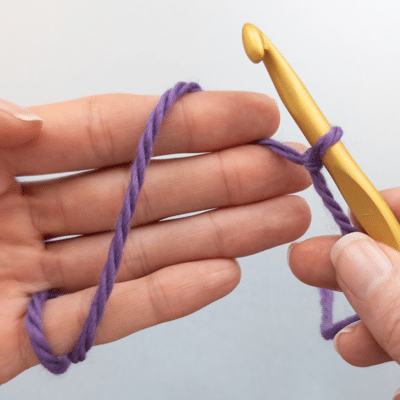
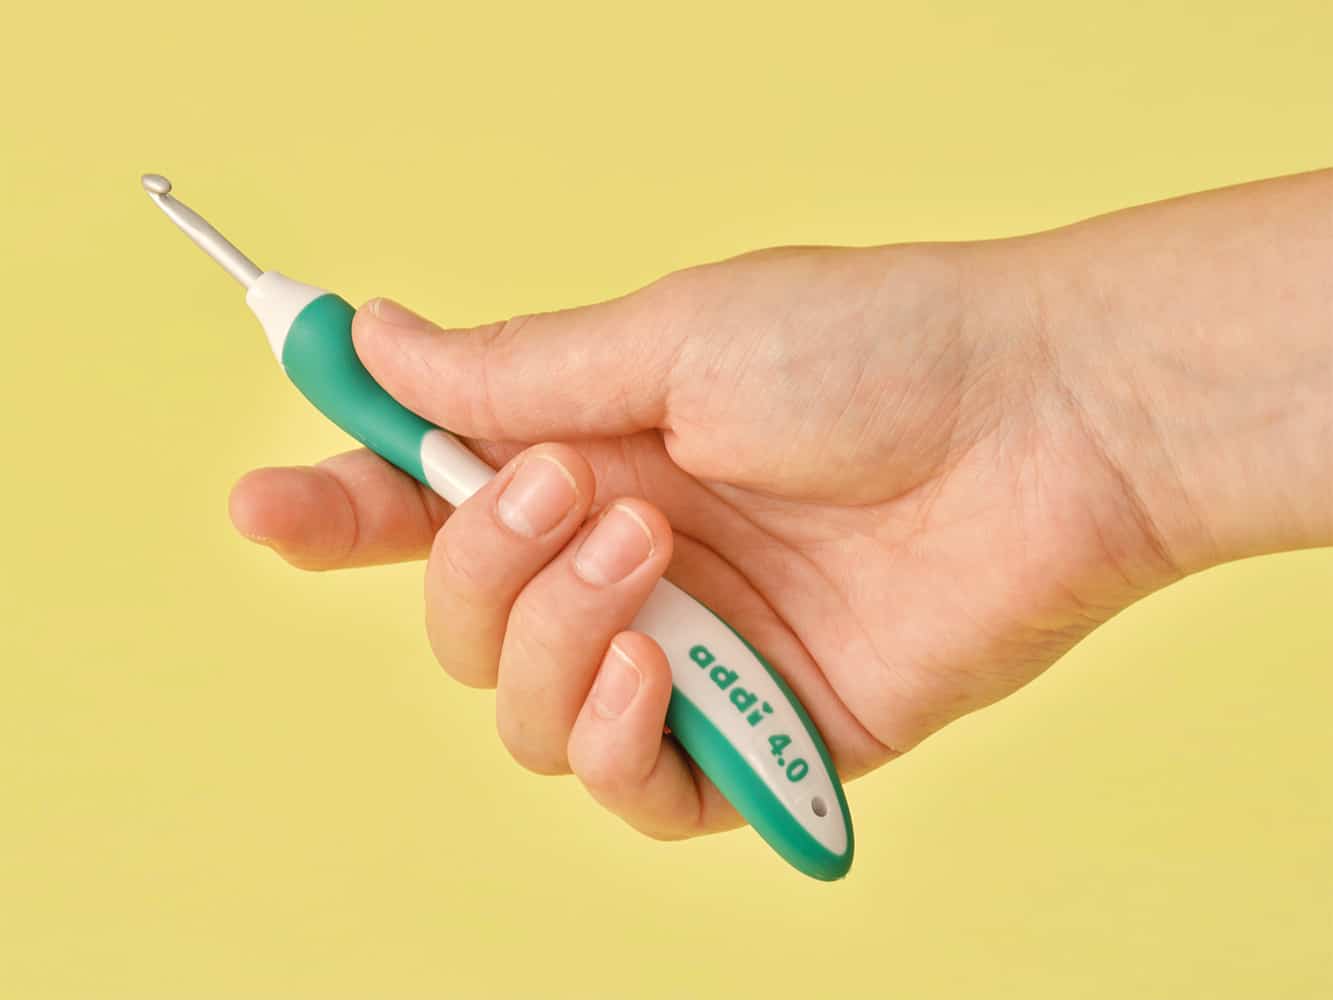
Needle and yarn position when crocheting
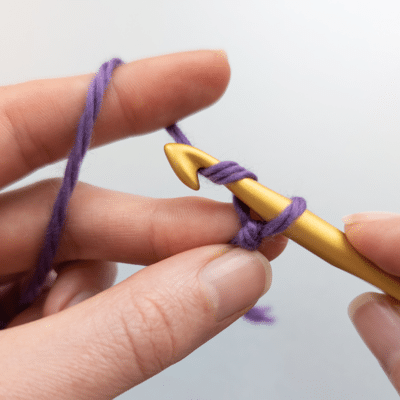
There are basically two common methods: The needle can be held like a pencil or like a knitting needle. Which variant suits you better depends on your personal preference. It is advisable to try out both options to find out which position is most comfortable.
Knife posture
In the knife position, the crochet hook is held in the right hand like a knife. The ergonomically shaped addiSwing crochet hooks are particularly suitable for this position as they offer optimum comfort.
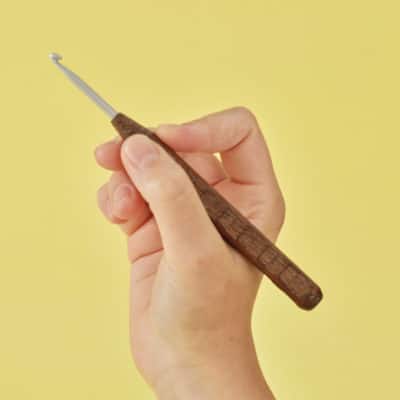
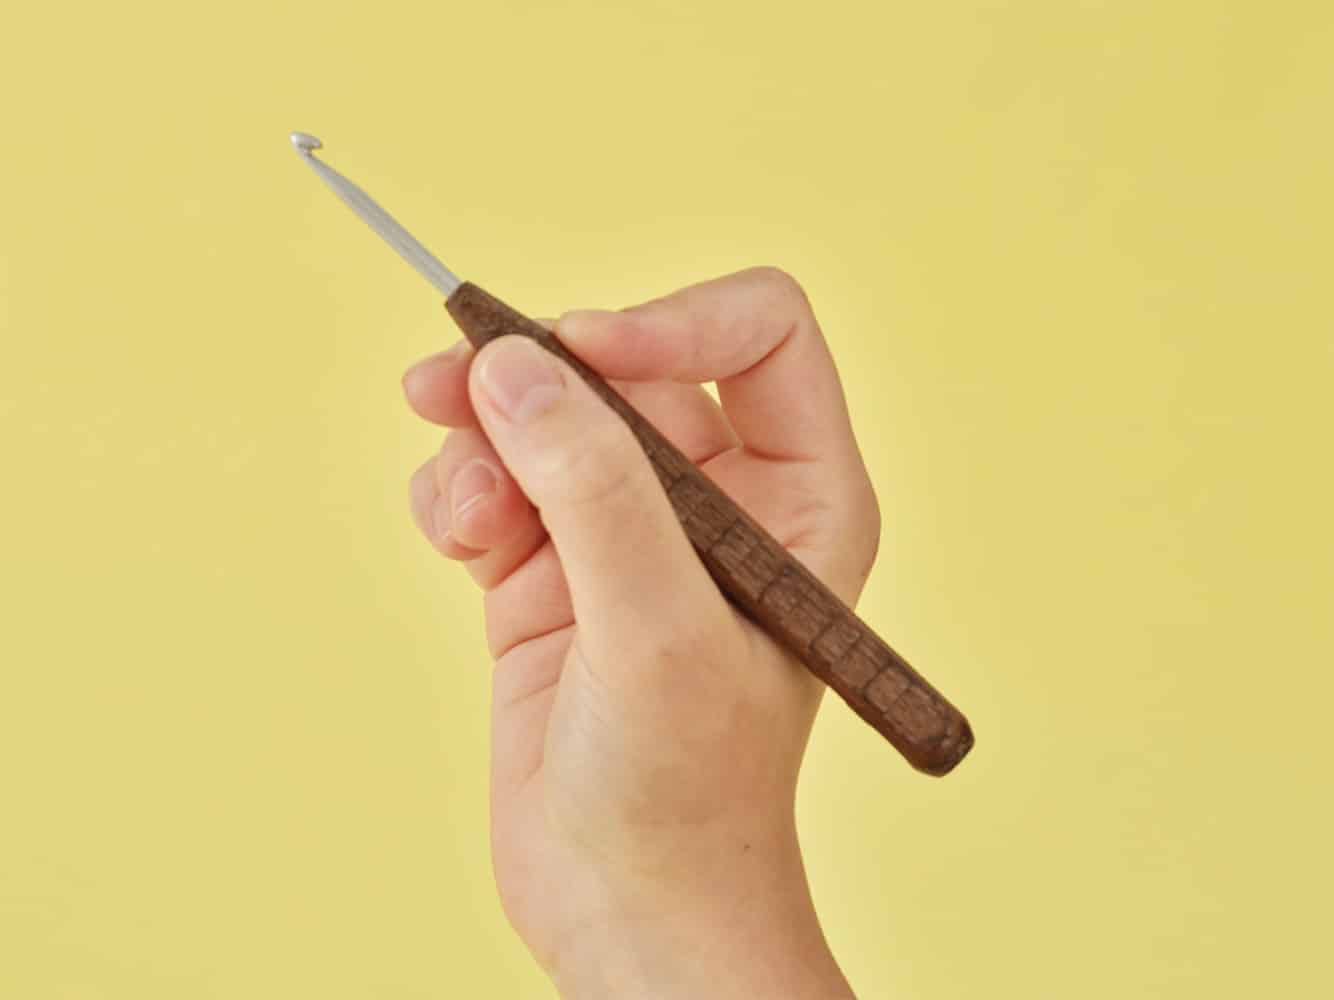
Pen posture
In pencil position, the crochet hook is held in the right hand like a pencil. Straight crochet hooks are very suitable for this position.

Needle and yarn position when crocheting
There are basically two common methods: The needle can be held like a pencil or like a knitting needle. Which variant suits you better depends on your personal preference. It is advisable to try out both options to find out which position is most comfortable.
Knife posture
In the knife position, the crochet hook is held in the right hand like a knife. The ergonomically shaped addiSwing crochet hooks are particularly suitable for this position as they offer optimum comfort.
Pen posture
In pencil position, the crochet hook is held in the right hand like a pencil. Straight crochet hooks are very suitable for this position.


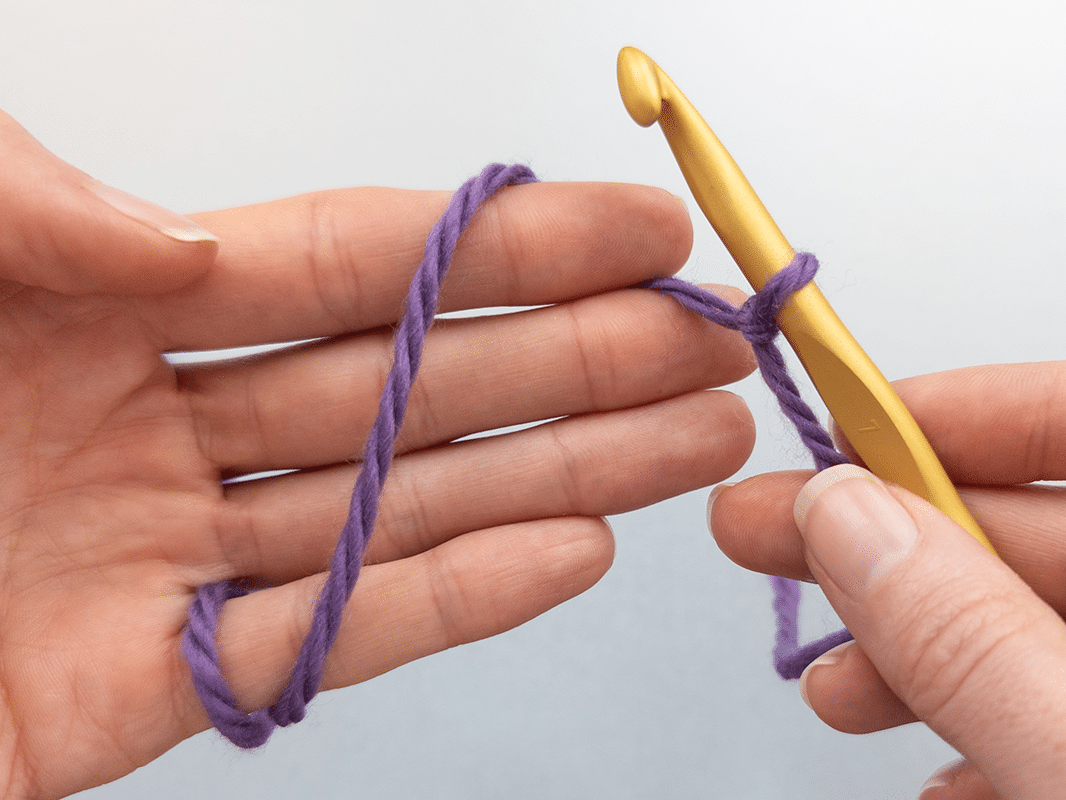
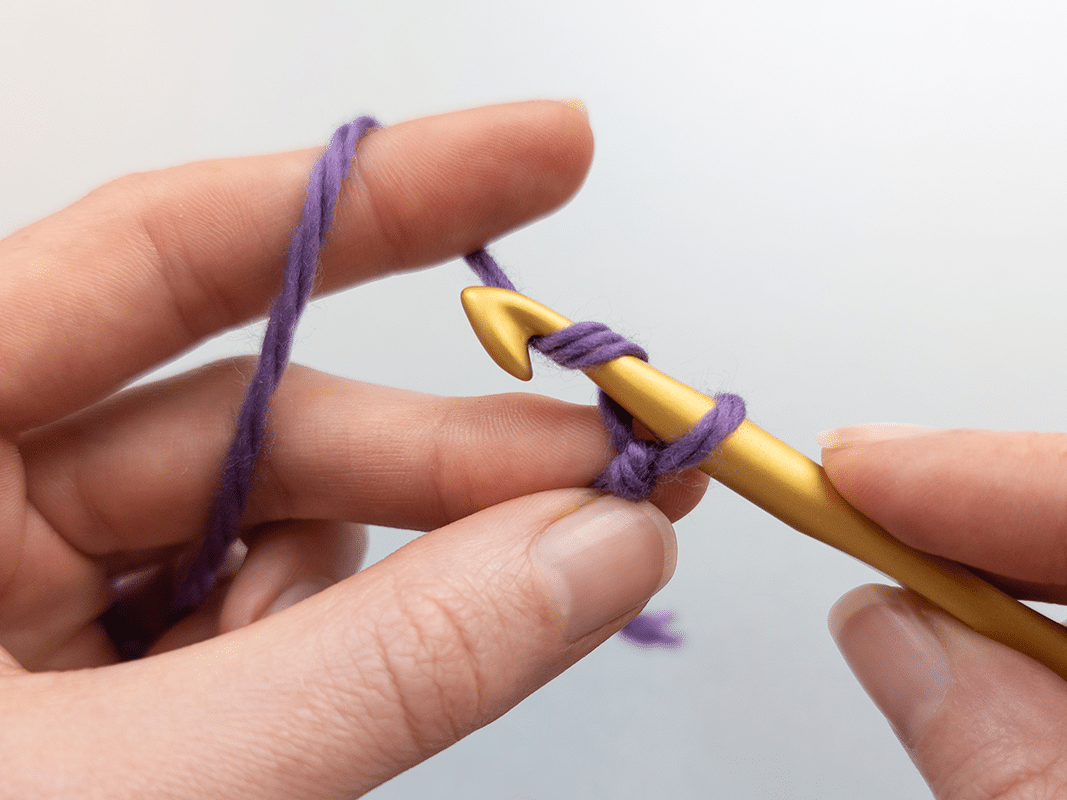
What is the starting loop in crochet?
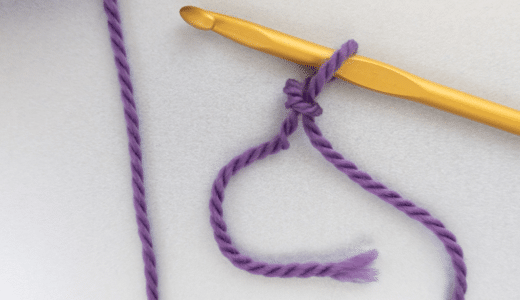
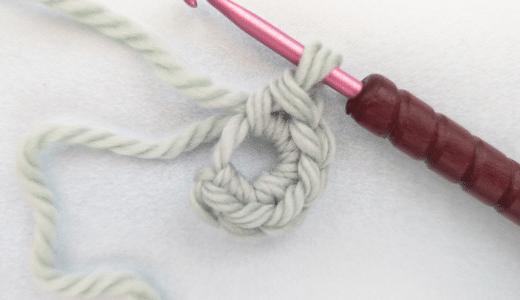
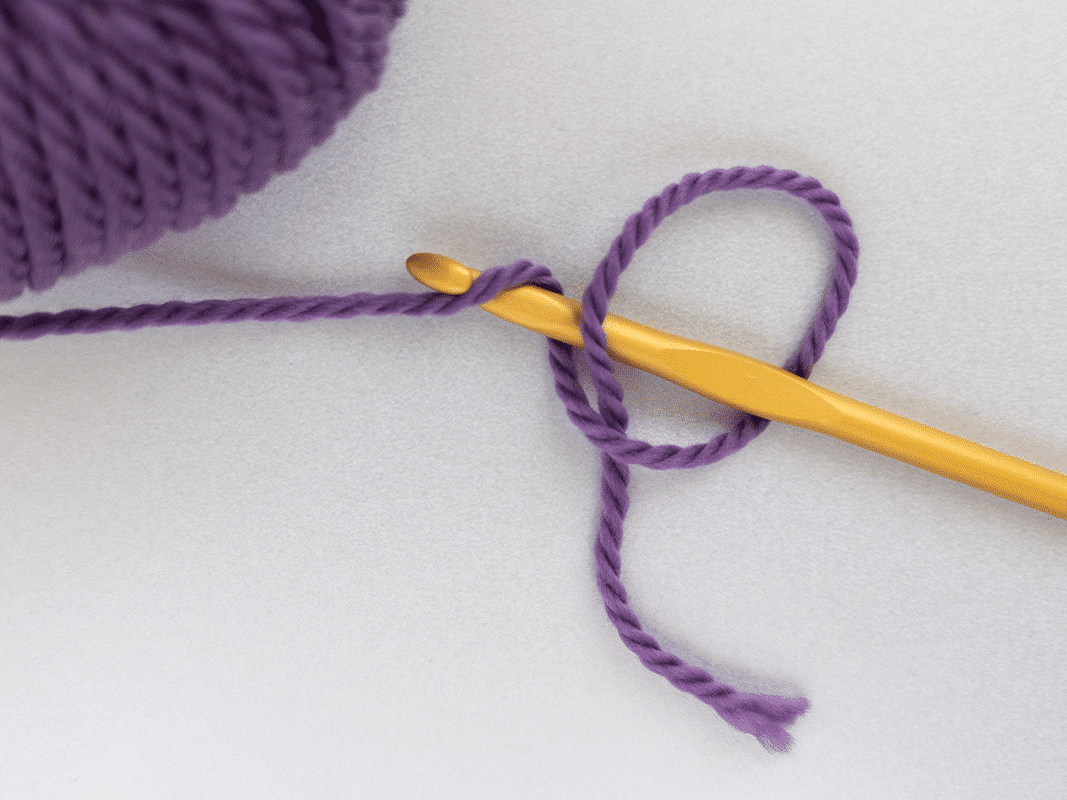
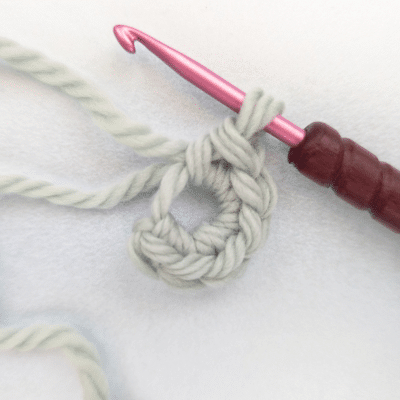
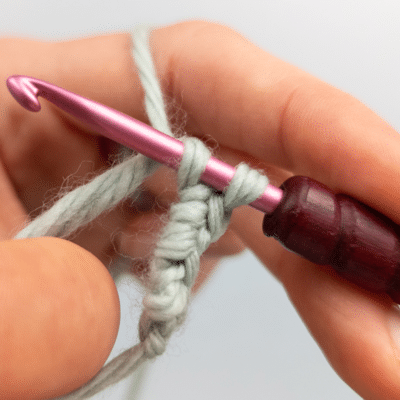
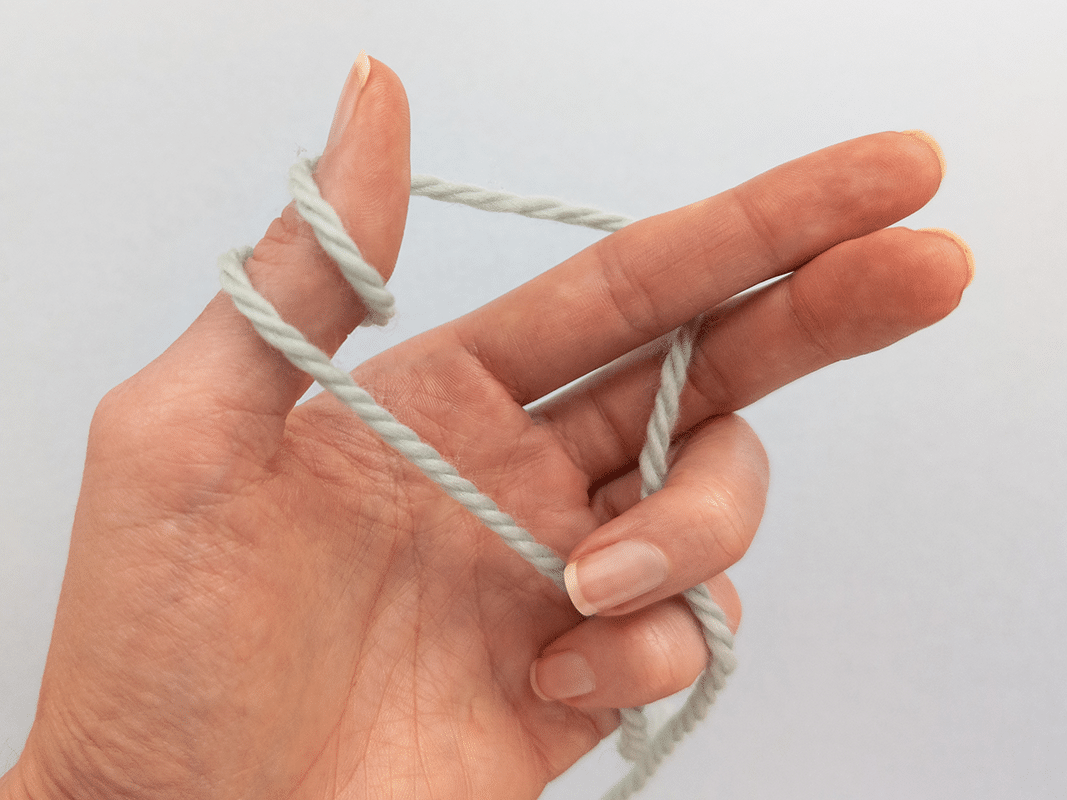
The starting loop, also known as the first loop, is the starting point for almost every crochet project. There are various ways to create this knot. In these instructions, we will show you how to make a simple starting loop with a crochet hook.
Starting loop crochet –
stept by step
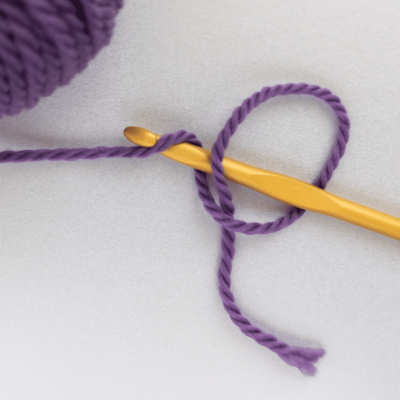
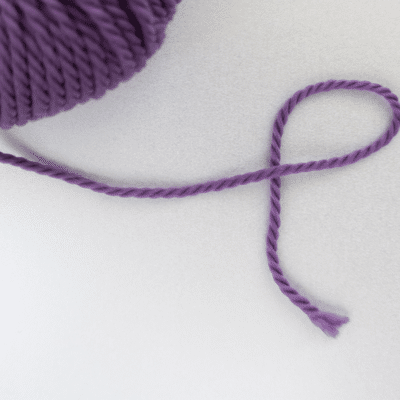
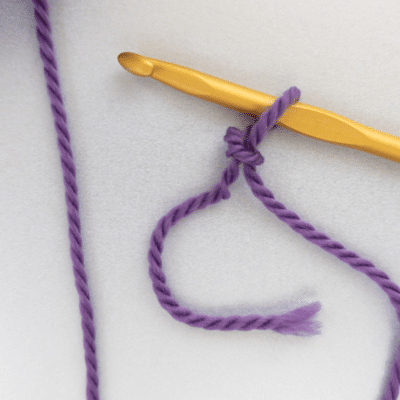
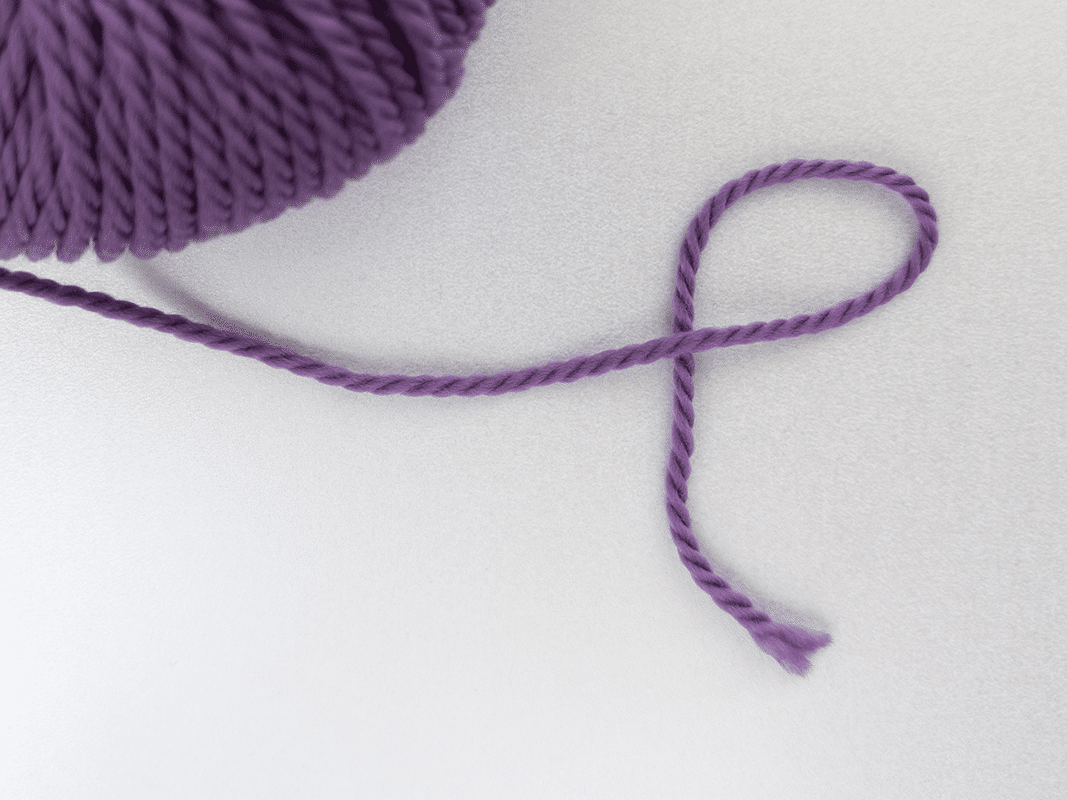
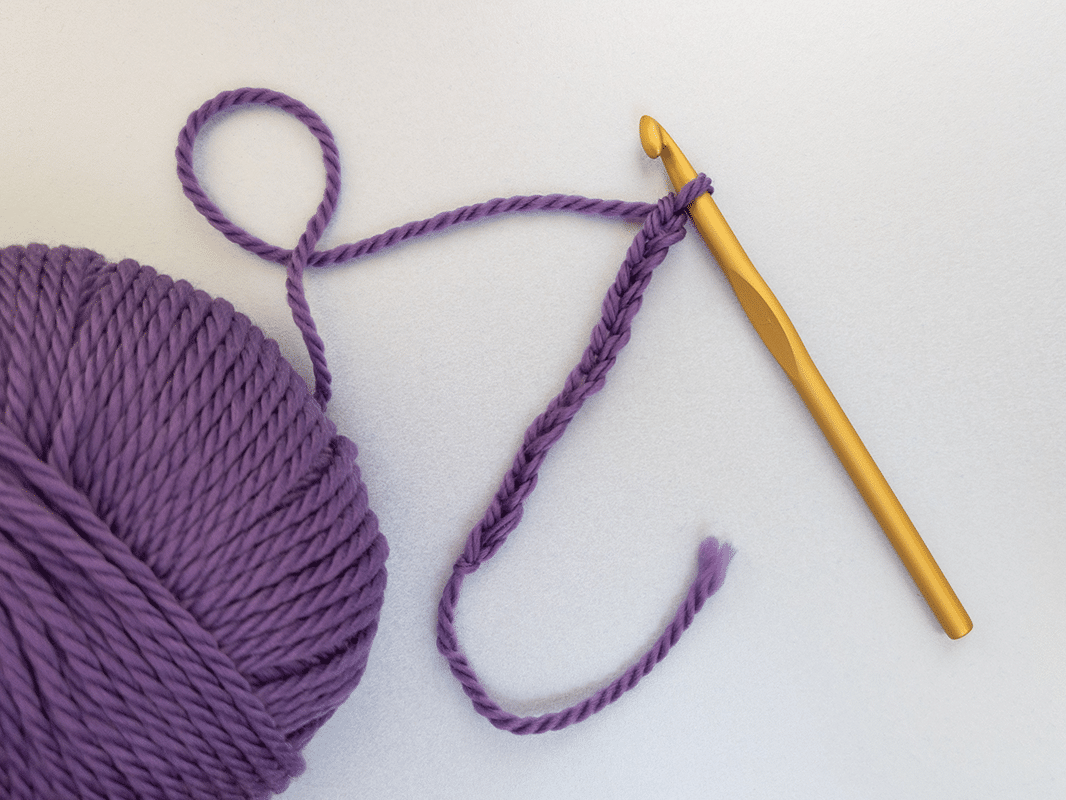
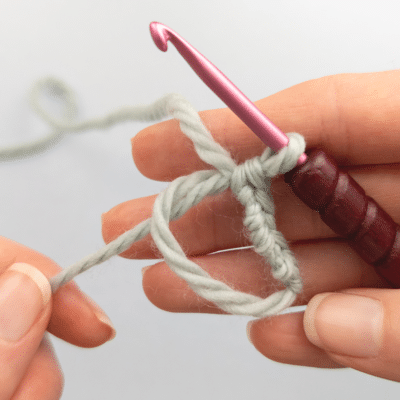
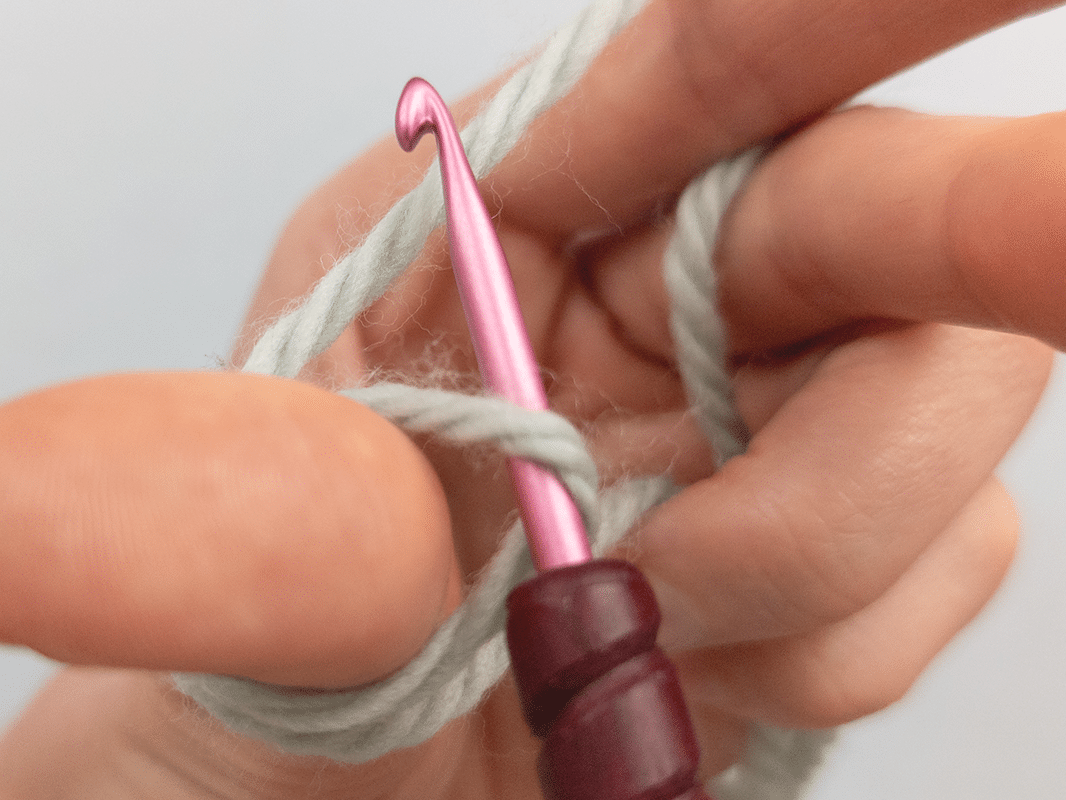
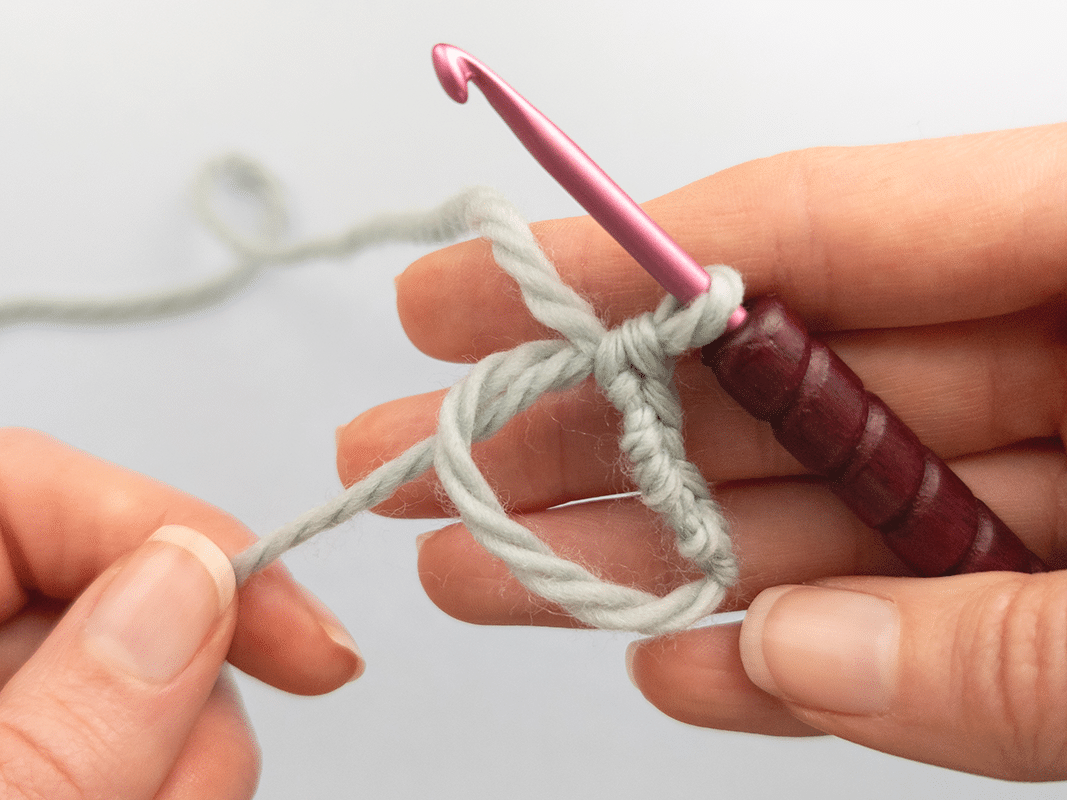
Step 1: The yarn is laid to form a ring, crossing over each other. The end of the thread is at the front and does not have to be very long. The yarn comes from the ball of wool and is laid to the back.
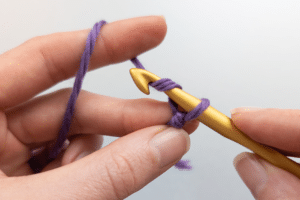
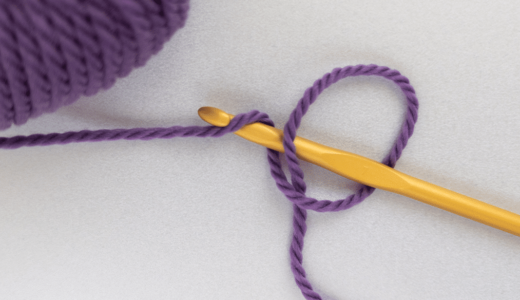
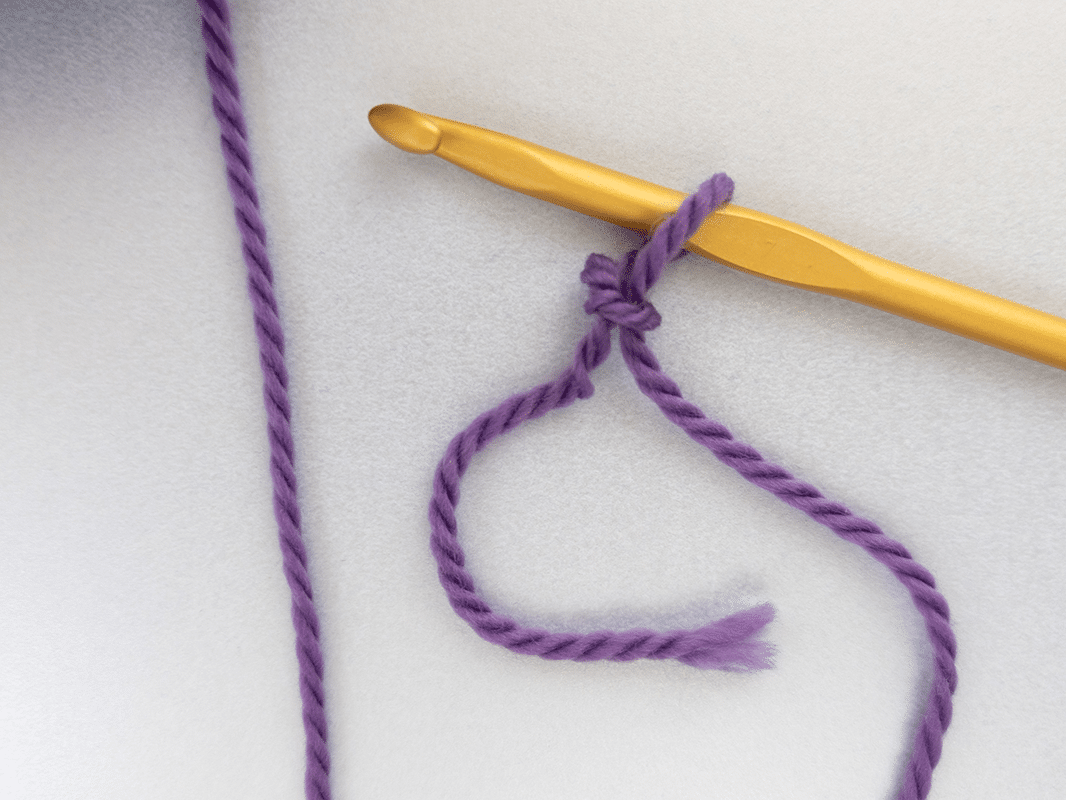
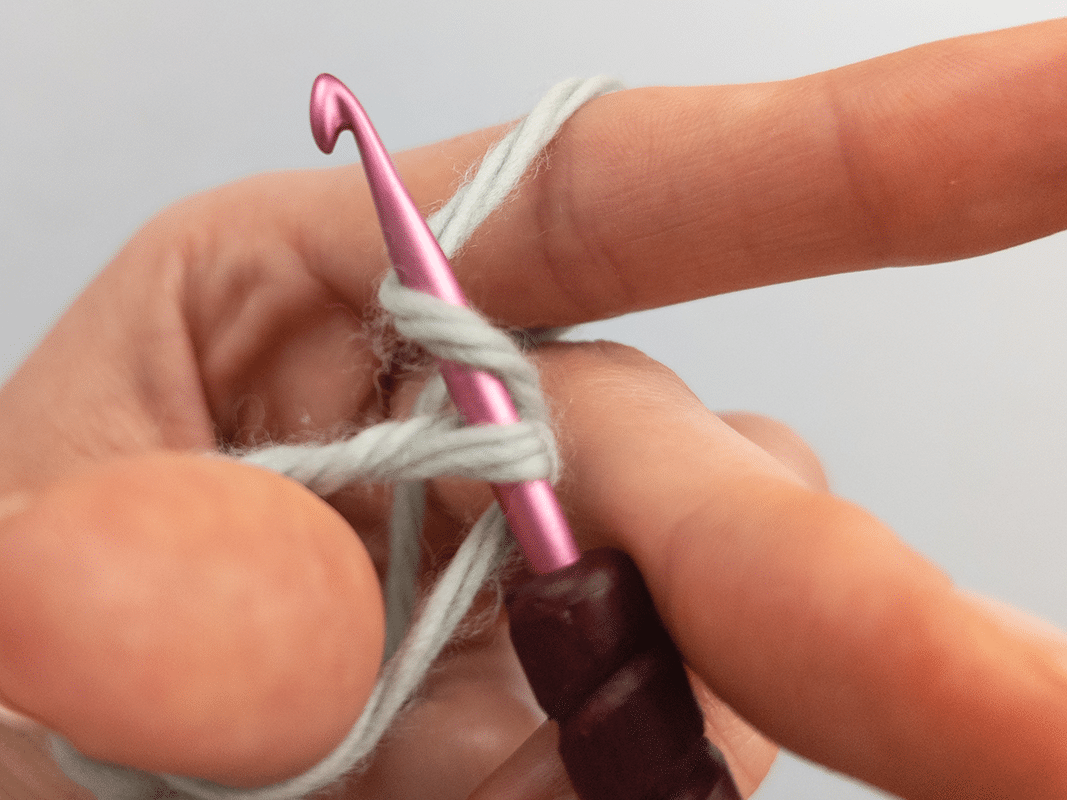
Step 2: Use your thumb and index finger to fix the point where the yarn crosses and use the crochet hook to pull the back the yarn through the resulting ring.
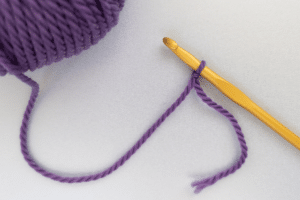
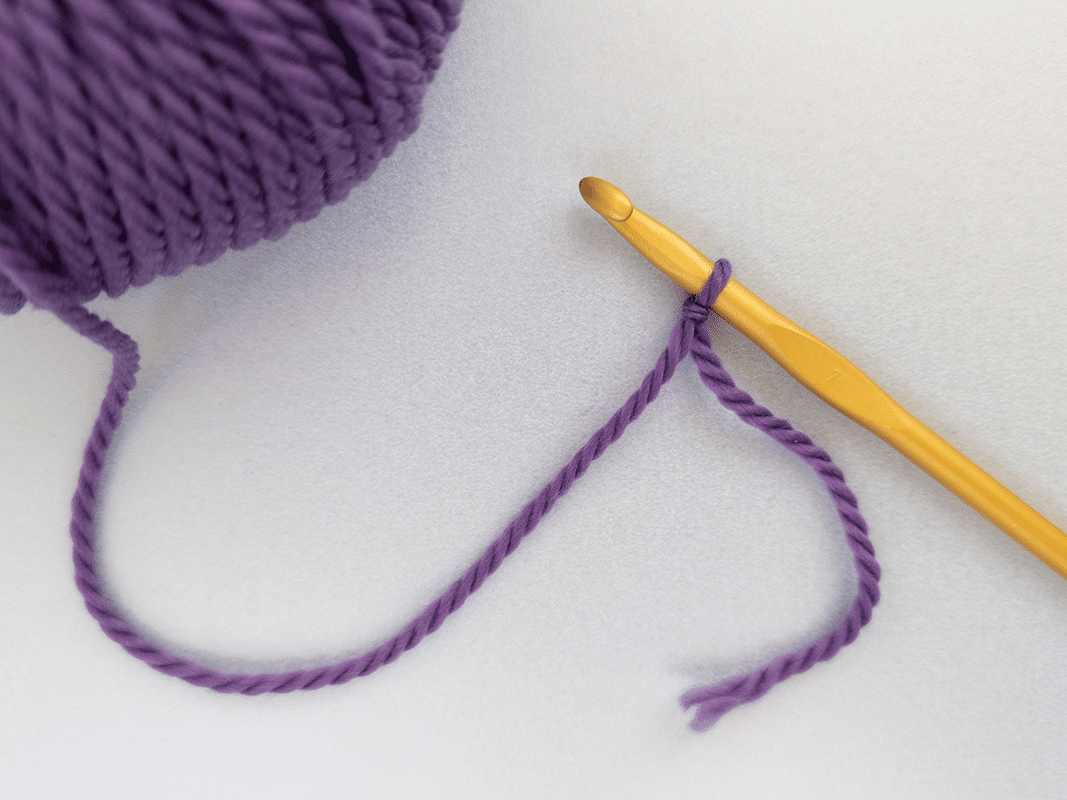
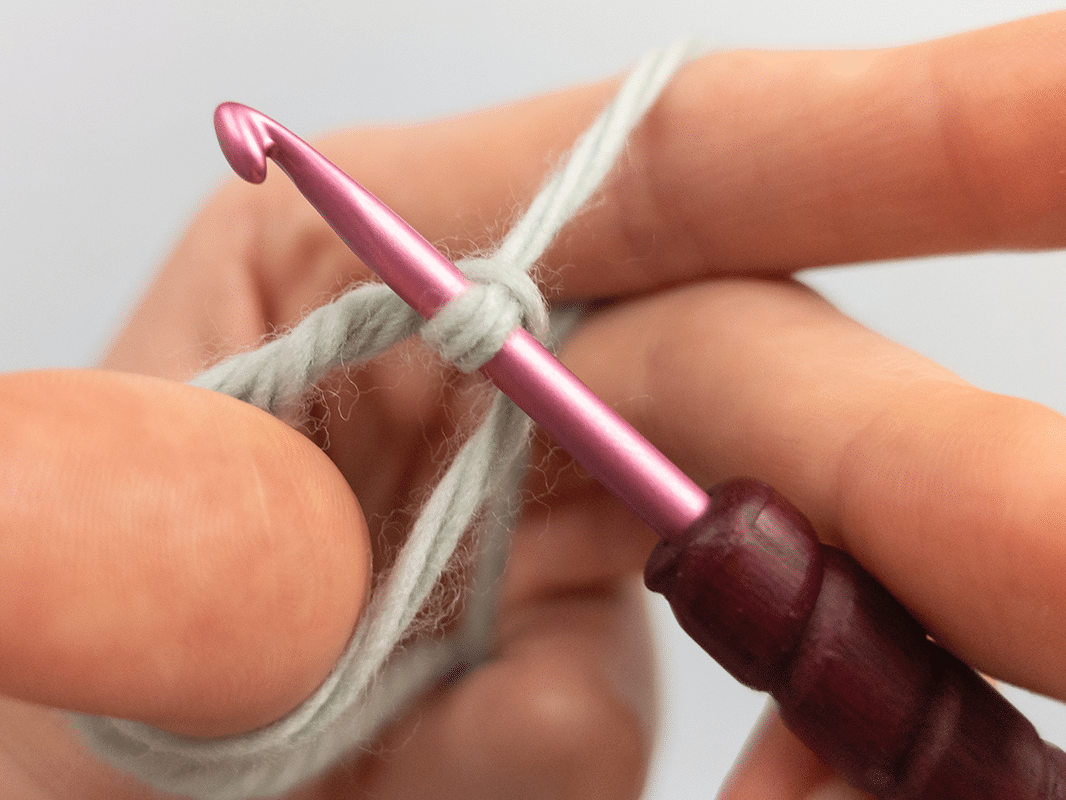
Step 3: Pull the loop tight so that it is not too loose around the crochet hook. And your first crocheted starting loop is finished.
Starting loop crochet –
stept by step
Step 1: The yarn is laid to form a ring, crossing over each other. The end of the thread is at the front and does not have to be very long. The yarn comes from the ball of wool and is laid to the back.
Step 2: Use your thumb and index finger to fix the point where the yarn crosses and use the crochet hook to pull the back the yarn through the resulting ring.
Step 3: Pull the loop tight so that it is not too loose around the crochet hook. And your first crocheted starting loop is finished.

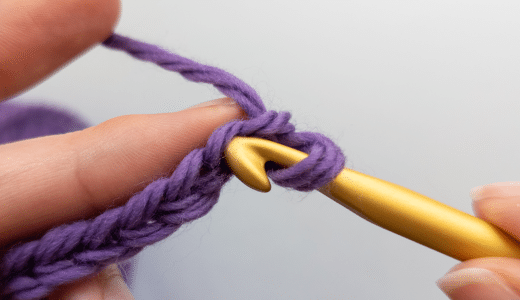
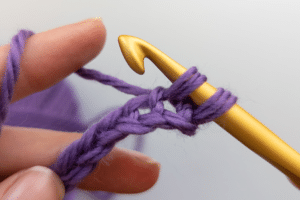
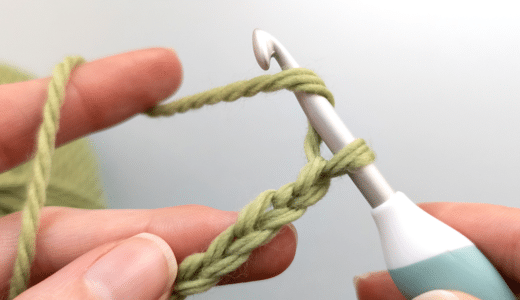
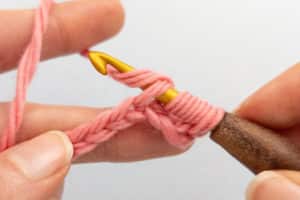
What are chain stitches in crochet?
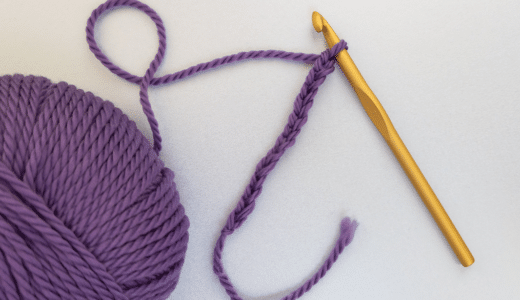
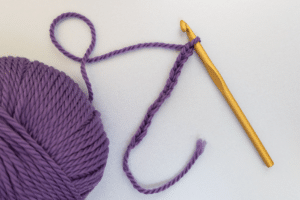
Chain stitches are one of the basics of crochet and are often used as the first row when working in rows. They are also used in patterns to create decorative effects. The process of crocheting chain stitches consists of repeatedly pulling the yarn through a loop until the desired number is reached.
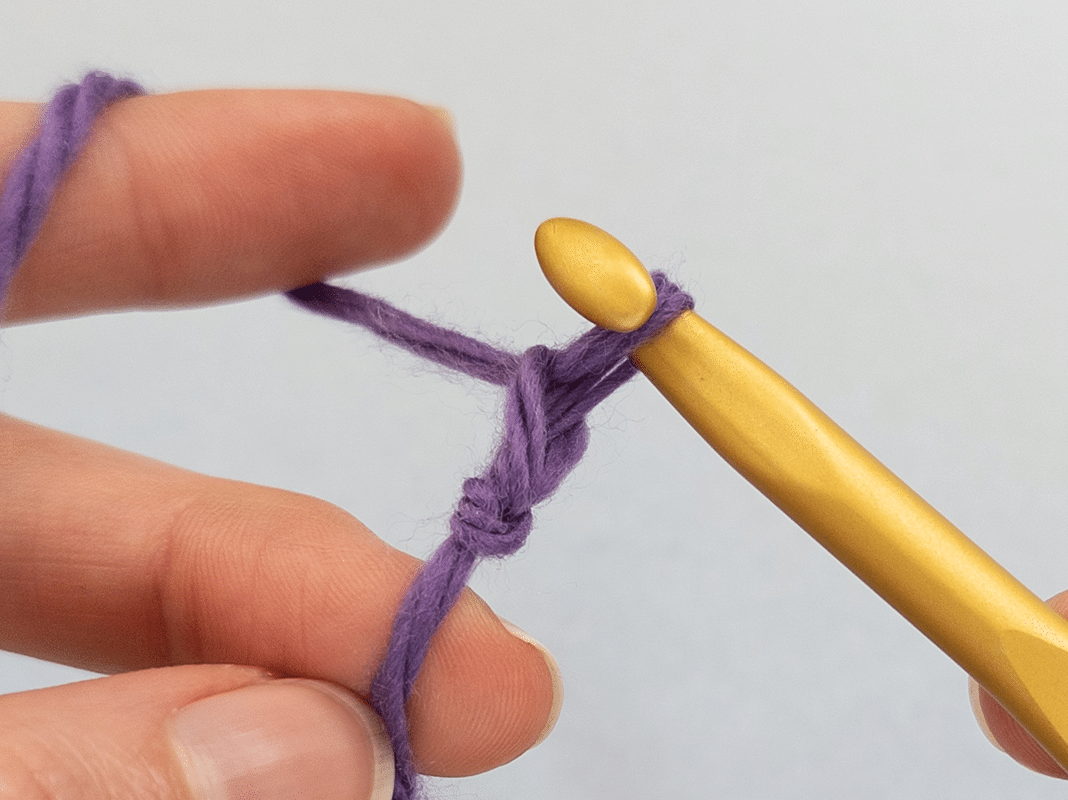
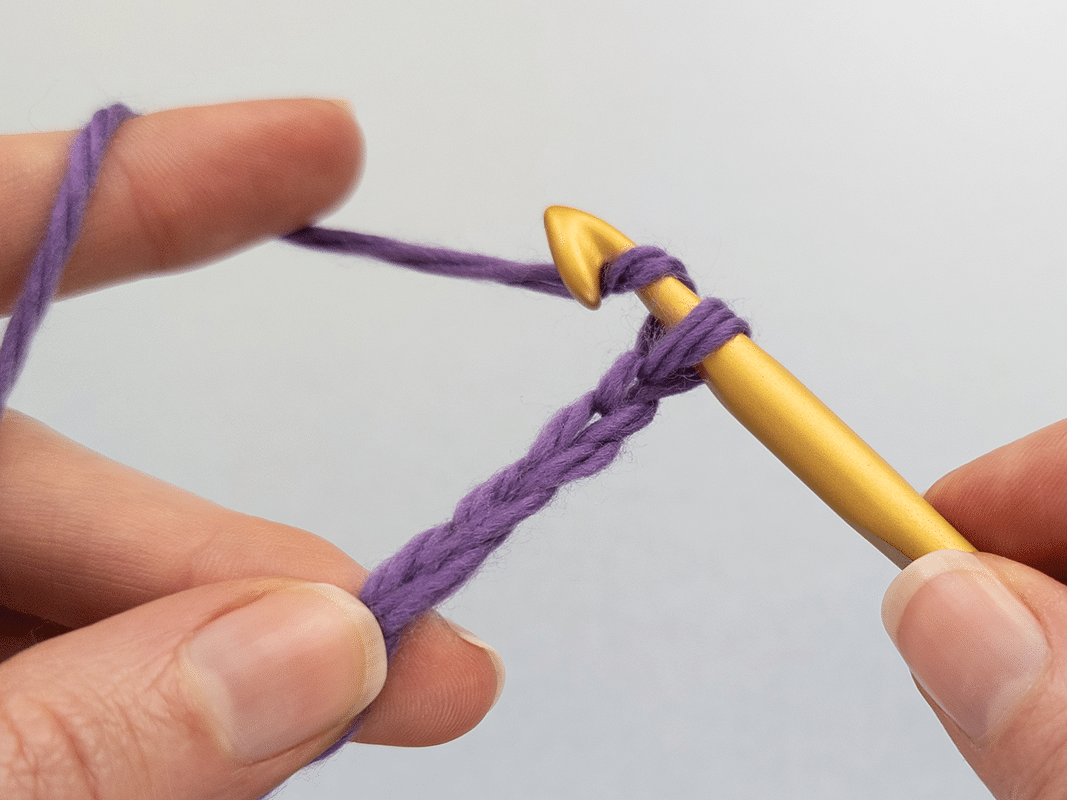
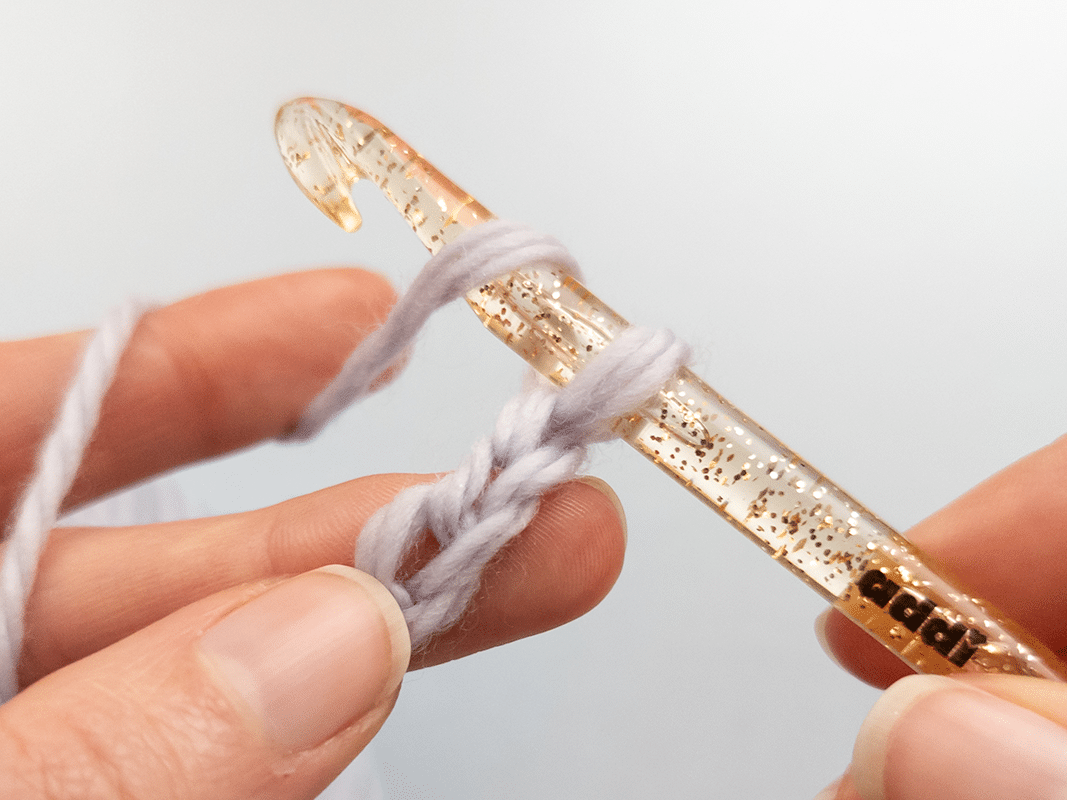
Chain stitches (ch) crochet – step by step
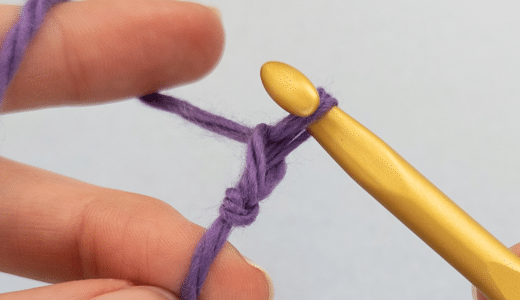
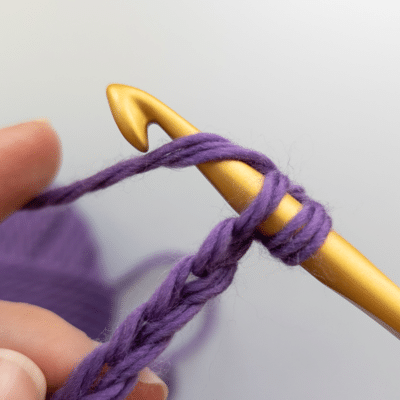
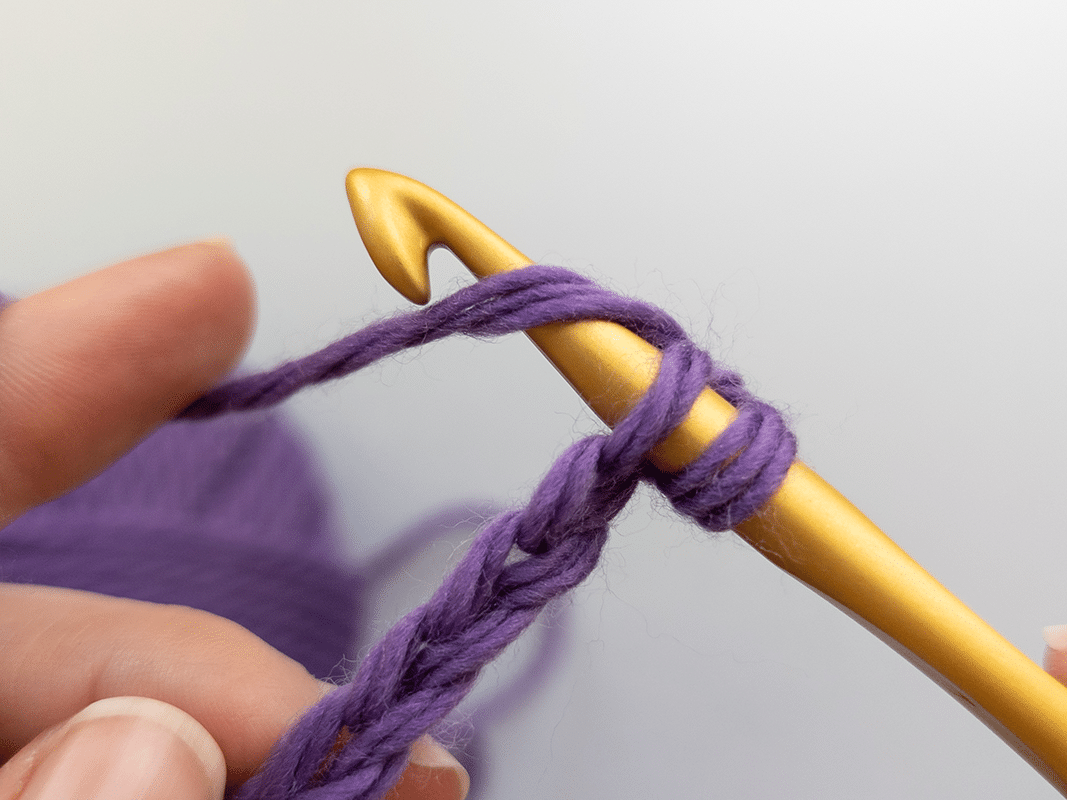
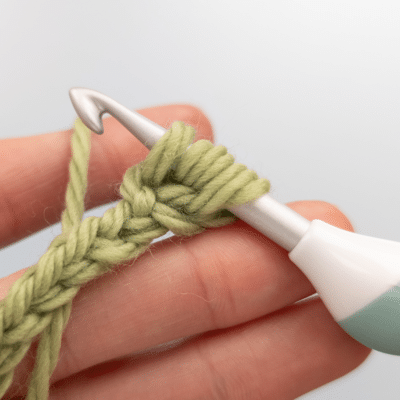
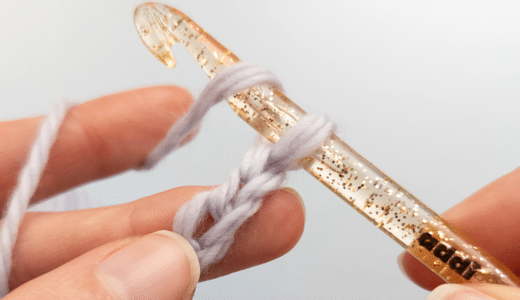
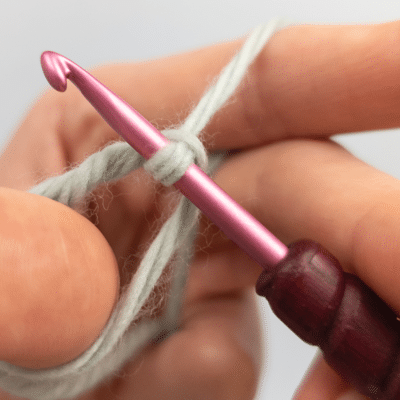
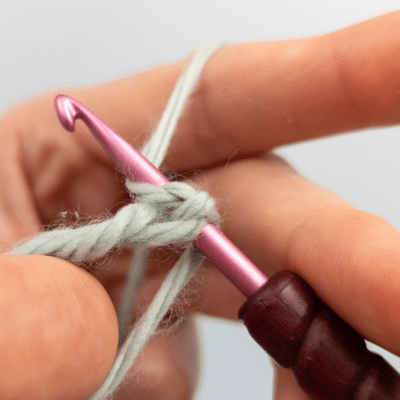
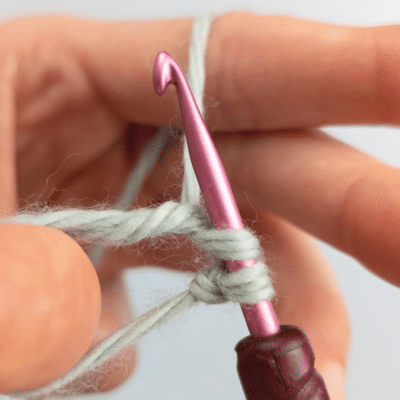
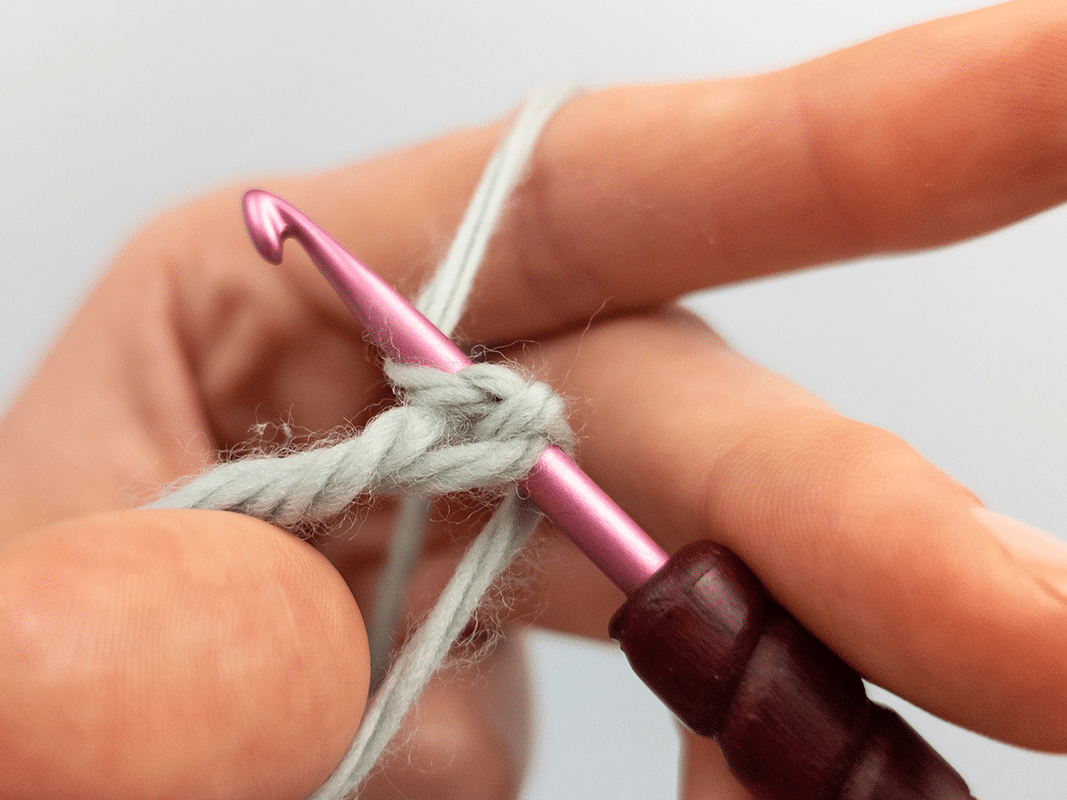
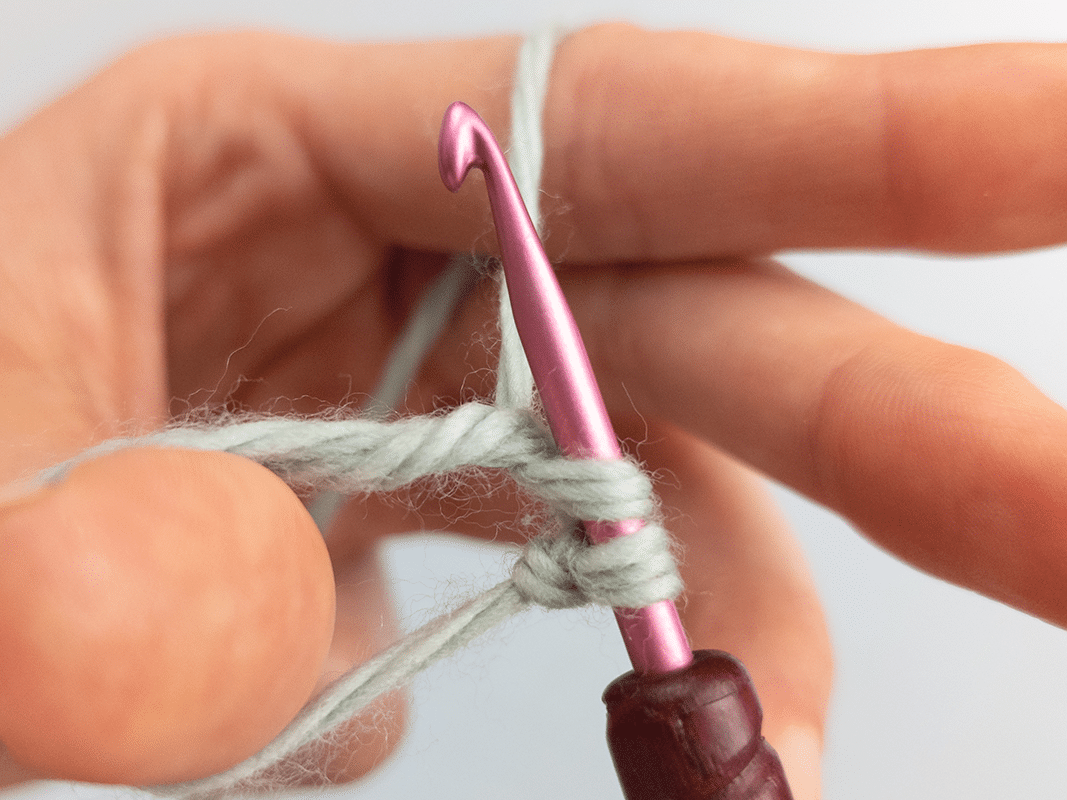
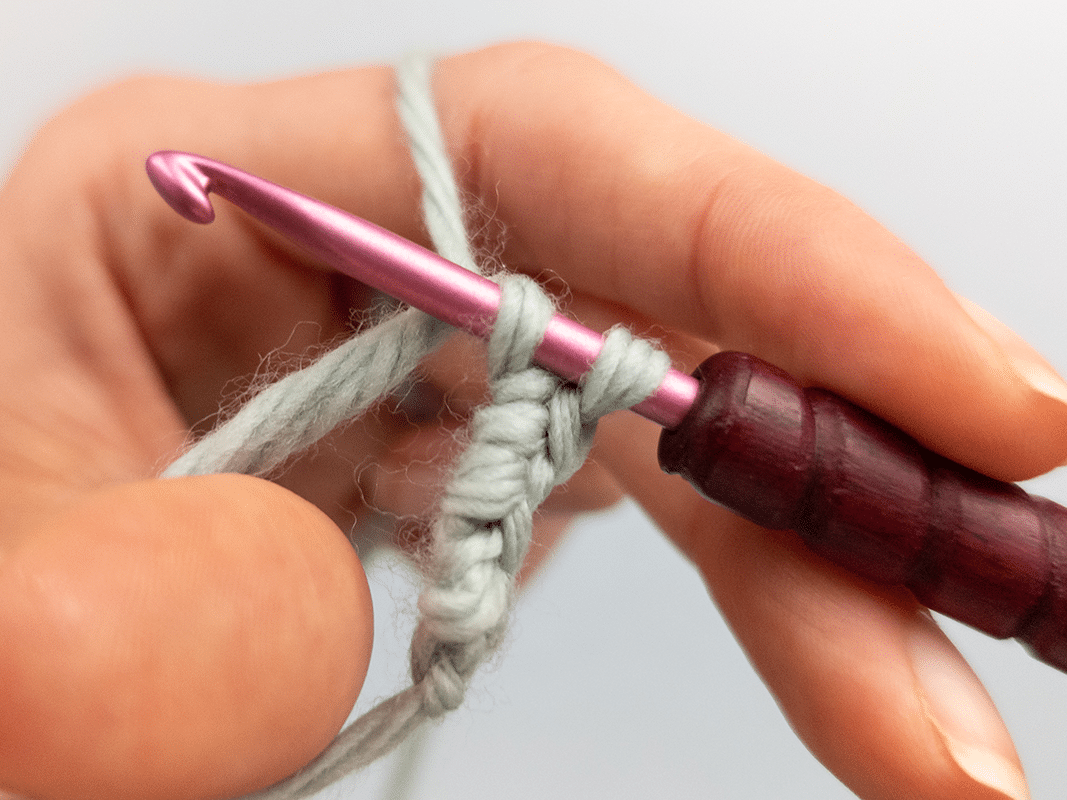
Step 1: Start with a starting loop. Then pick up the yarn with the crochet hook and turn the hook inwards by about 90 degrees to catch the yarn securely.
Step 2: Pull the yarn through the loop and return the crochet hook to the starting position.
Step 3: Repeat the process until the required number of chain stitches is reached. The result is an even chain of chain stitches.
Tip for even chain stitches:
When counting the stitches, it helps to place a stitch marker after every 10th or 20th stitch, especially for long chains such as for blankets or sweaters. This saves time and makes counting easier. In addition, do not crochet too tightly so that the next row can be worked into the chain more easily.

Chain stitches (ch) crochet – step by step
Step 1: Start with a starting loop. Then pick up the yarn with the crochet hook and turn the hook inwards by about 90 degrees to catch the yarn securely.
Step 2: Pull the yarn through the loop and return the crochet hook to the starting position.
Step 3: Repeat the process until the required number of chain stitches is reached. The result is an even chain of chain stitches.
Tip for even chain stitches:
When counting the stitches, it helps to place a stitch marker after every 10th or 20th stitch, especially for long chains such as for blankets or sweaters. This saves time and makes counting easier. In addition, do not crochet too tightly so that the next row can be worked into the chain more easily.
This is how it works:
The chain of chain stitches is the basis for the crochet work. Different types of stitches can now be worked in each chain stitch, which are presented and described below.
- Either you crochet back and forth in rows - then the work is turned at the end of each row.
- Or the chain is closed to form a circle. Then you can crochet in rounds.
- If the work is to be a closed circle or ball, for example, start with a magic ring (described below)
Work in rows:
Work this chain stitches: Before the work is turned to crochet a wrong side rows, chain stitches are required.
- For single crochet stitches or half double crochet stitches, one chain stitch is sufficient
- For higher stitches such as double crochets, two or three turning chain stitches are useful
- Once the turning chain stitches have been worked, the crocheted piece is turned and the crochet hook is inserted back into the first stitch.
At the beginning, it can be a little more difficult to crochet the first rows as the project does not yet have a fixed shape. With practice, however, the work becomes easier and the stitches come off more easily.
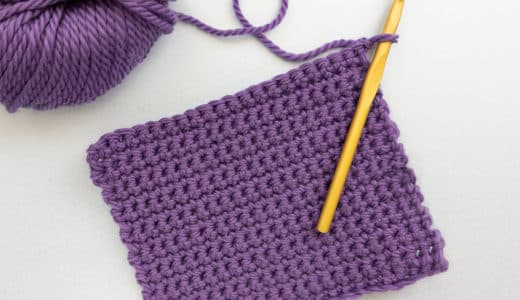
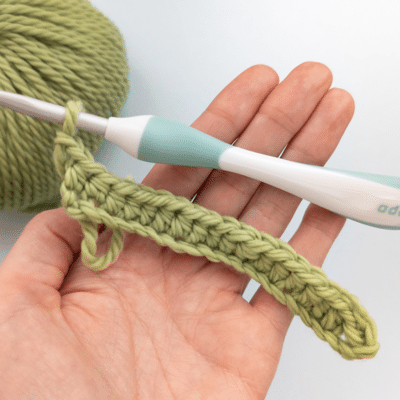
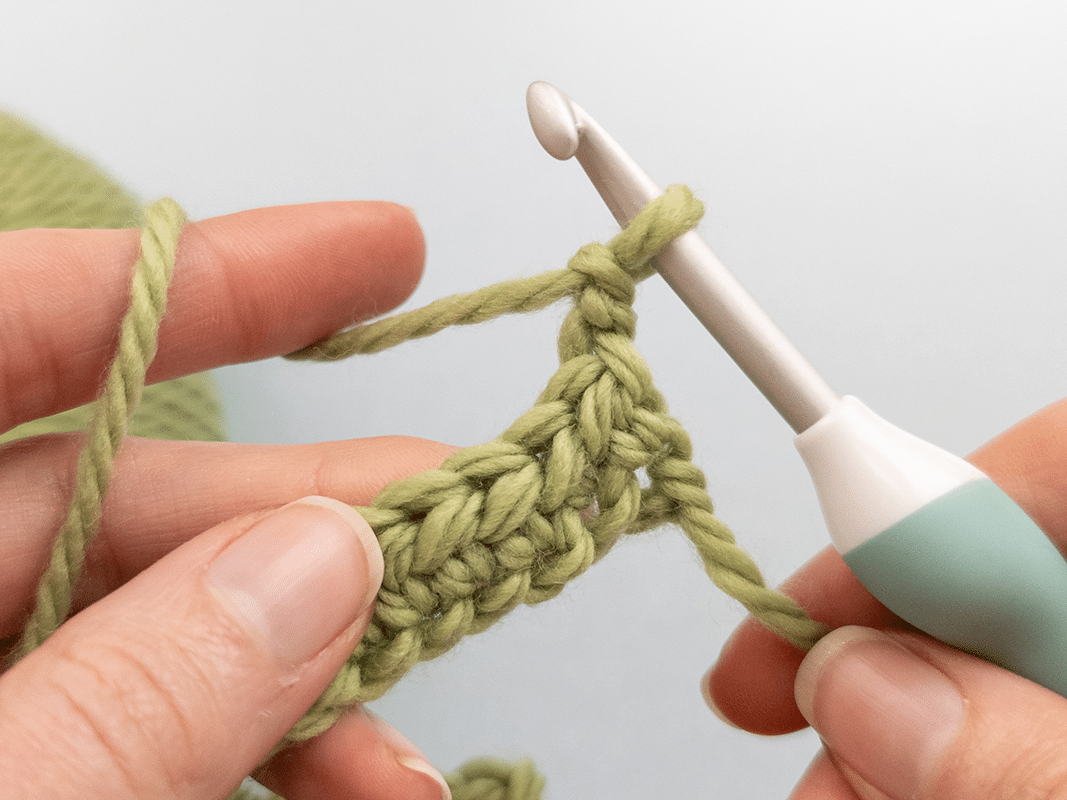
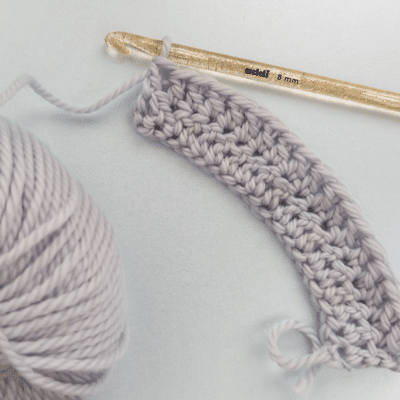
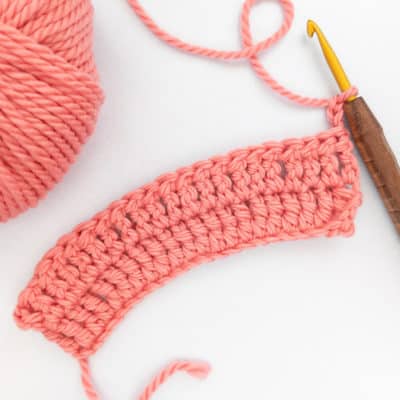
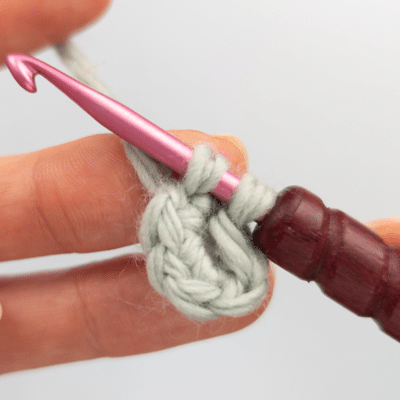
What are single crochets?
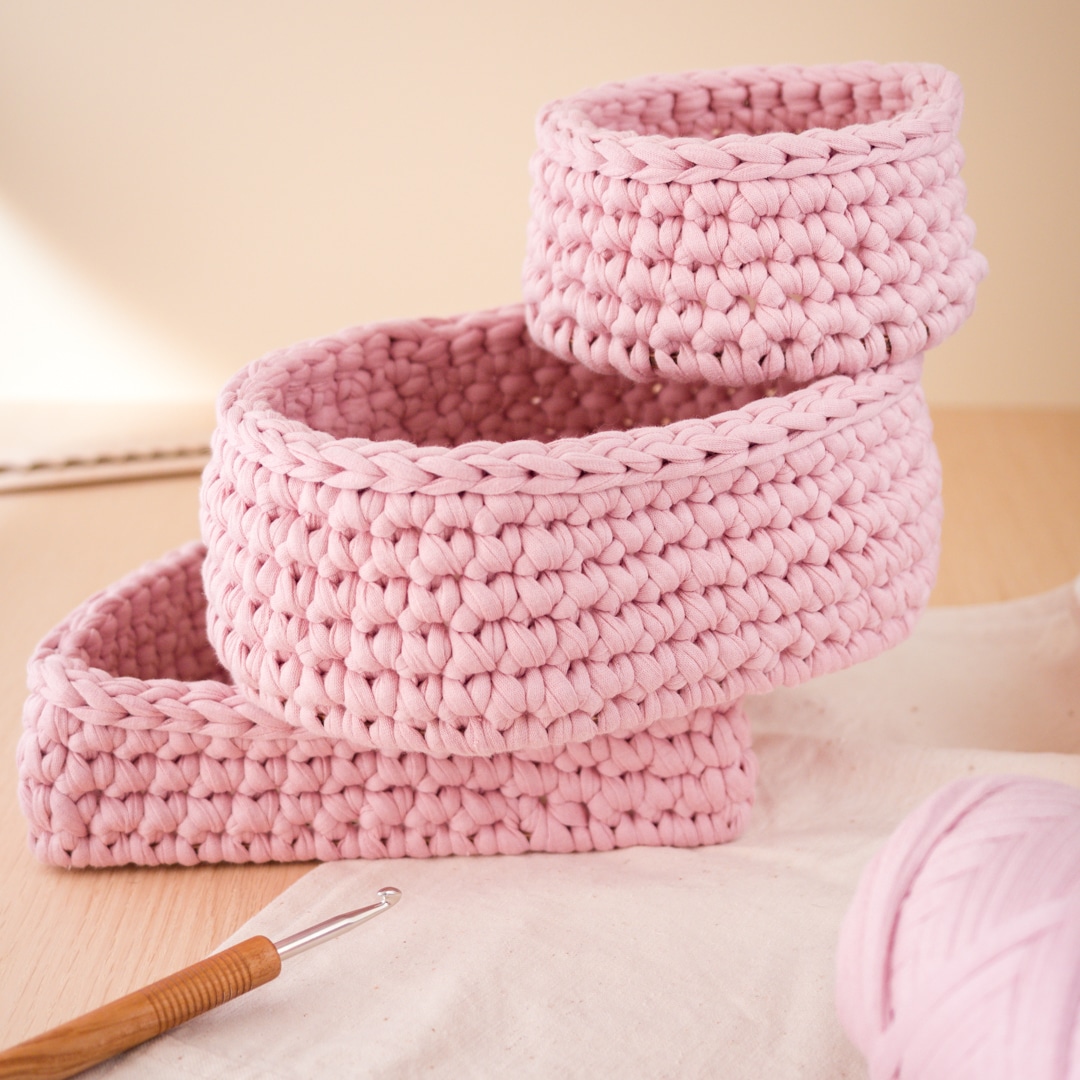
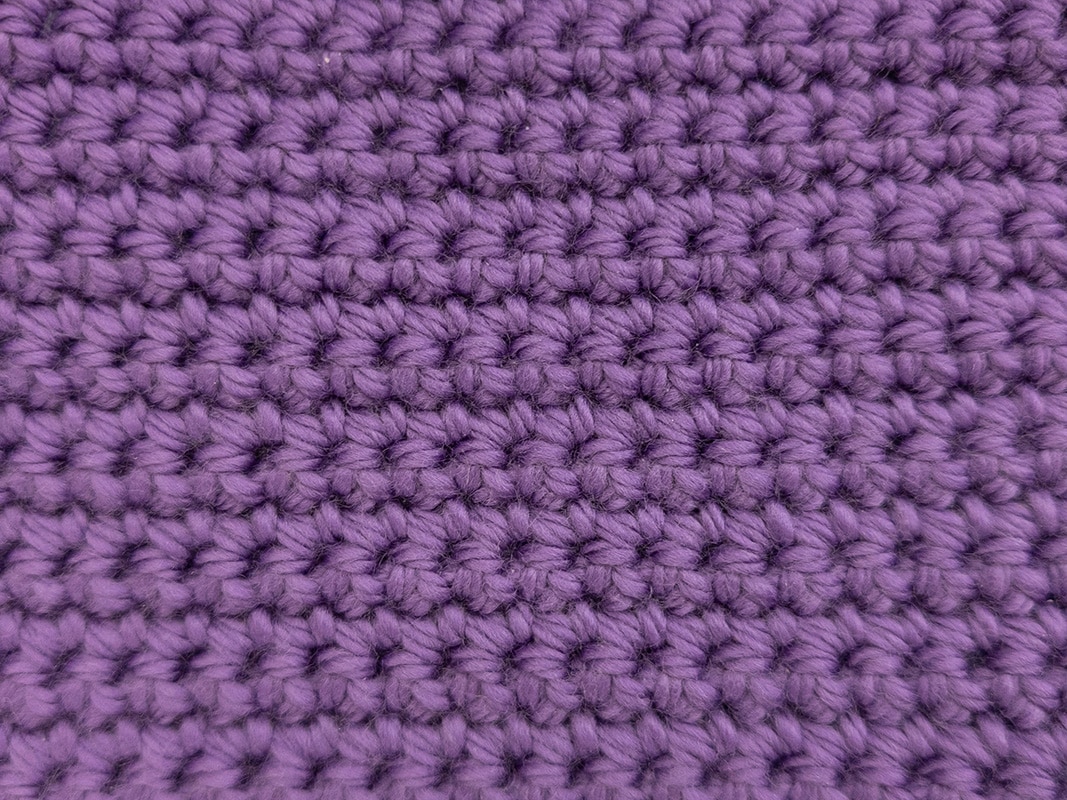
Single crochets (US) or double crochets (UK) are one of the most important crochet techniques and form the basis for many projects. They ensure a dense, even stitch pattern and are often used for amigurumi, potholders or baskets. As they are easy to crochet, they are particularly suitable for beginners. They can also be easily combined with other types of stitches to create different structures.
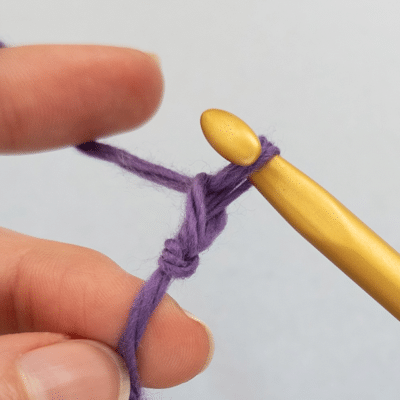
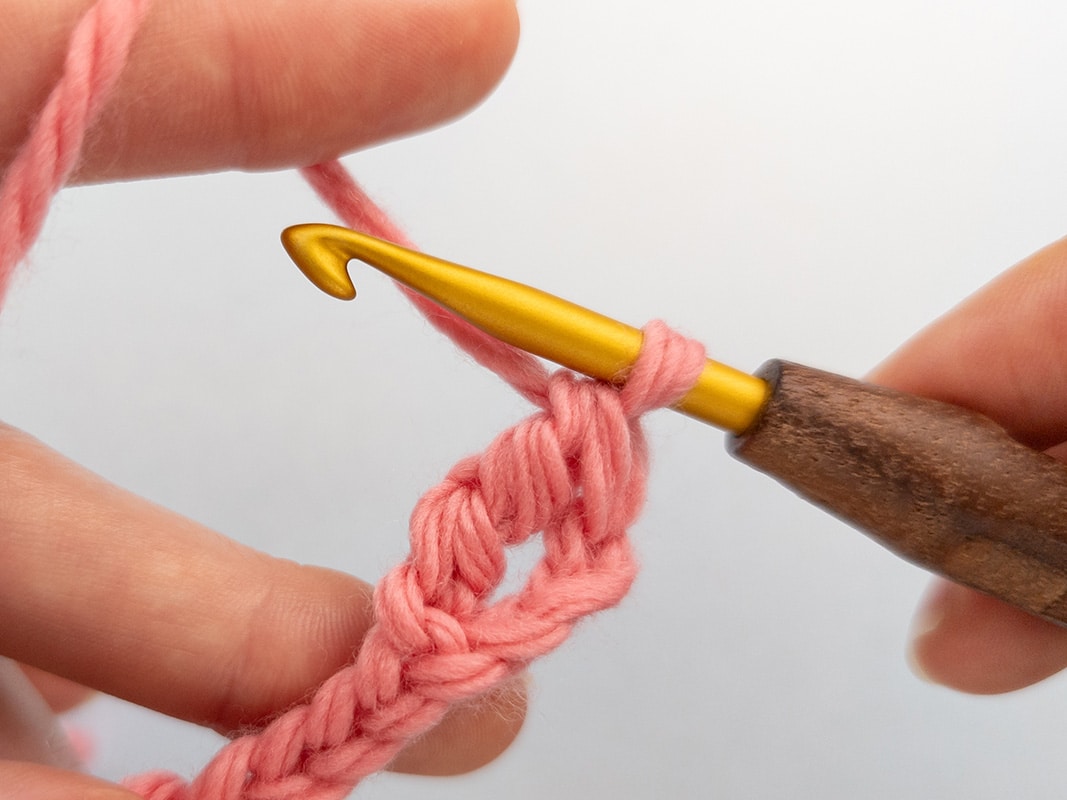
Single crochet (sc) – step by step
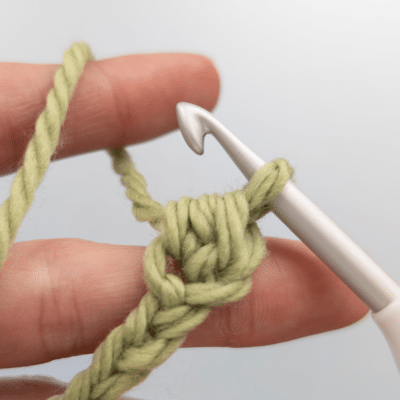
Step 1: An additional chain stitch is crocheted onto a chain to create a turning chain.
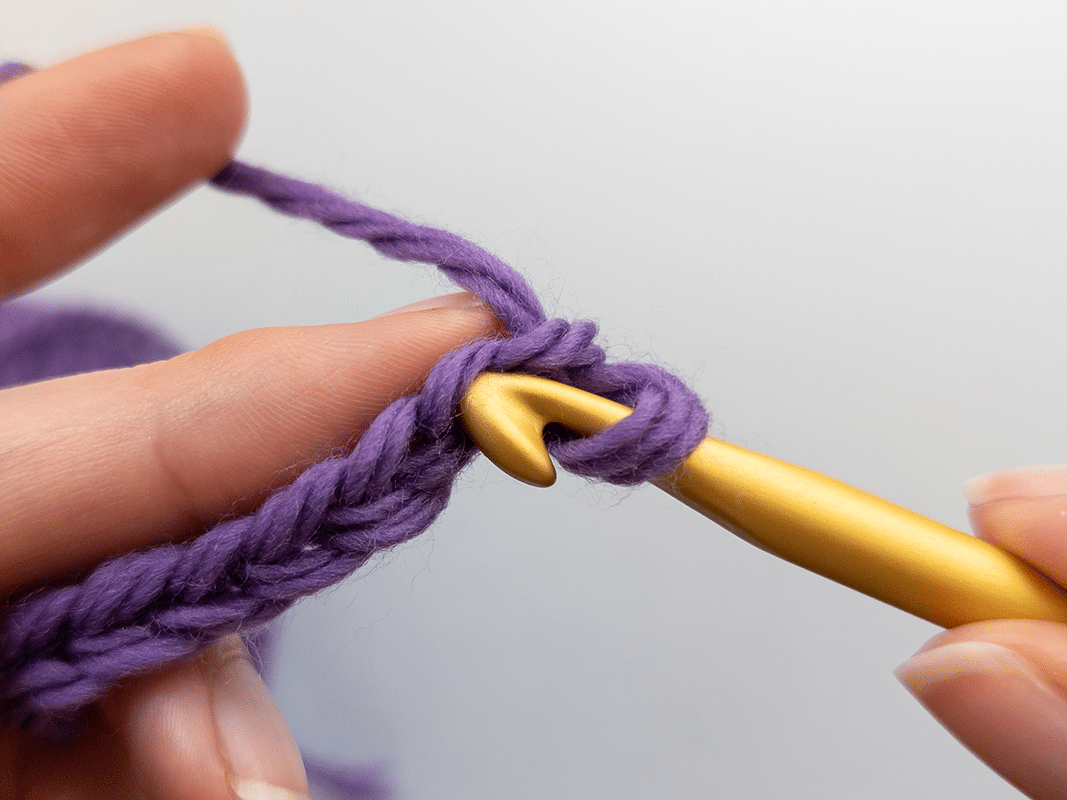
Step 2: Insert the crochet hook into the chain stitch before the turning chain. Take care not to insert it into the turning stitch.
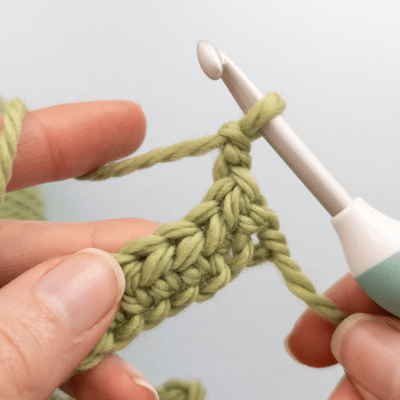
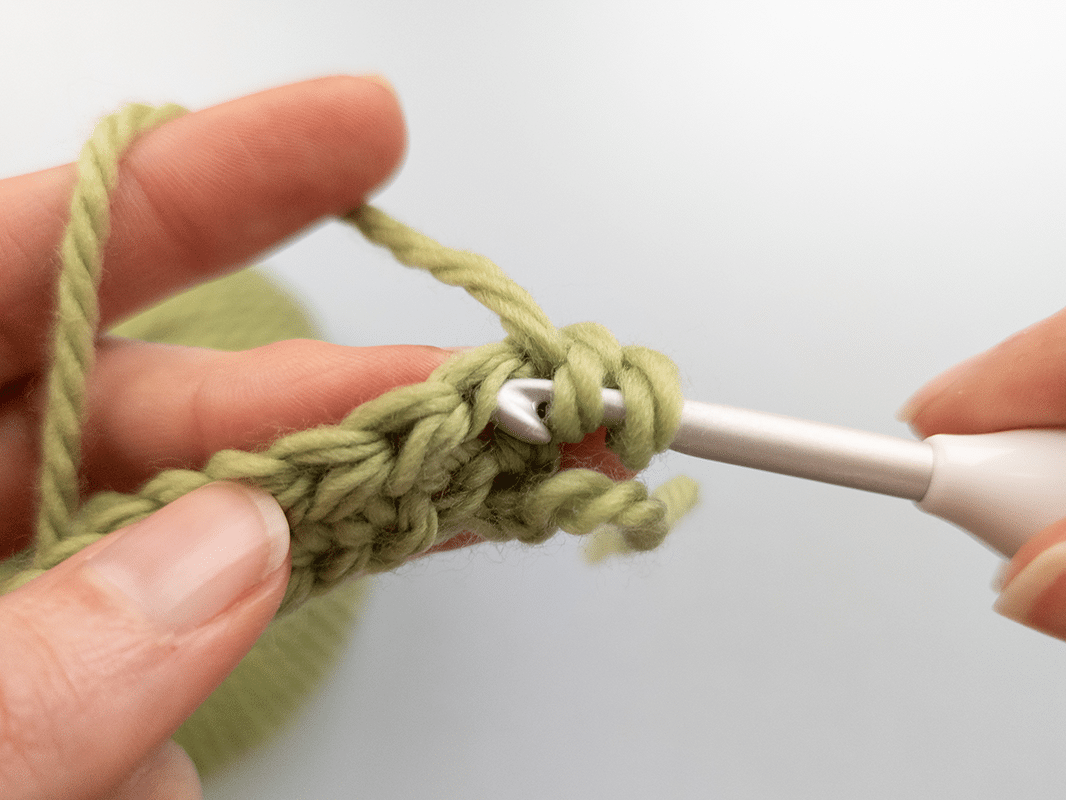
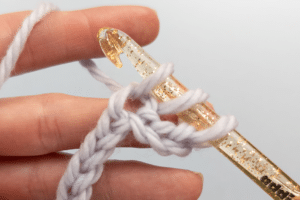
Step 3: Pick up the yarn with the crochet hook and pull it through the stitch so that there are two loops on the hook.
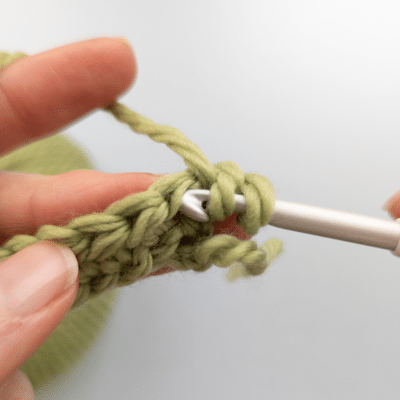
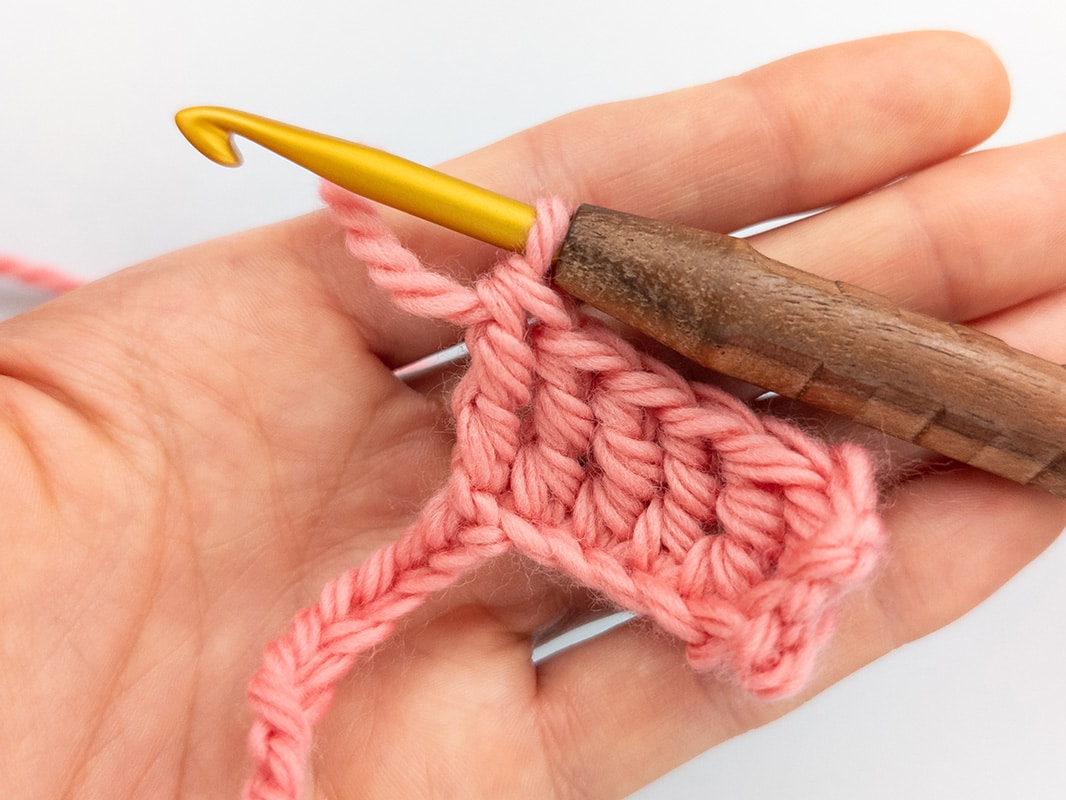
Step 4: Pick up the yarn again and pull it through both loops on the hook.
Step 5: The first single crochet is now complete. Repeat this process until you have crocheted it in all chain stitches.
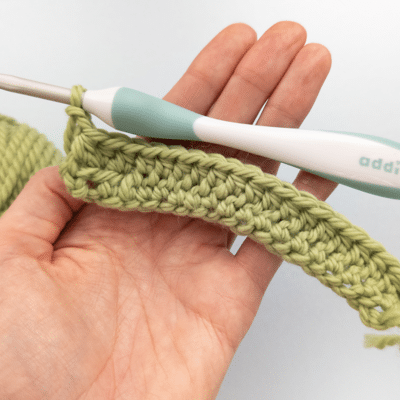
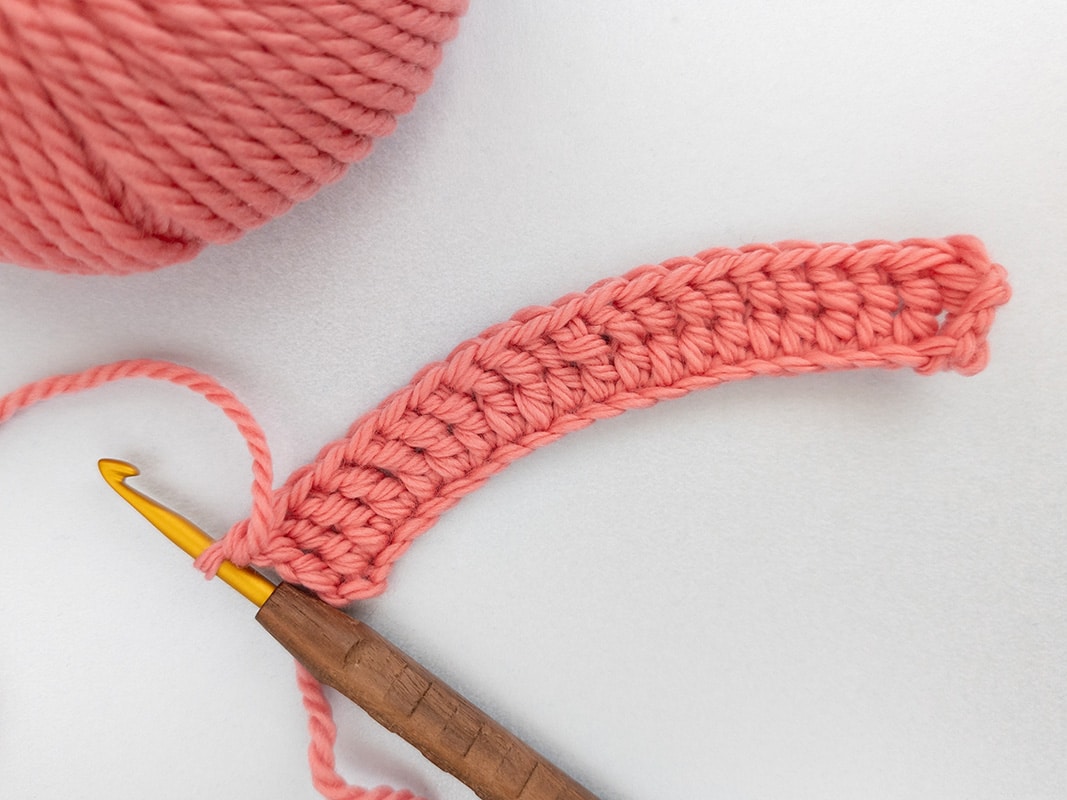
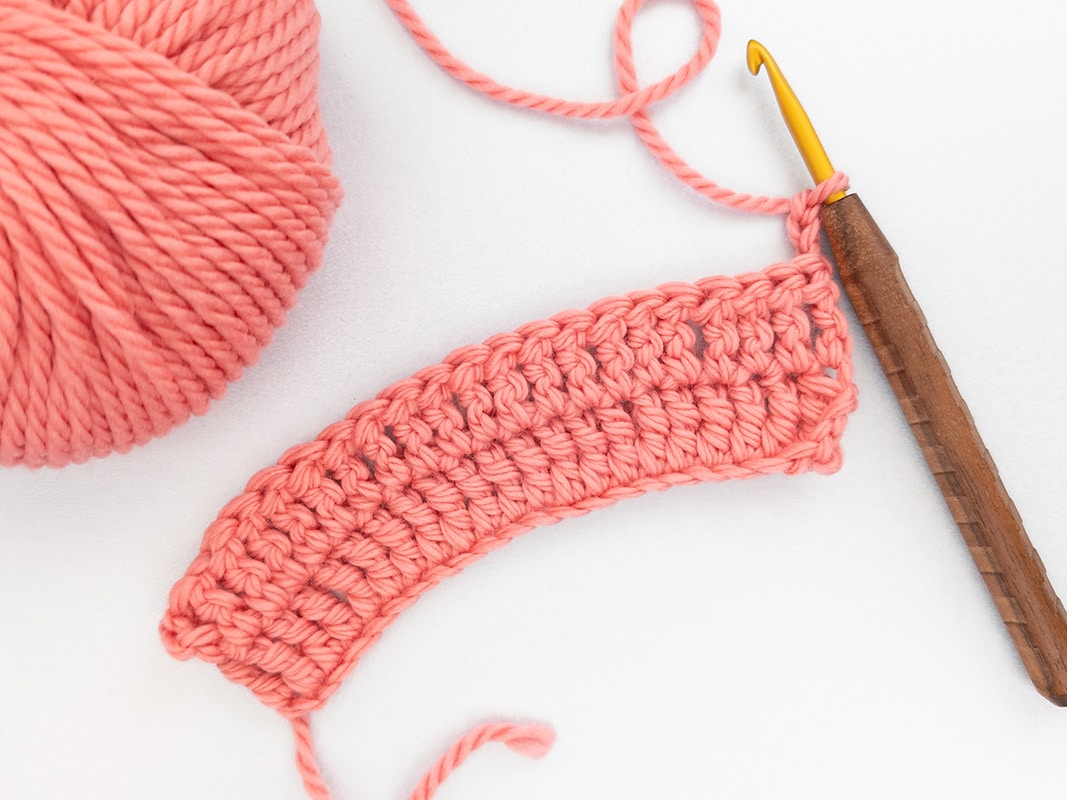
Crochet further rowsIf you want to add more rows of single crochets, you will first need to add turning chains. One turning chain is sufficient for single crochets, while two or three turning chains are useful for higher stitches such as double crochet. After the turning chain stitches have been worked, the crochet piece is turned and the next stitch is inserted into the last stitch before the turning chain stitches.
Tip: At the beginning of each row, count how many stitches are crocheted per row. At the beginning, the first or last stitch is often overlooked, which results in the crocheted object becoming narrower and narrower.
Single crochet (sc) – step by step
Step 1: An additional chain stitch is crocheted onto a chain to create a turning chain.
Step 2: Insert the crochet hook into the chain stitch before the turning chain. Take care not to insert it into the turning stitch.
Step 3: Pick up the yarn with the crochet hook and pull it through the stitch so that there are two loops on the hook.
Step 4: Pick up the yarn again and pull it through both loops on the hook.
Step 5: The first single crochet is now complete. Repeat this process until you have crocheted it in all chain stitches.
Crochet further rowsIf you want to add more rows of single crochets, you will first need to add turning chains. One turning chain is sufficient for single crochets, while two or three turning chains are useful for higher stitches such as double crochet. After the turning chain stitches have been worked, the crochet piece is turned and the next stitch is inserted into the last stitch before the turning chain stitches.
Tip: At the beginning of each row, count how many stitches are crocheted per row. At the beginning, the first or last stitch is often overlooked, which results in the crocheted object becoming narrower and narrower.
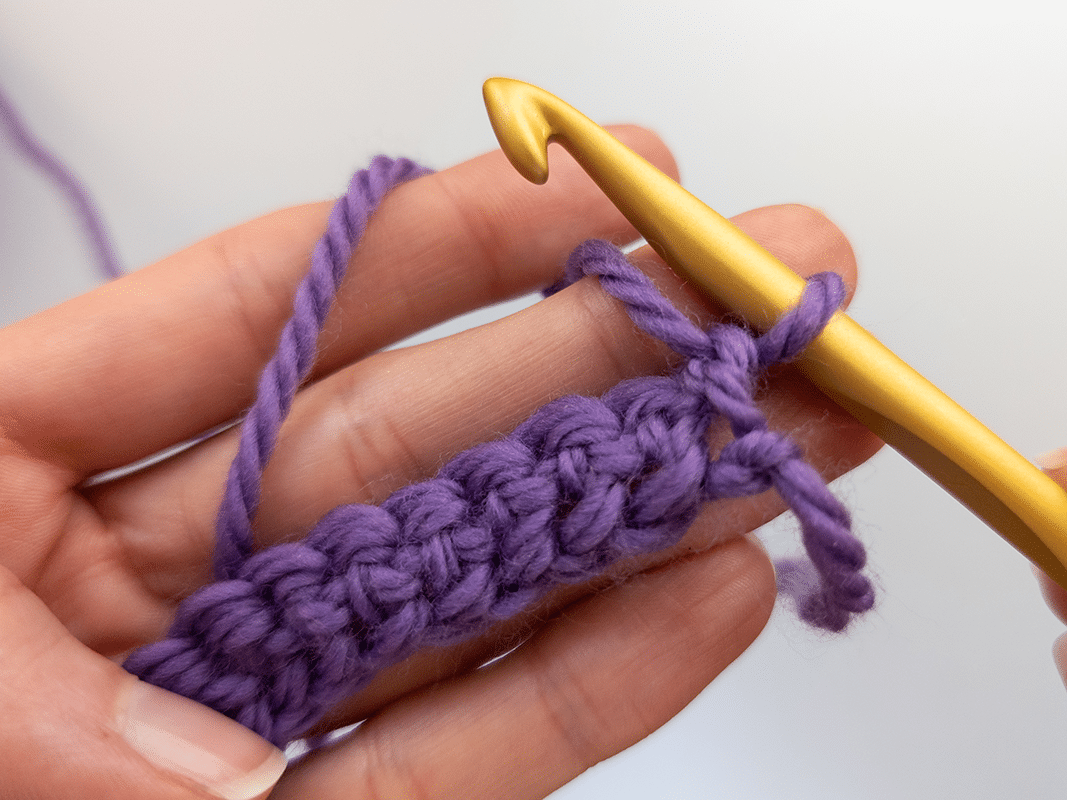

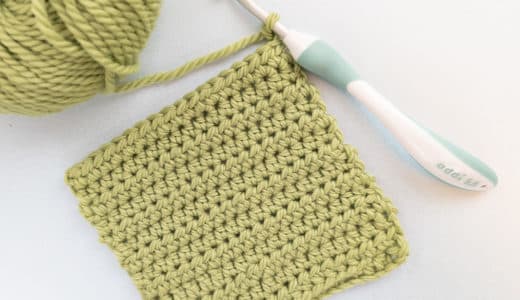
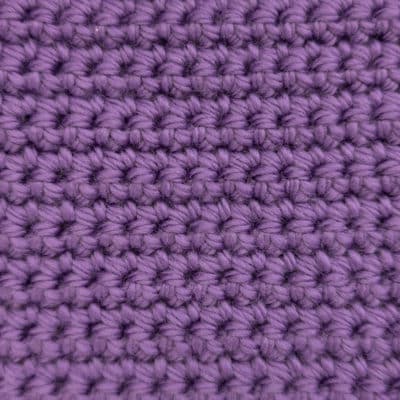
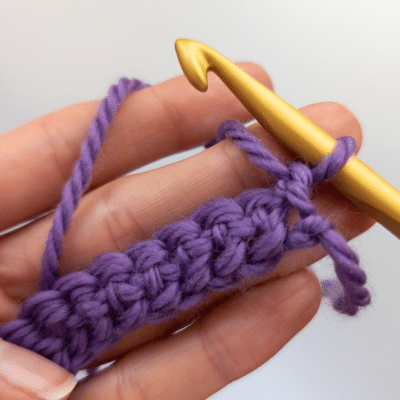
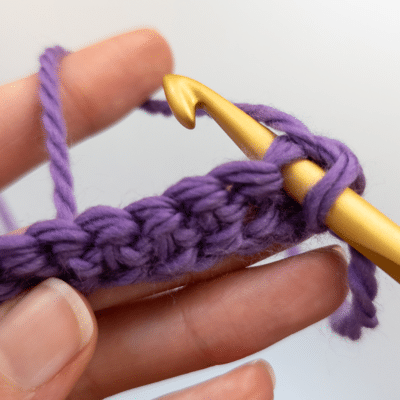
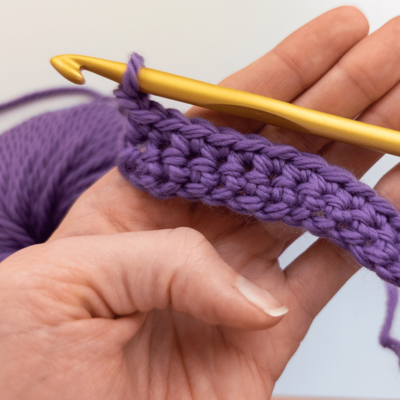
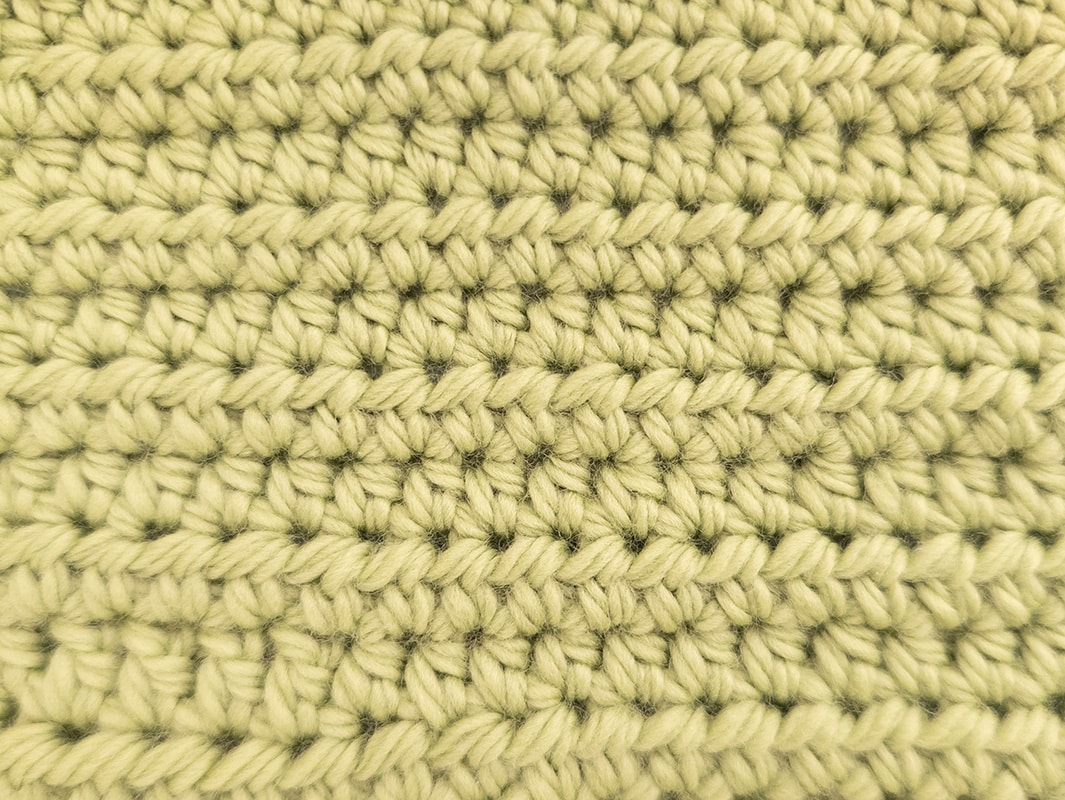
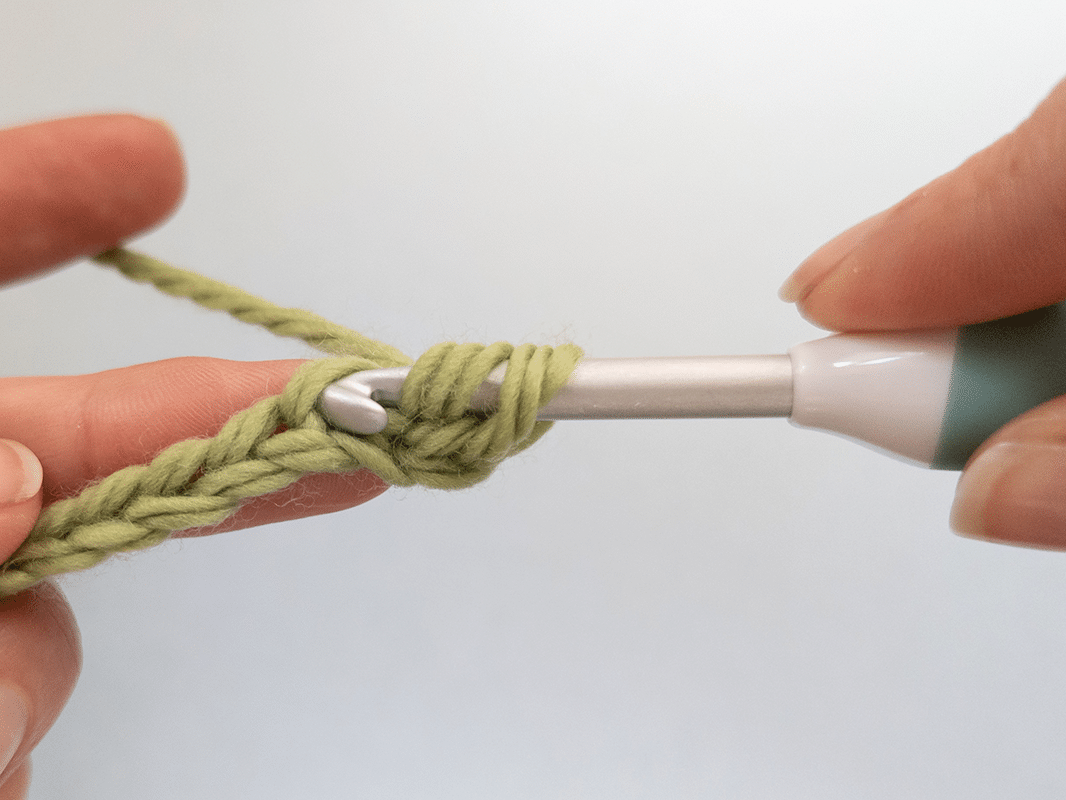
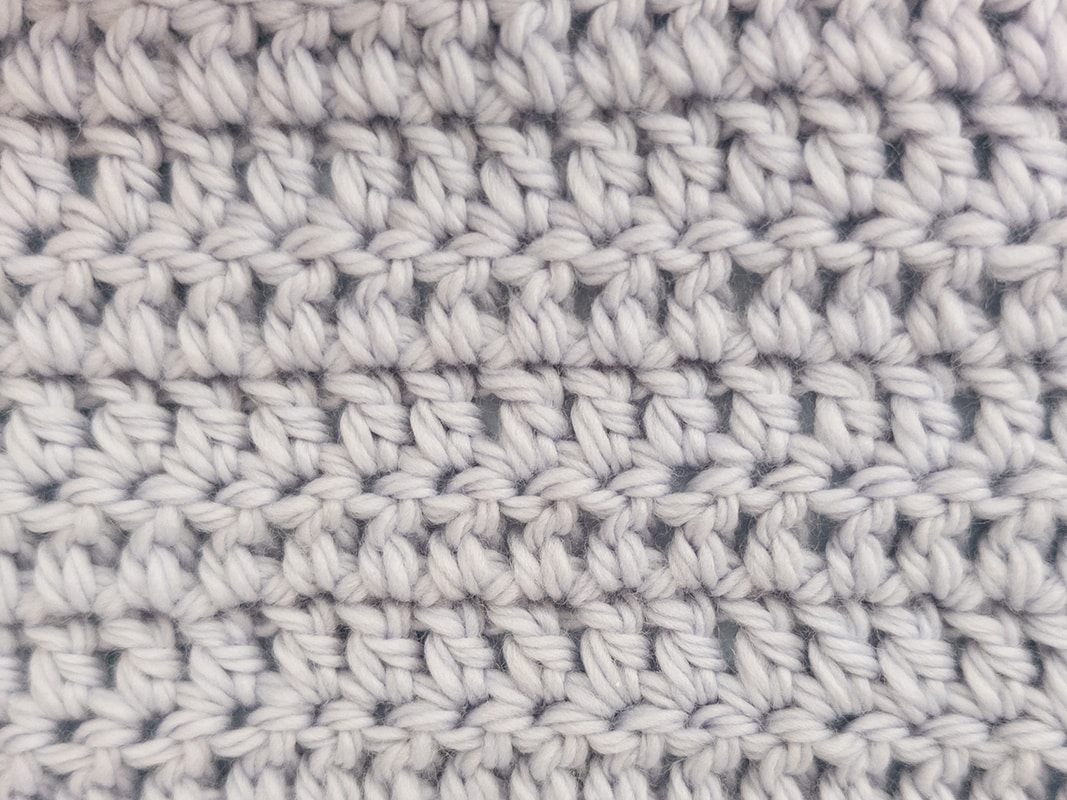
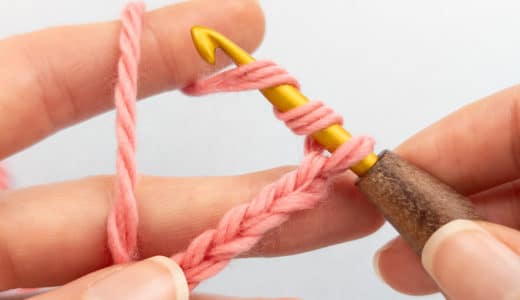
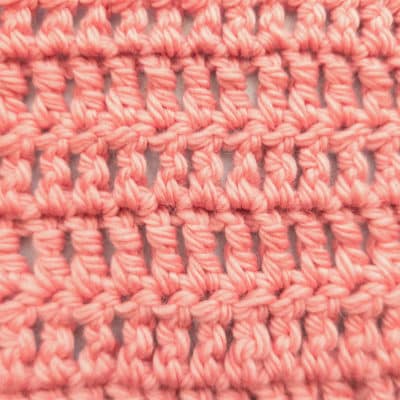
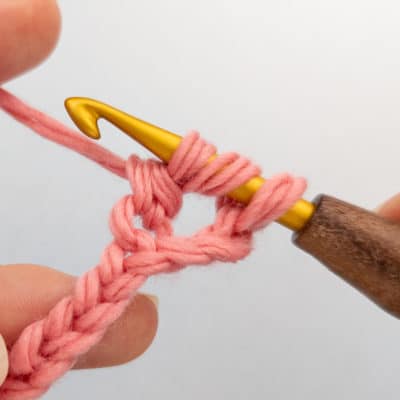
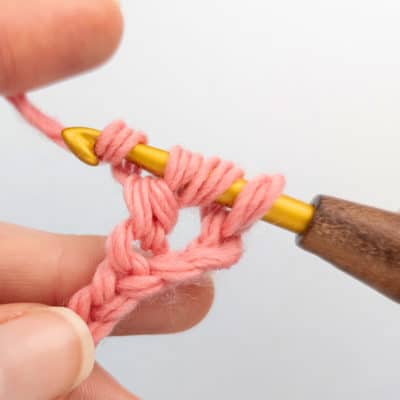
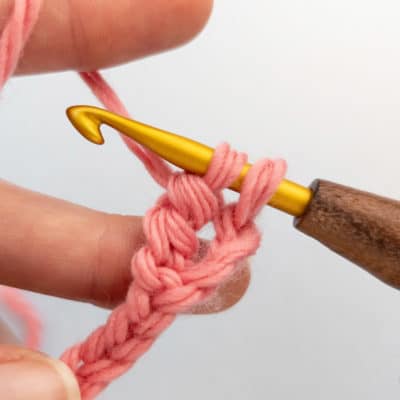
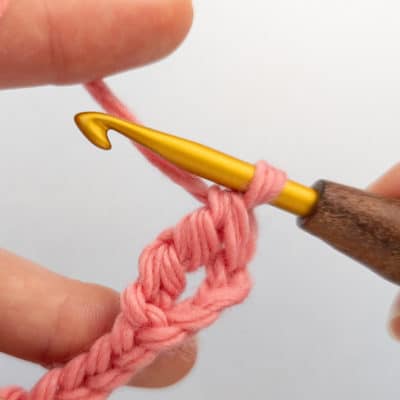
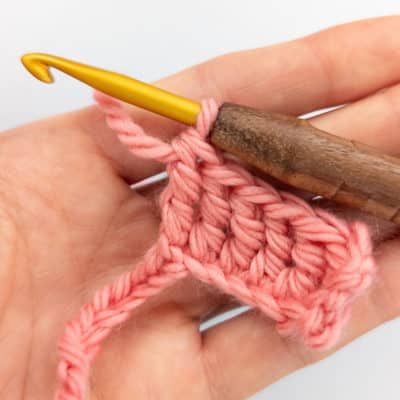
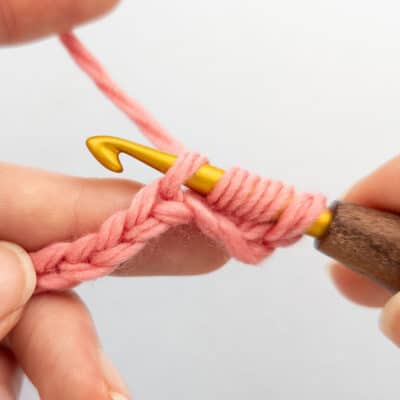
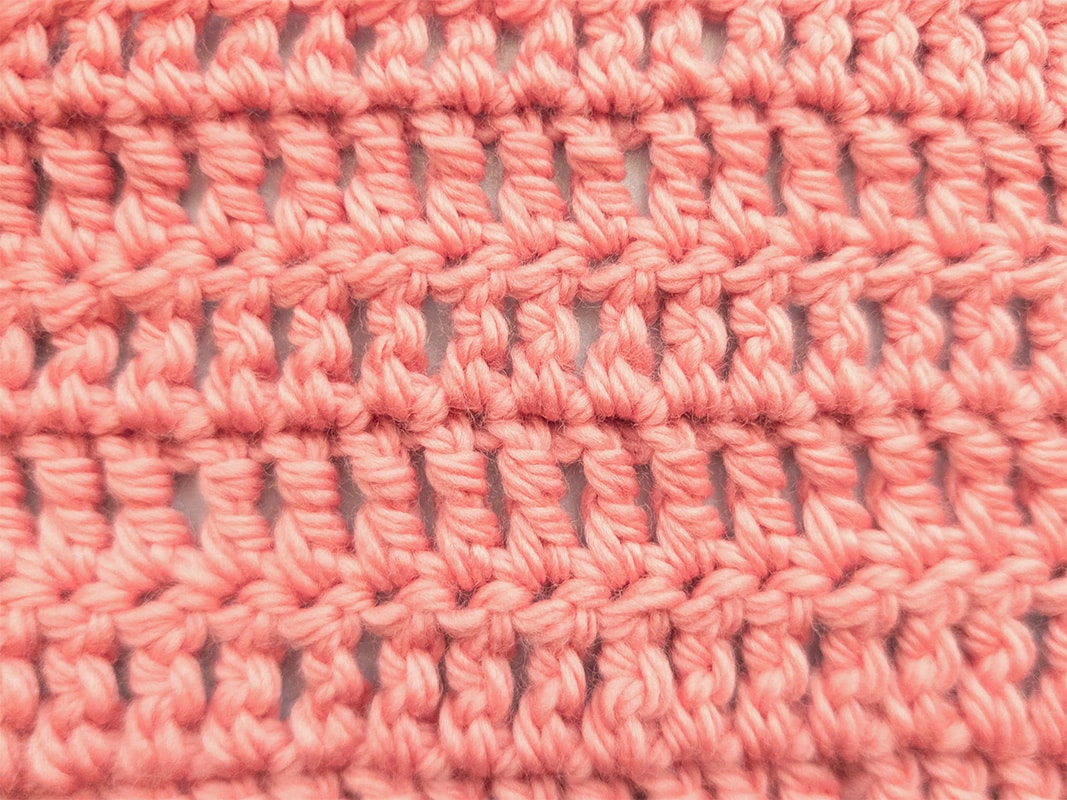
What are Half double crochets?
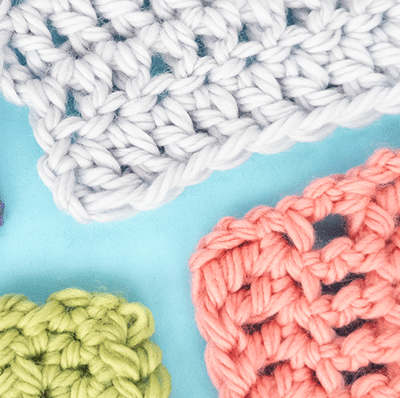
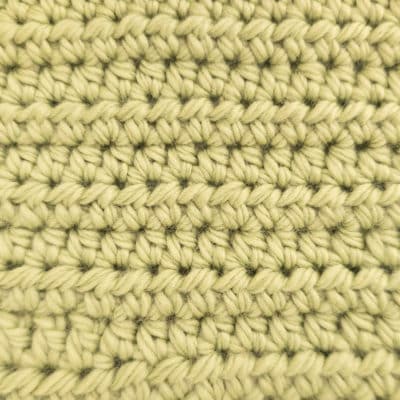
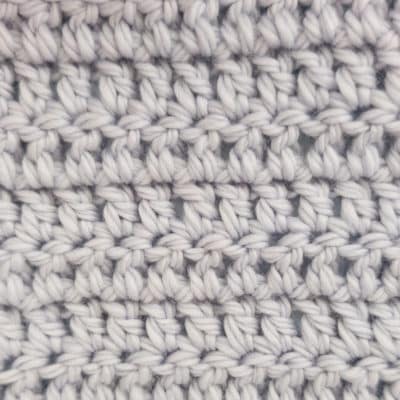
Alongside single crochet stitches, half double crochet (US) or half treble crochet (UK) is one of the most important basic techniques in crochet. Half double crochets are known for their characteristic lace pattern, which gives many crochet projects their typical look. They are looser than single crochets, but denser and more stable than double crochets. This makes them ideal for a variety of projects such as dishcloths or washcloths, which are given an even and appealing structure by the treble crochets. To get a better understanding of the basics, let's focus on just the treble crochets for now.
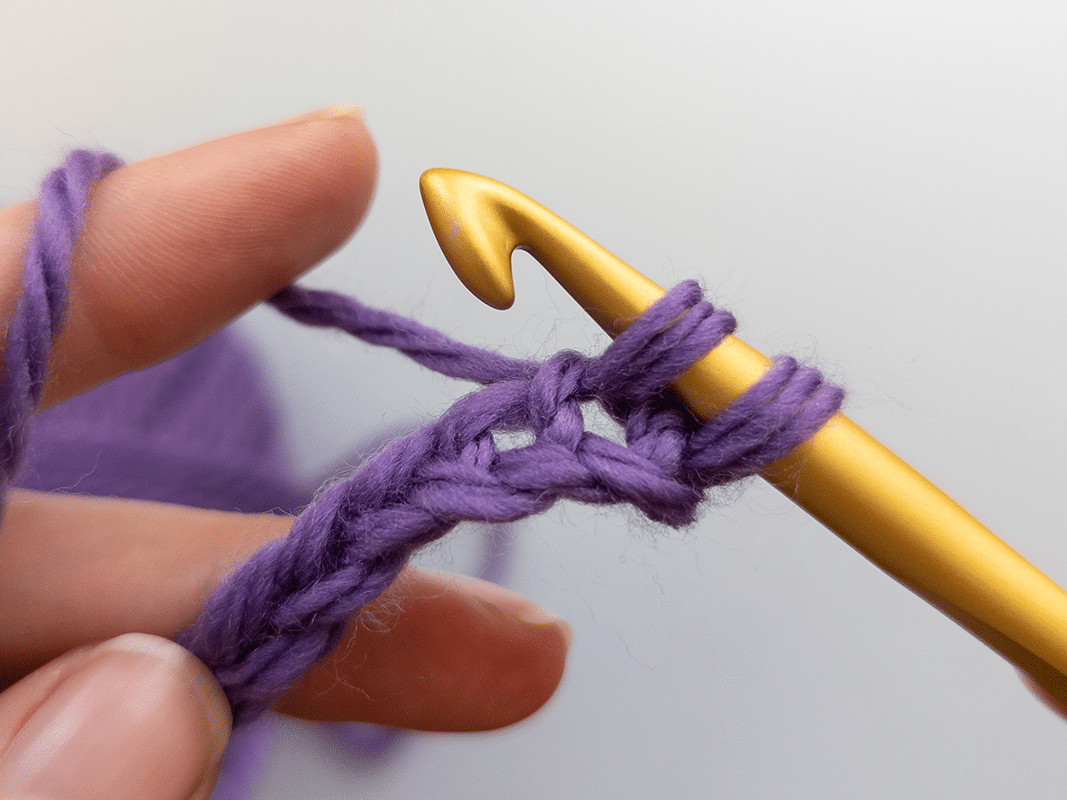
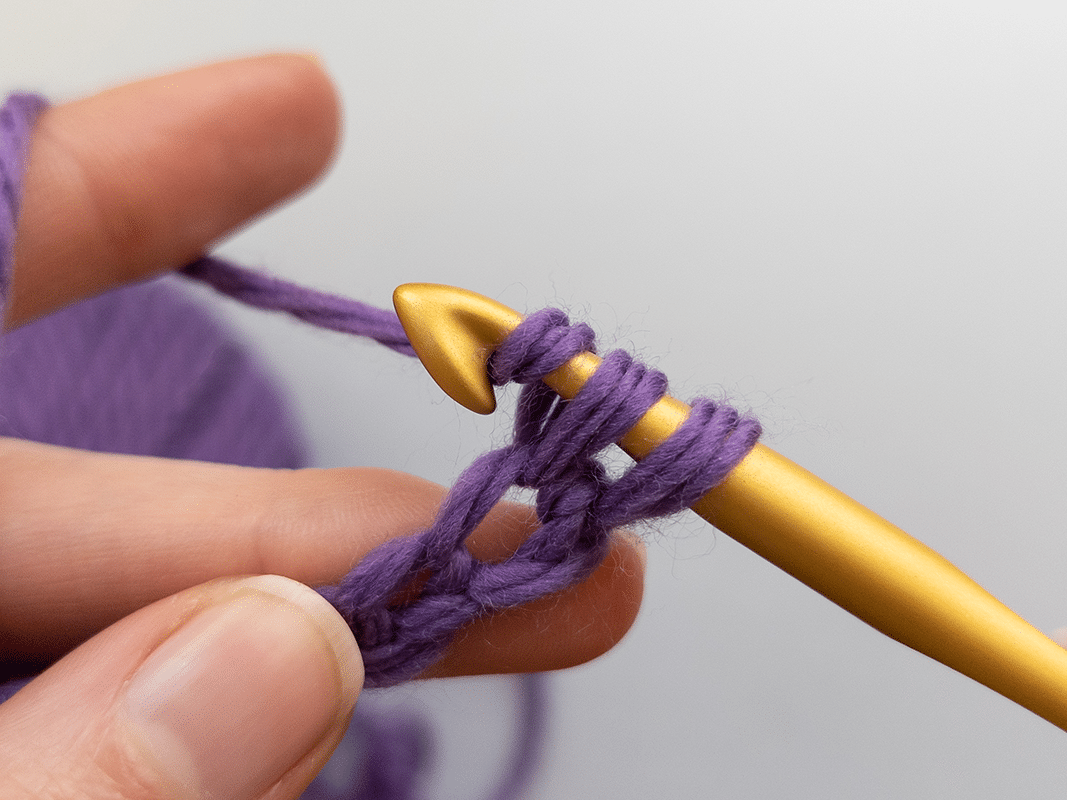
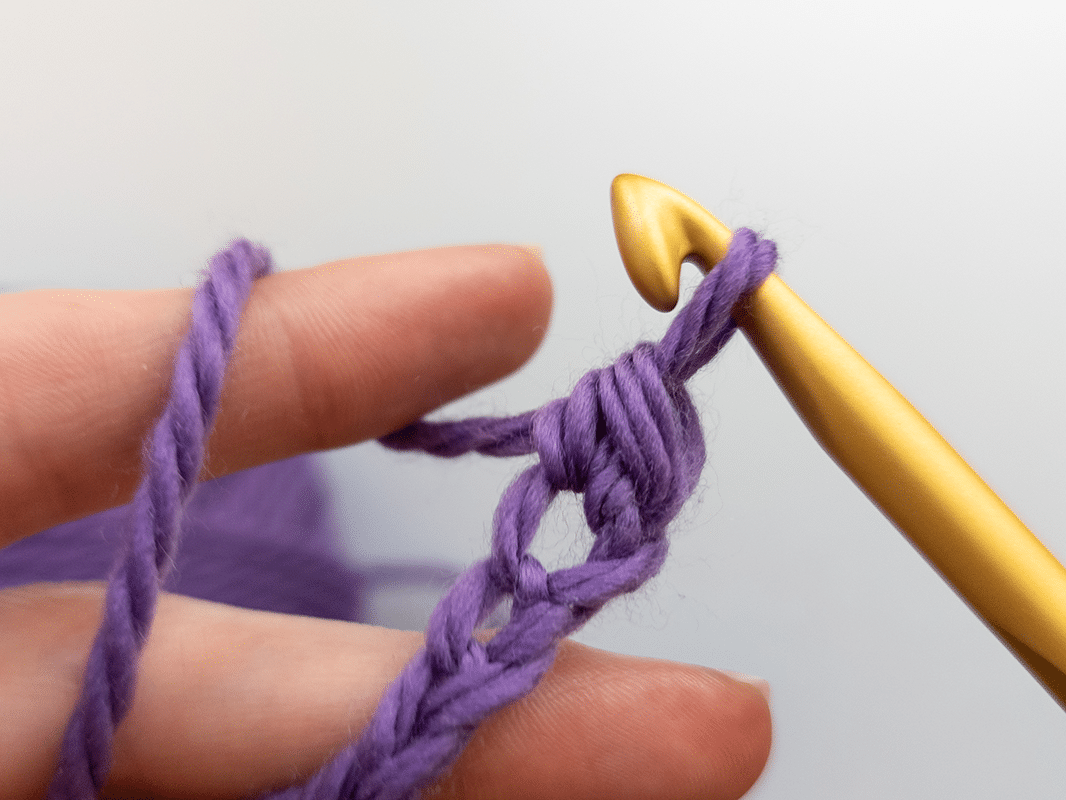
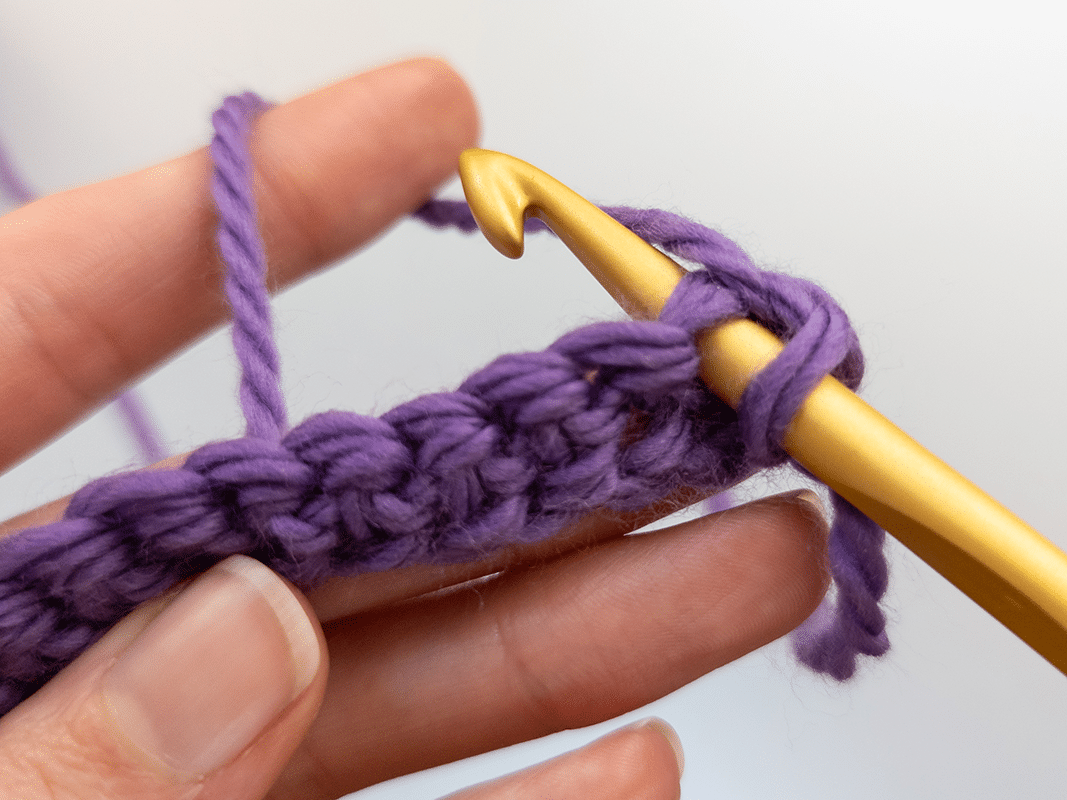
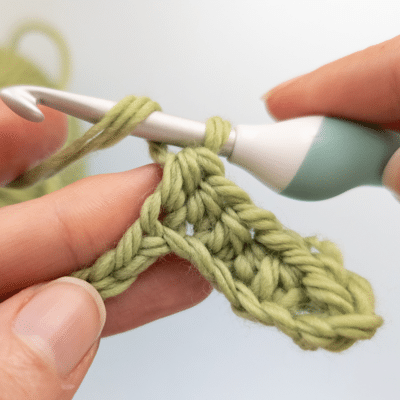
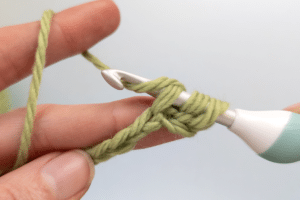
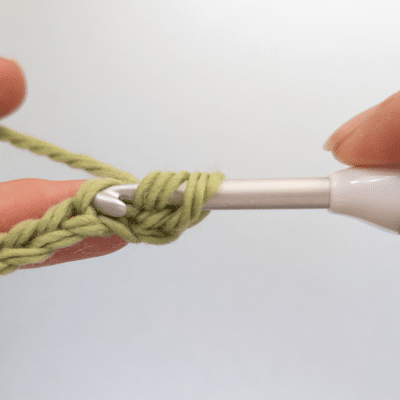
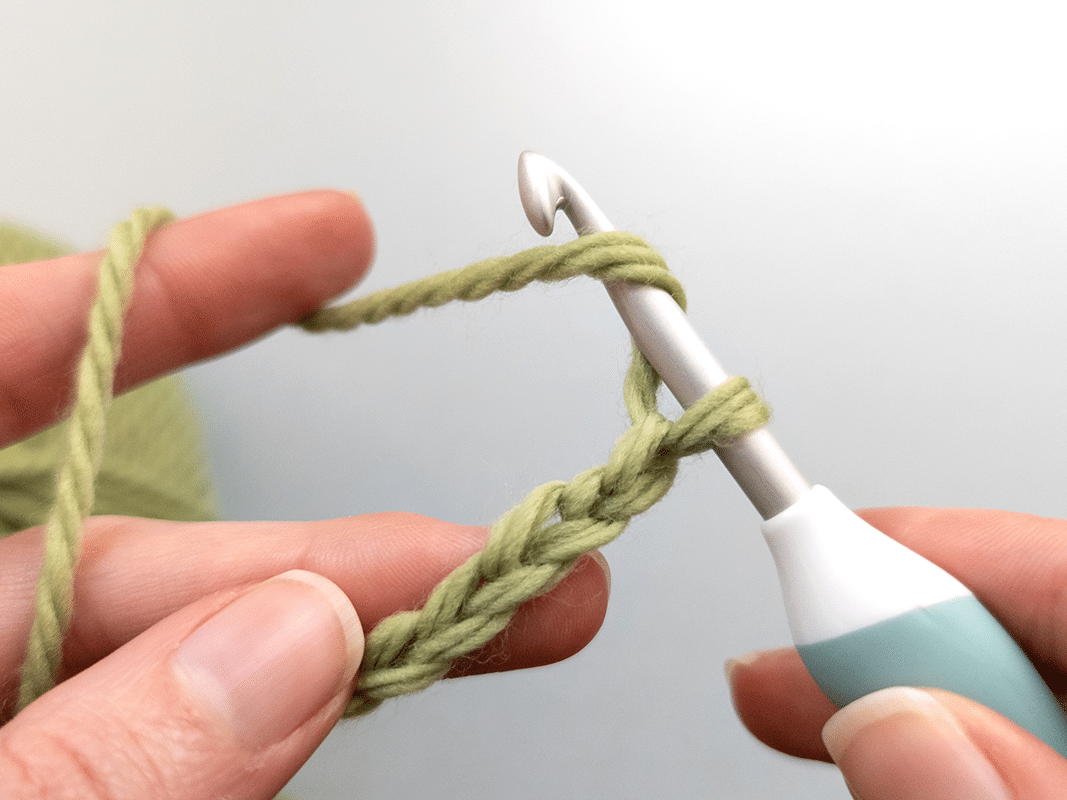
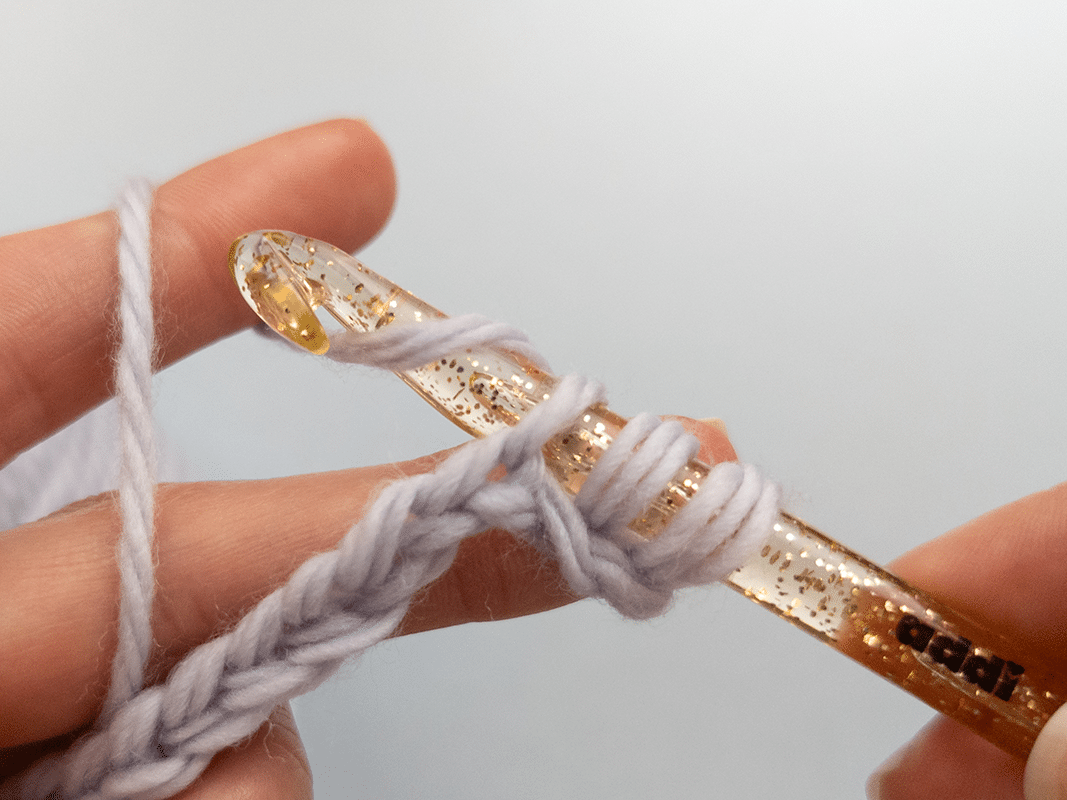
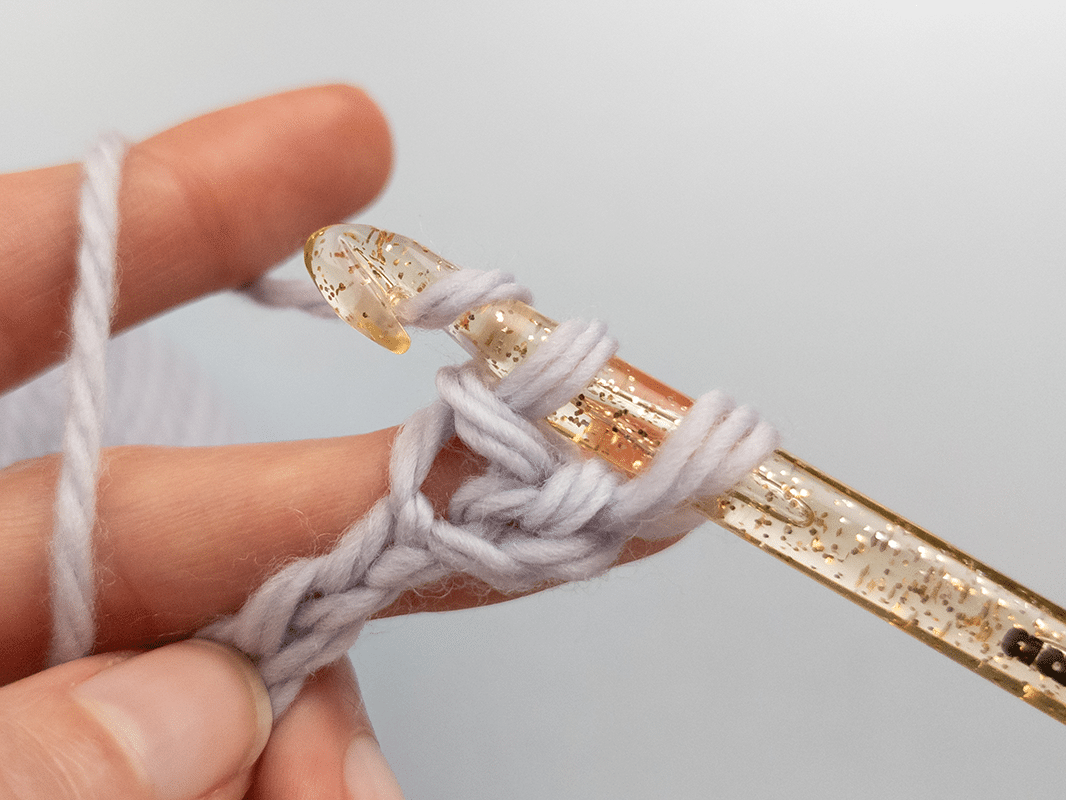
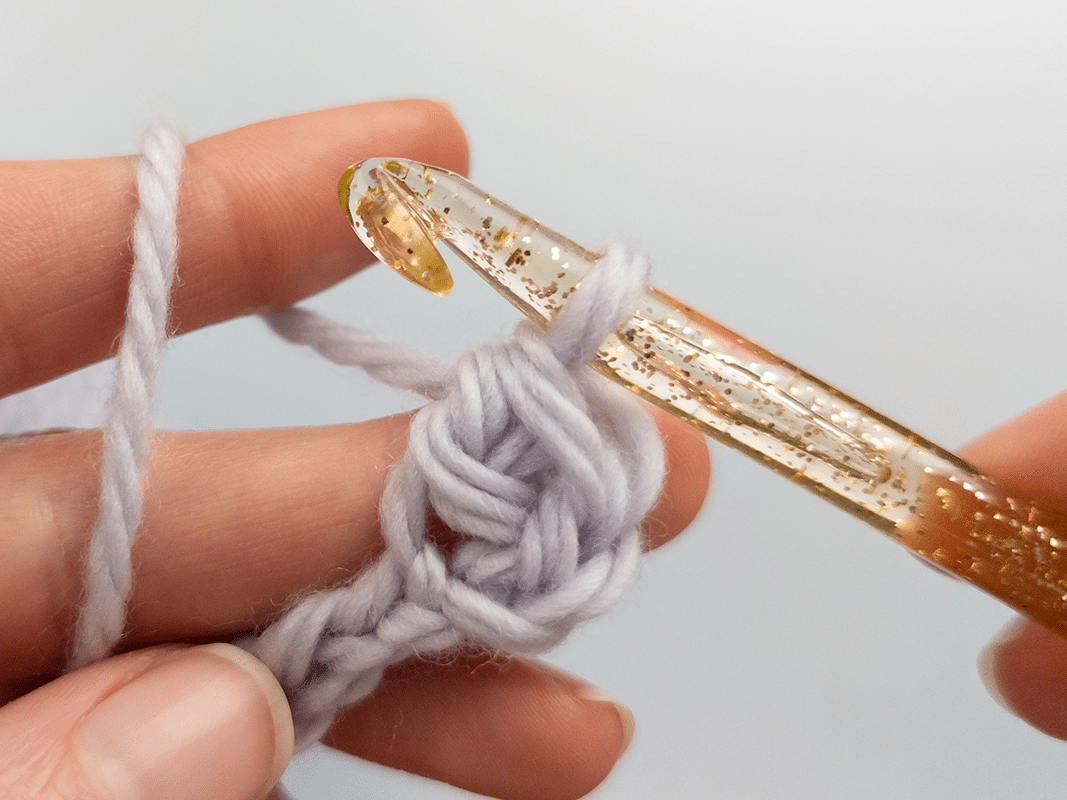
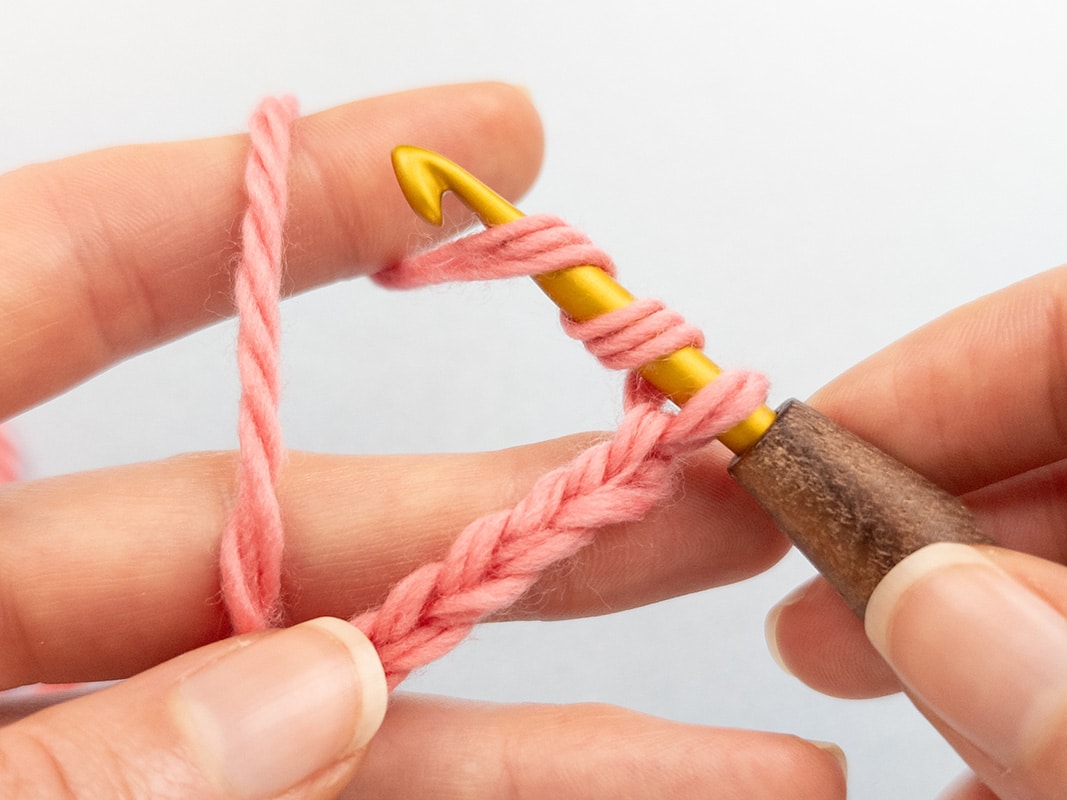
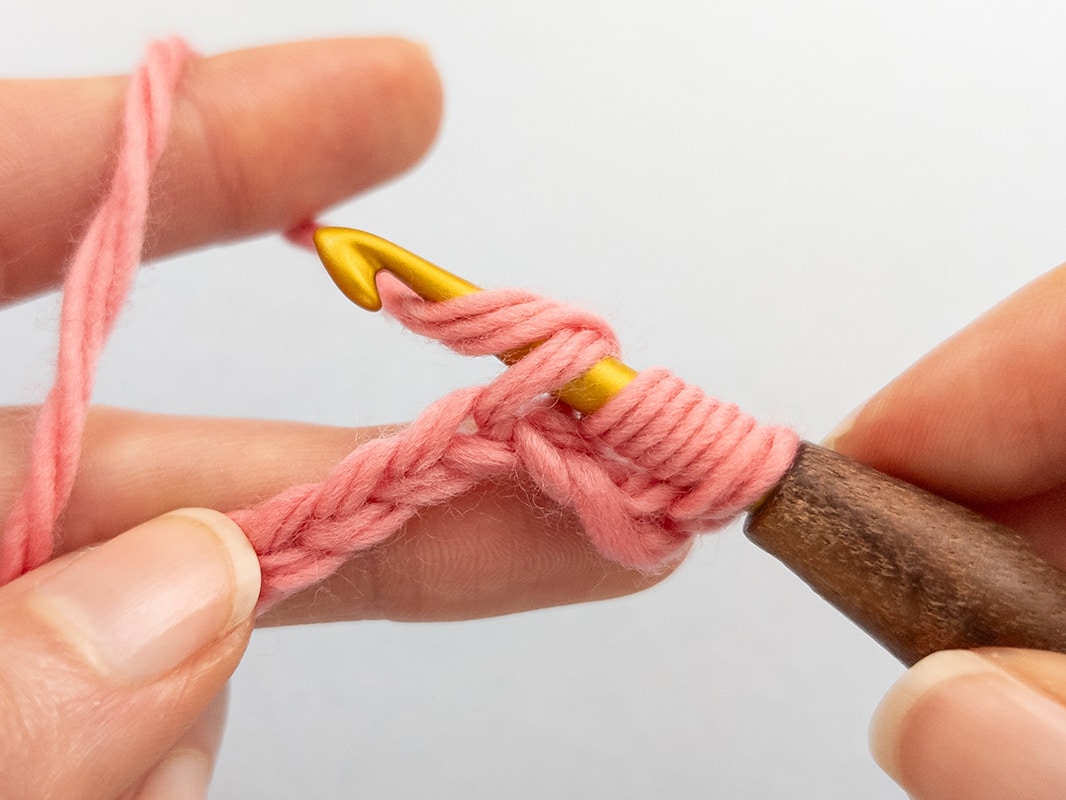
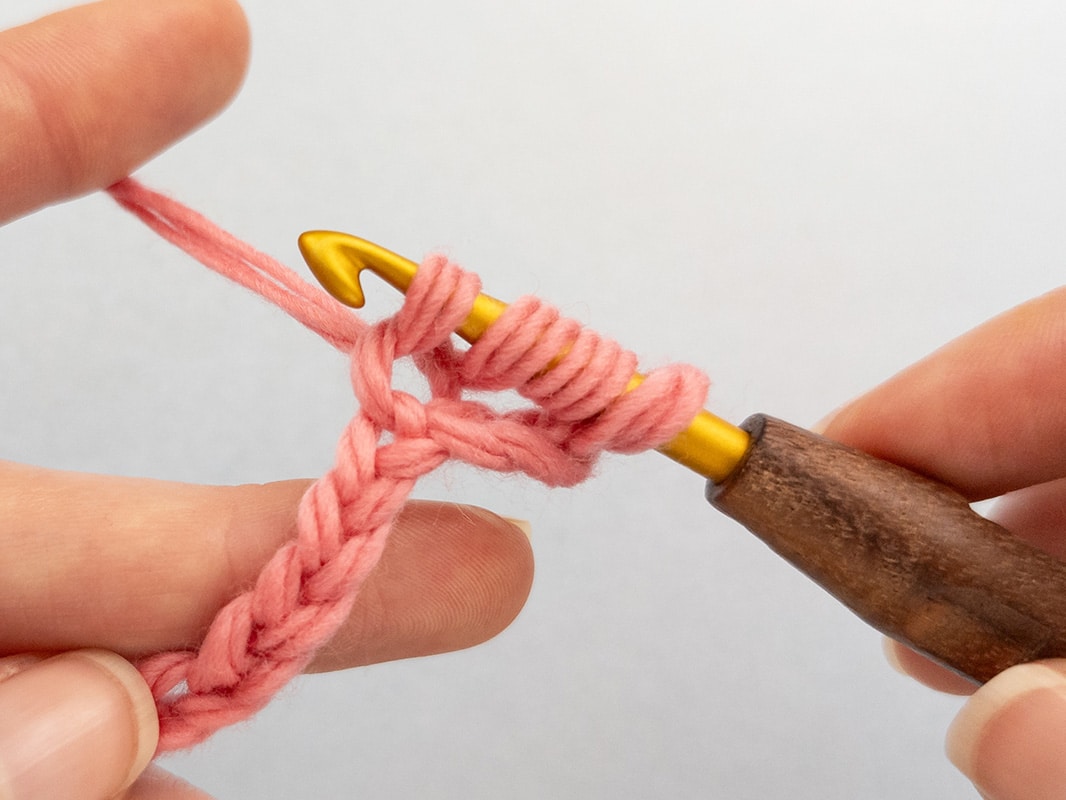
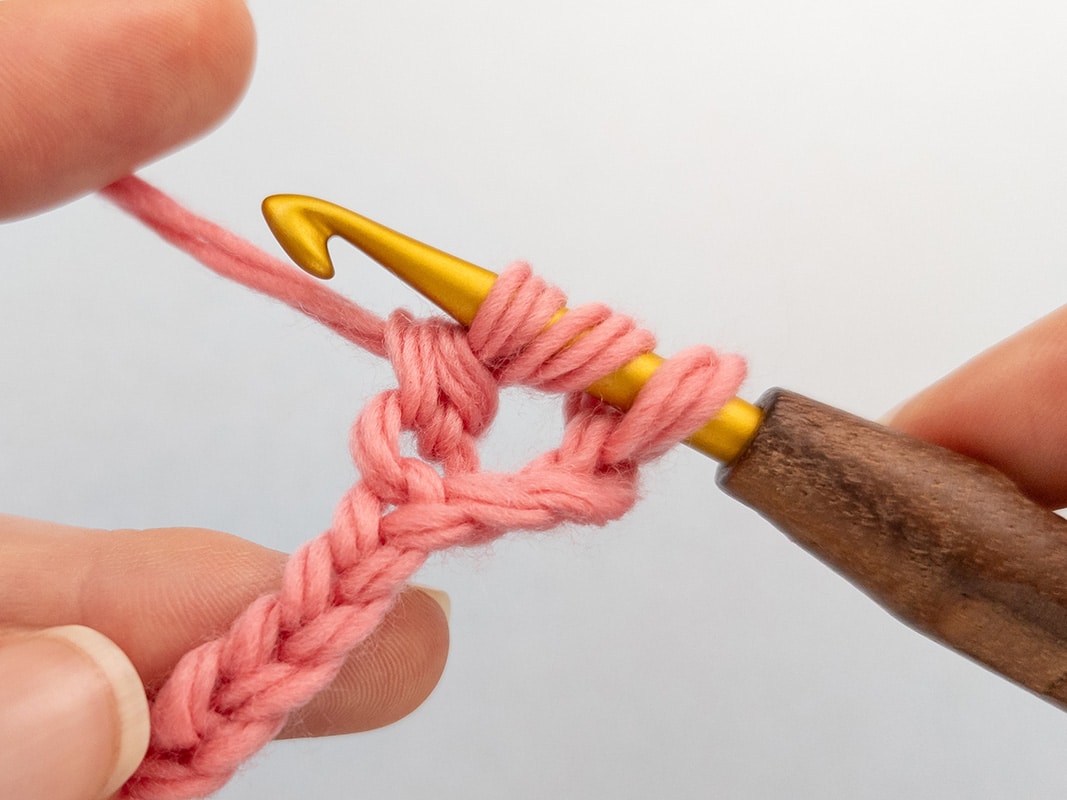
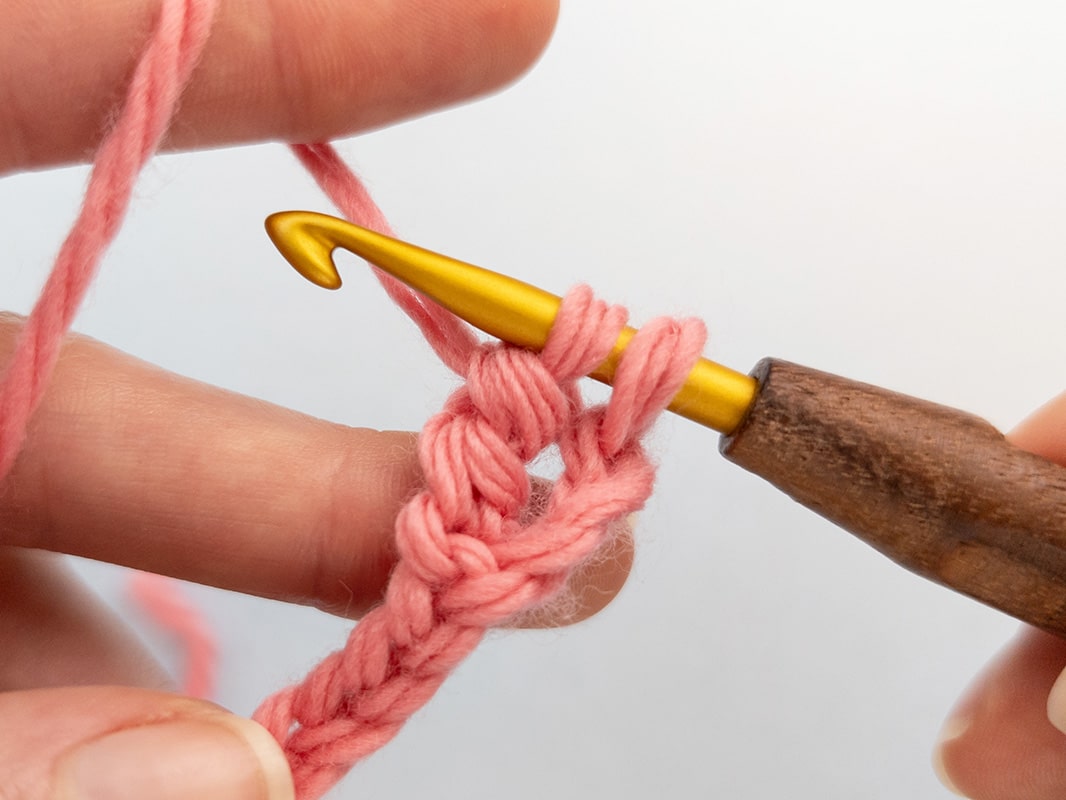
Half double crochets (hdc) – step by step
Step 1: For half double crochets, a turning chain is crocheted at the end of the row. This is only necessary at the beginning of the row.
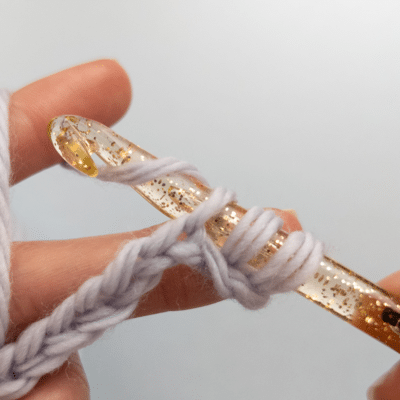
Step 2: The yarn is placed around the crochet hook (from back to front) and then inserted into the chain stitch. Make sure you do not insert the needle into the turning chain (insert into the 2nd stitch).
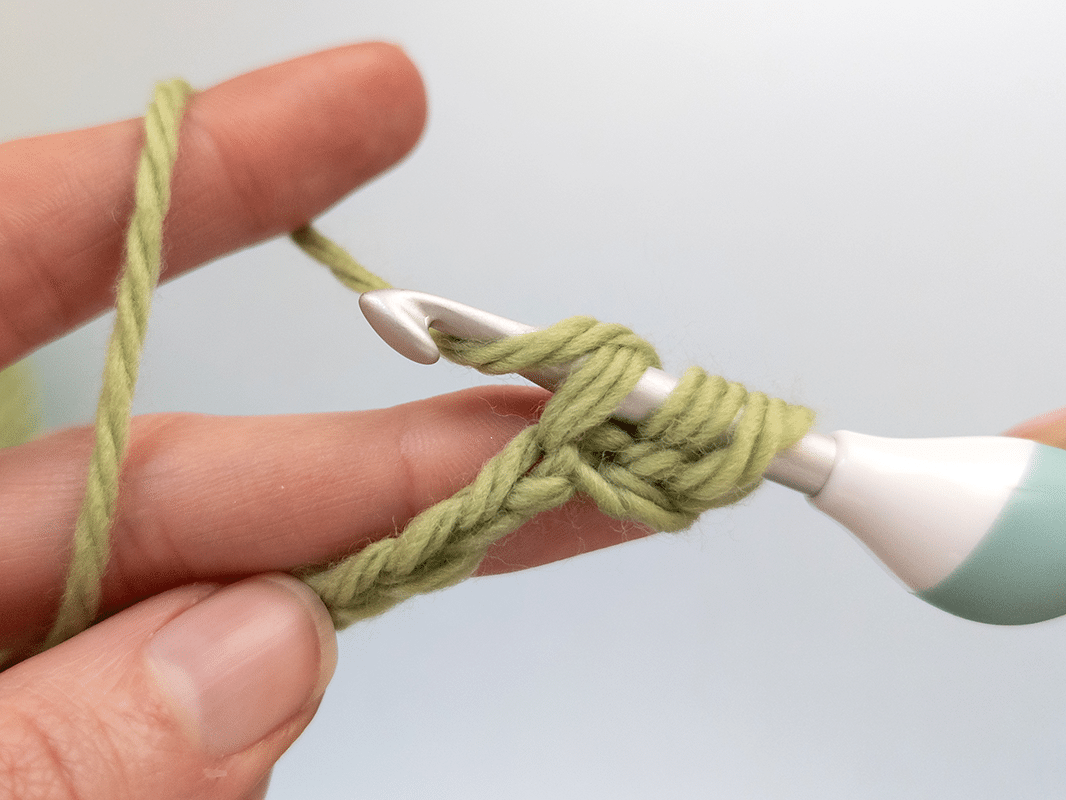
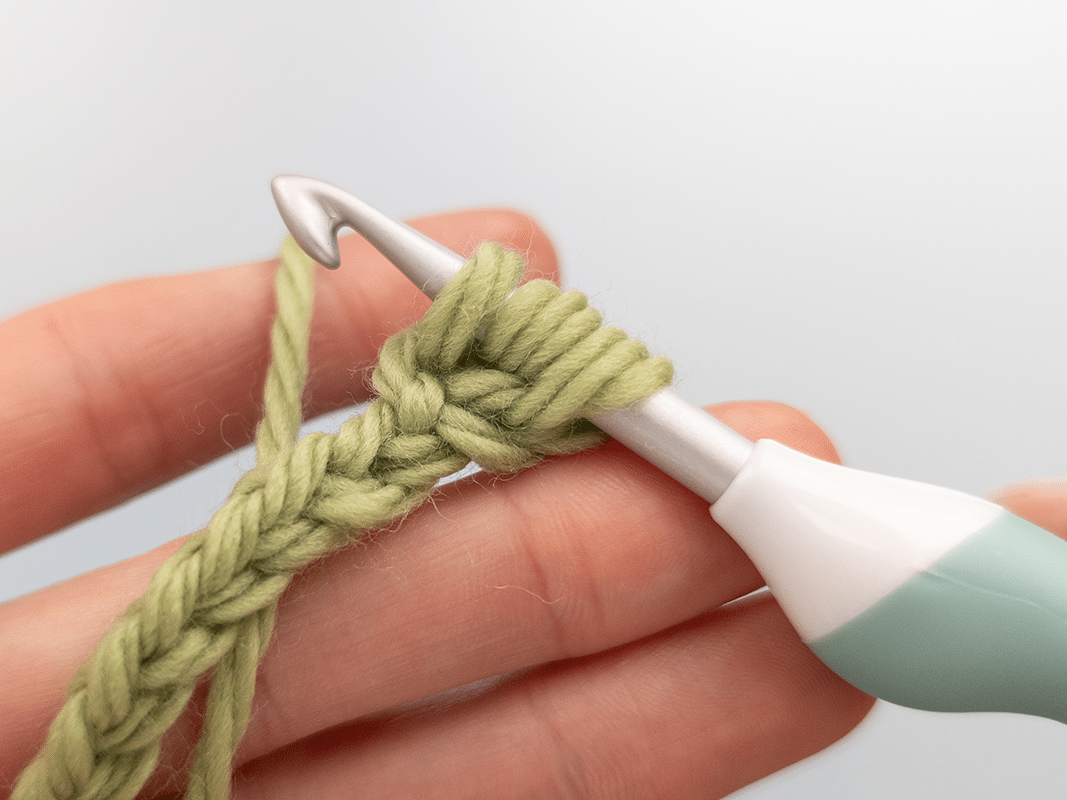
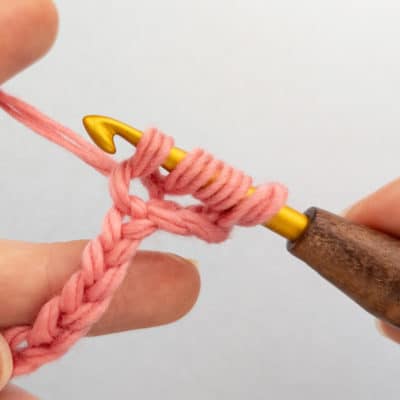
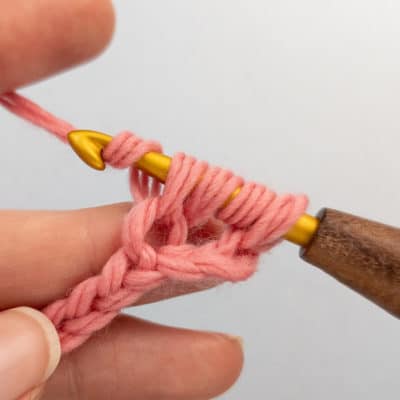
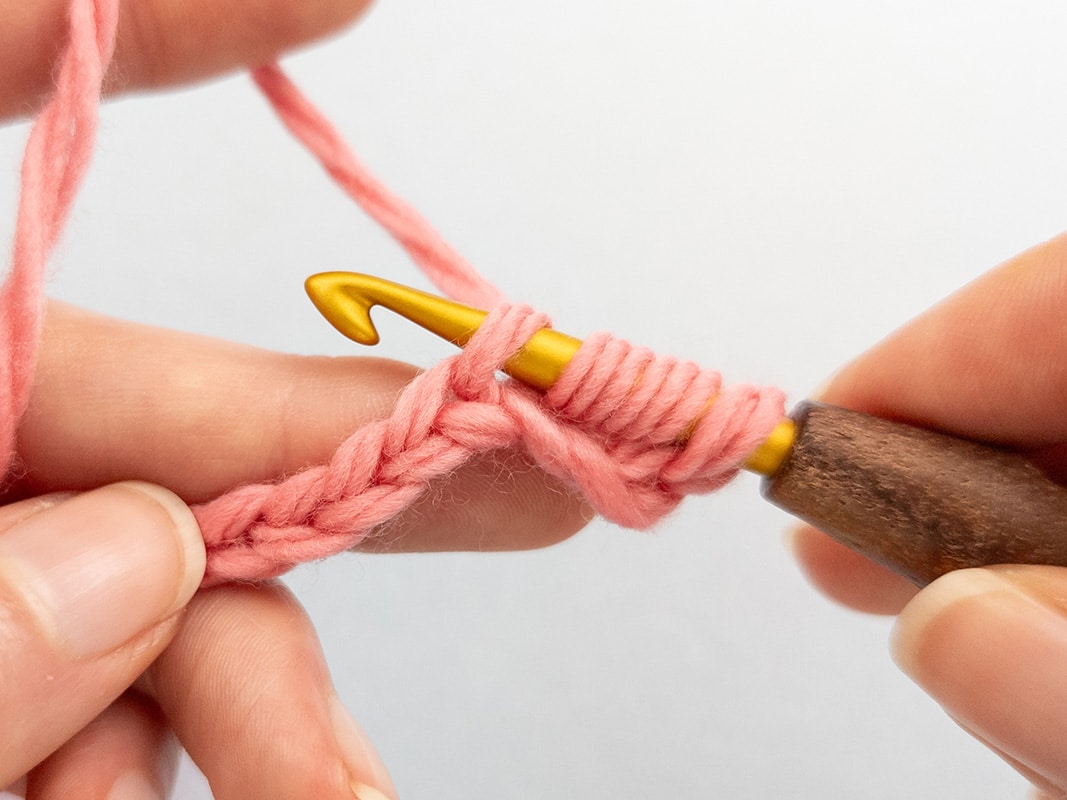
Step 3: Place the yarn around the crochet hook again and pull it through the first stitch. There should now be three loops on the crochet hook.
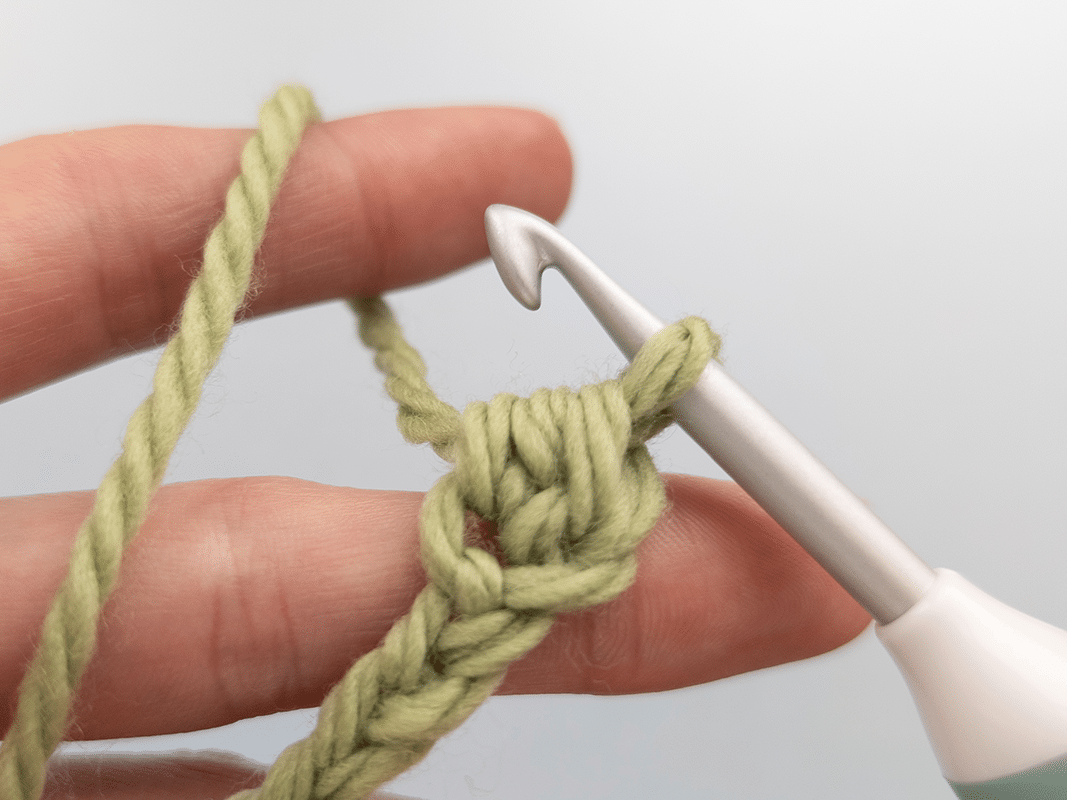
Step 4: Now place the yarn around the crochet hook again and pull it through all three loops on the hook. The first half double crochets is now complete.
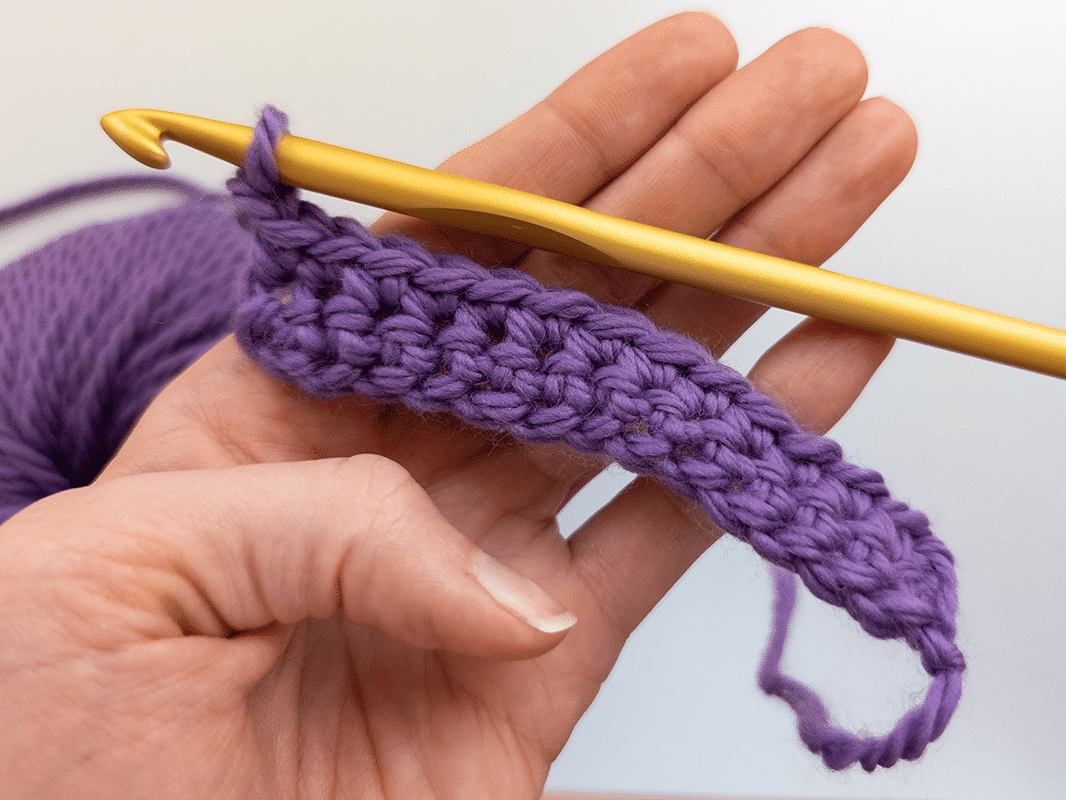
Repeat these steps from step 2 until you have worked the desired number of half double crochets.
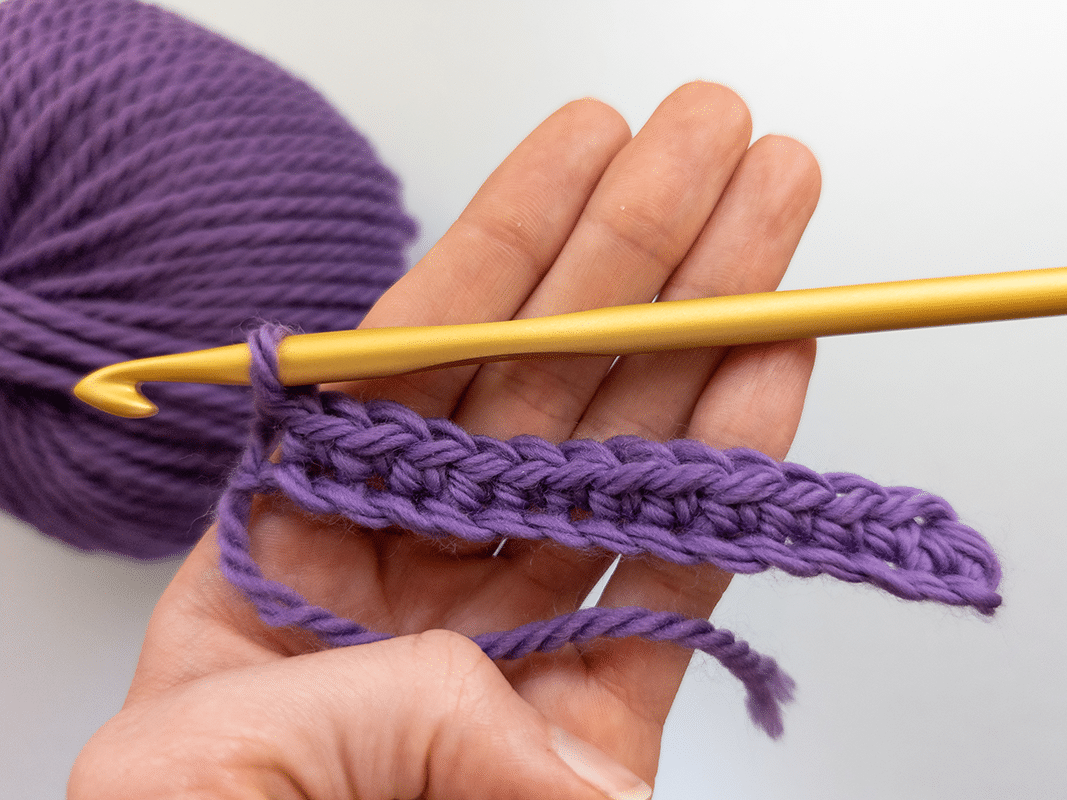
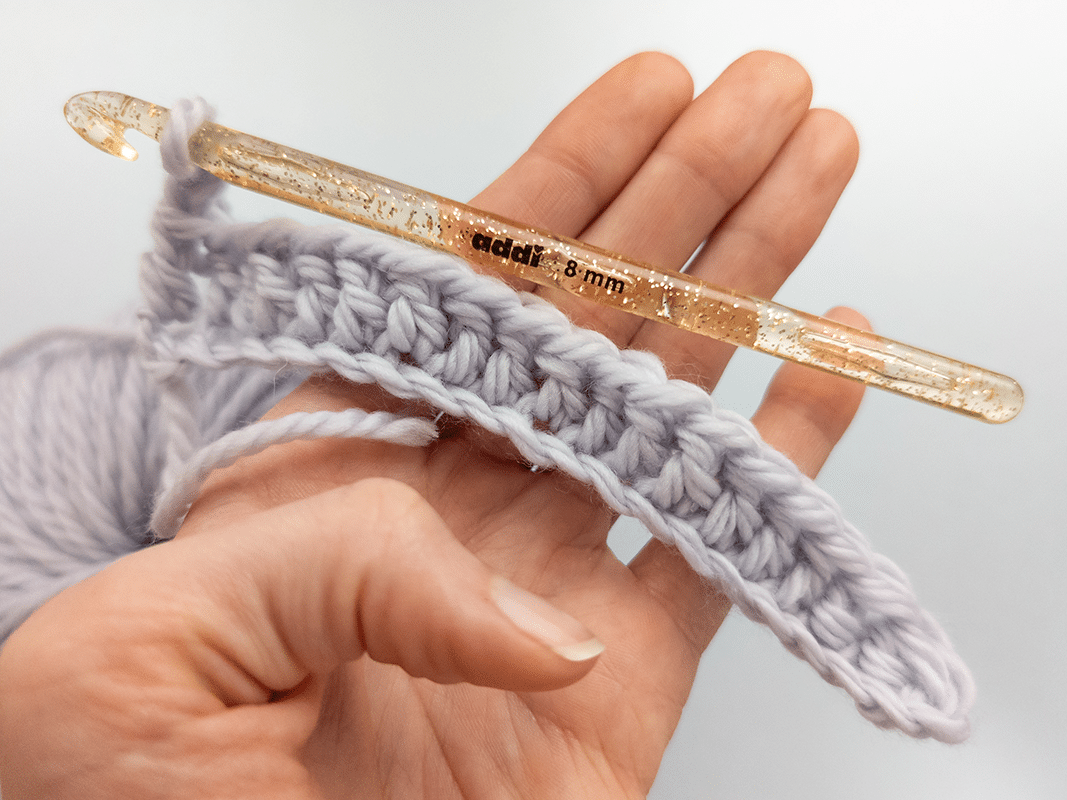
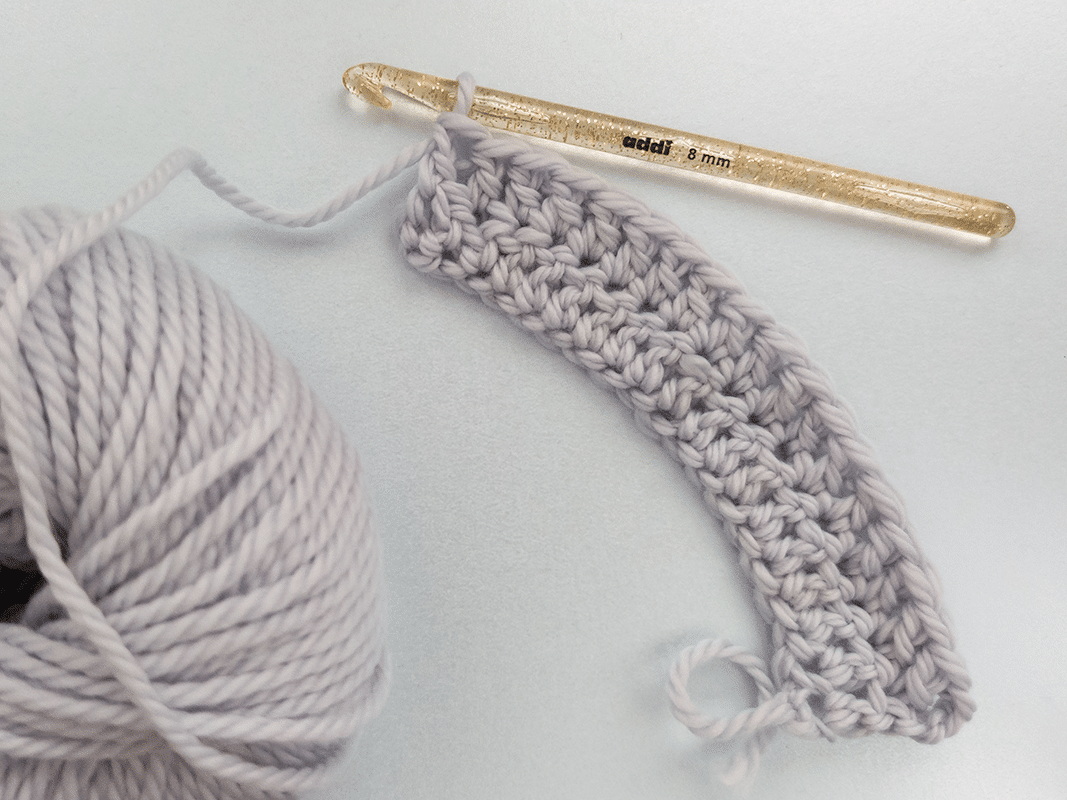
Crochet further rows: If further rows are to be added to the row of treble crochets, a turning chain is worked at the end of the row. Then turn the work and crochet another treble crochet in each stitch of the previous row.
Half double crochets (hdc) – step by step
Step 1: For half double crochets, a turning chain is crocheted at the end of the row. This is only necessary at the beginning of the row.
Step 2: The yarn is placed around the crochet hook (from back to front) and then inserted into the chain stitch. Make sure you do not insert the needle into the turning chain (insert into the 2nd stitch).
Step 3: Place the yarn around the crochet hook again and pull it through the first stitch. There should now be three loops on the crochet hook.
Step 4: Now place the yarn around the crochet hook again and pull it through all three loops on the hook. The first half double crochets is now complete.
Repeat these steps from step 2 until you have worked the desired number of half double crochets.
Crochet further rows: If further rows are to be added to the row of treble crochets, a turning chain is worked at the end of the row. Then turn the work and crochet another treble crochet in each stitch of the previous row.


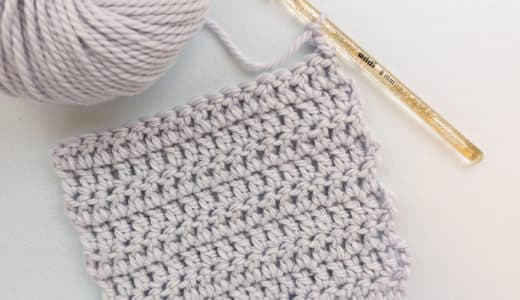
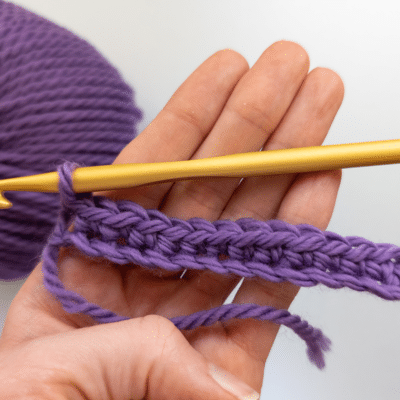
What are double crochets?
Double crochets (US) or treble crochets (UK) are higher than half double crochets and create a loose, decorative stitch pattern that is particularly suitable for patterns with open structures. The combination of height and stability means that double crochet can be used for a wide range of crochet projects, from light garments to delicate home accessories.
When crocheting with double crochets, each row is started with three turning chains, which serve as a substitute for the first double crochet and create the required height. This technique ensures an even edge and makes it easier to work over several rows. The principle of the double crochet is simple: the additional yarn over before inserting into the stitch gives the stitch its characteristic height.
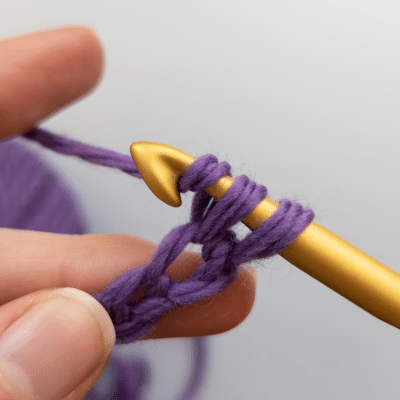
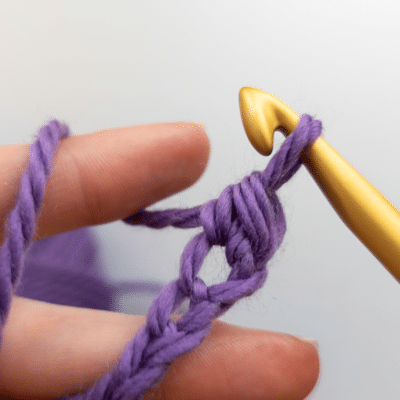
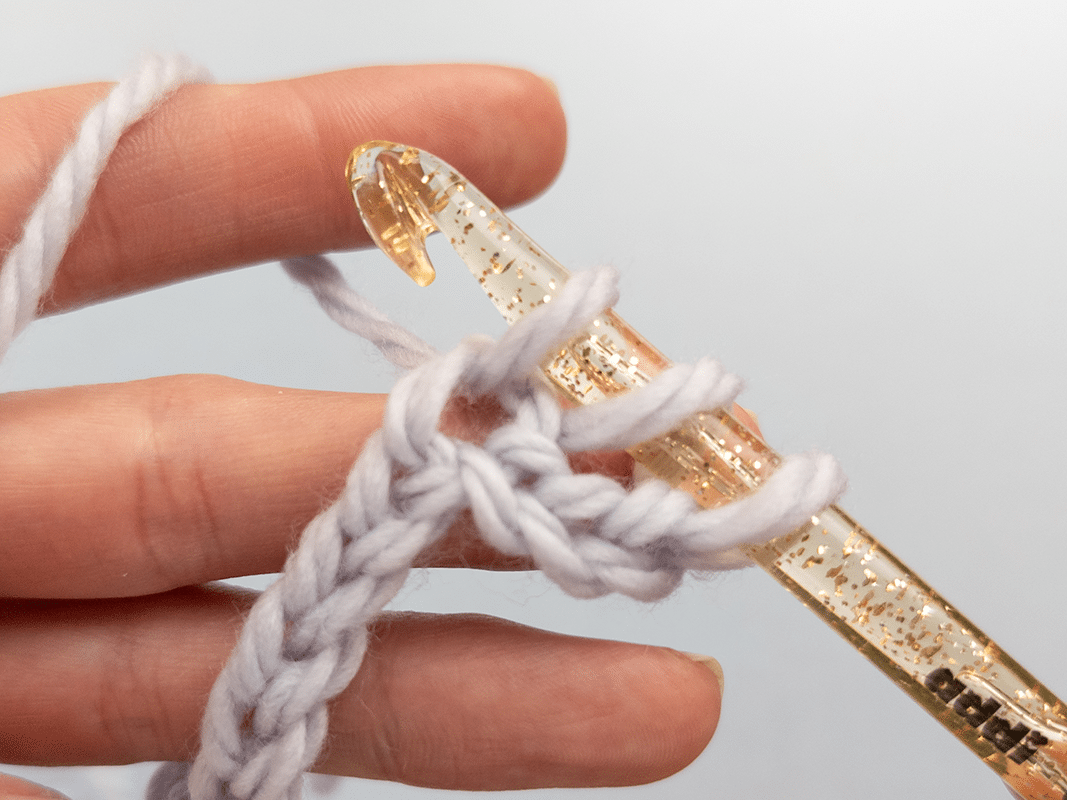
Double crochet (dc) – step by step
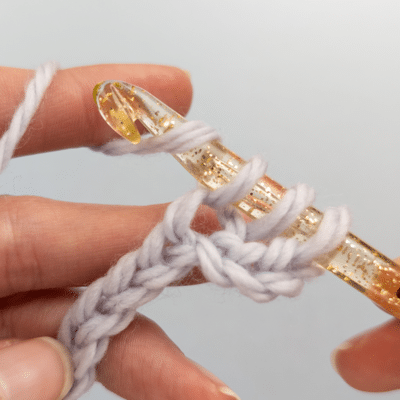
Step 1: To make a double crochet, first crochet three turning chains. The yarn is placed around the crochet hook as a yarn over (from back to front) and then inserted into the fourth chain stitch.
Step 2: Place the yarn around the crochet hook and pull it through the first stitch. There should now be three loops on the crochet hook.
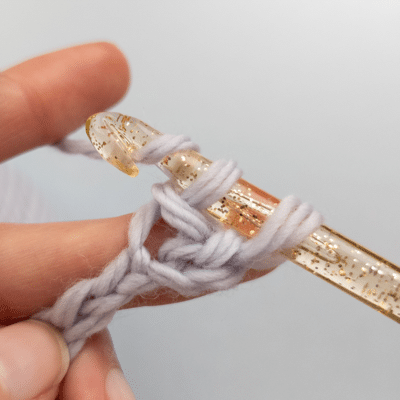
Step 3: Place the working yarn around the crochet hook again and pull it through the first two stitches. There should now be two loops on the crochet hook.
Step 4: Place the yarn around the crochet hook again and pull it through the last two stitches. The first double crochet is finished.
Repeat these steps from the yarn over in step 1 until the desired number of trebles has been worked.
Crochet further rows: Soll die Reihe Stäbchen um weitere Reihen ergänzt werden, werden am Ende der Reihe drei Wendeluftmaschen gearbeitet. Dann wird die Arbeit gewendet und in jede Masche der vorherigen Reihe wieder ein Stäbchen gehäkelt.

Double crochet (dc) – step by step
Step 1: To make a double crochet, first crochet three turning chains. The yarn is placed around the crochet hook as a yarn over (from back to front) and then inserted into the fourth chain stitch.
Step 2: Place the yarn around the crochet hook and pull it through the first stitch. There should now be three loops on the crochet hook.
Step 3: Place the working yarn around the crochet hook again and pull it through the first two stitches. There should now be two loops on the crochet hook.
Step 4: Place the yarn around the crochet hook again and pull it through the last two stitches. The first double crochet is finished.
Repeat these steps from the yarn over in step 1 until the desired number of trebles has been worked.
Crochet further rows: Soll die Reihe Stäbchen um weitere Reihen ergänzt werden, werden am Ende der Reihe drei Wendeluftmaschen gearbeitet. Dann wird die Arbeit gewendet und in jede Masche der vorherigen Reihe wieder ein Stäbchen gehäkelt.
What are treble crochets?
The previous sections explained how to crochet half double crochets and double crochets. Treble crochets (US) or double treble (UK) are the next step if you want an even looser and airier stitch pattern. They are ideal for softly draping scarves, airy triangular shawls or other crochet projects that need to look particularly light and flowing.
This type of stitch is a little more challenging than single crochet or half double crochet, as several steps are required to complete it. However, with the right instructions, even beginners can easily master treble crochet.
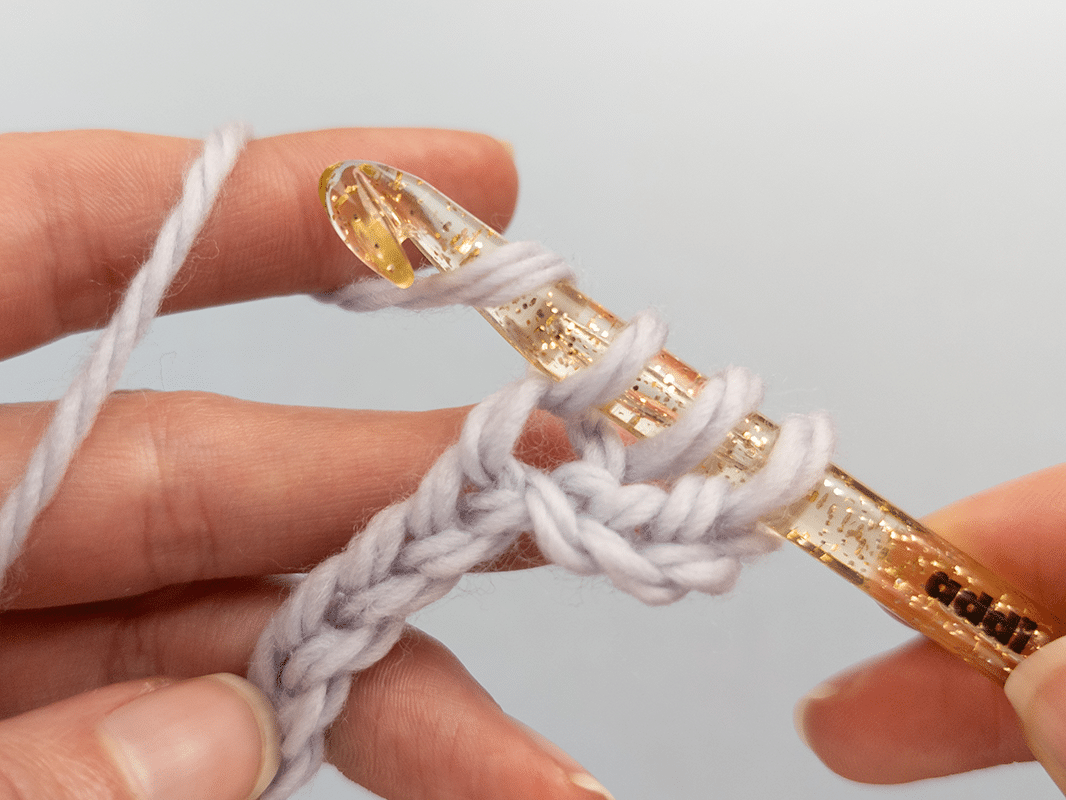
Treble crochets (tr) – step by step
For a double crochet, three turning chains are crocheted to equalize the height of the double crochet.
Step 1: Two yarn overs
The yarn is then wrapped around the crochet hook twice as a double crochet yarn over (from back to front) and then inserted into the fourth chain stitch.
Step 2: Insert into the fourth chain.
Place the yarn around the crochet hook and pull it through the first stitch. There should now be four loops on the crochet hook.
Step 3: Cast off the first yarn over
Place the yarn around the crochet hook again and pull it through two stitches.
There should now be three loops on the crochet hook.
Step 4: Cast off the second yarn over
Pick up the yarn again and pull it through the next two loops.
There are now two loops left.
Part 5: Work the last two stitches
Pick up the yarn one last time and pull it through the last two loops. There is now one loop left.


What are slip stitches?
Slipped stitches are the smallest stitches and are used to create a neat finish or to join individual crochet pieces together. They are recognizable by their particularly firm and low structure, which fits closely to the crocheted piece and ensures a compact and even result.
Thanks to their versatility, slip stitches are indispensable, whether to get to a specific point in the work without affecting the look of the crocheted piece or to create decorations such as borders. Slipped stitches are easy to learn and considerably expand the possibilities when crocheting.
Slip stitches (sl st) – step by step
Step 1: Inserting into the stitch
The crochet hook is inserted into the stitch in which the slip stitch is to be worked.
Step 2: Pick up the yarn
Pick up the working yarn with the crochet hook and pull it through both stitches. There should now be a loop on the hook again.
The slip stitch is finished.
Tips for crocheting chain stitches:
Slipped stitches are ideal for finishing off round crochet work, creating decorative edges or securing stitches. To do this, crochet just two slip stitches and then pull the end thread through and sew. It is particularly important to insert the slip stitch in the right place at the end of the round in order to achieve an even stitch pattern.


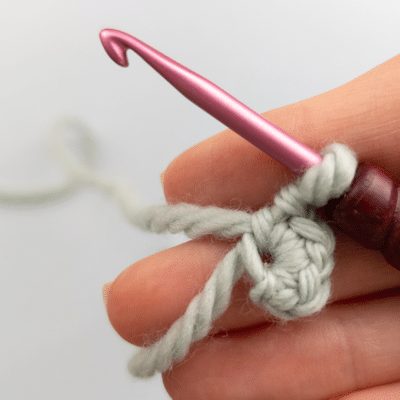
What is a magic ring?
A magic ring is the starting point for crocheting when working in rounds. It is often referred to as a “magic ring” or “flexible ring” in instructions. The magic ring is indispensable for round crochet projects such as coasters or amigurumi. If the magic ring still seems a little too difficult, an air stitch ring can be crocheted as an alternative. Both variants provide a stable basis for working in rounds.
Magic Ring (MR)
– step by step
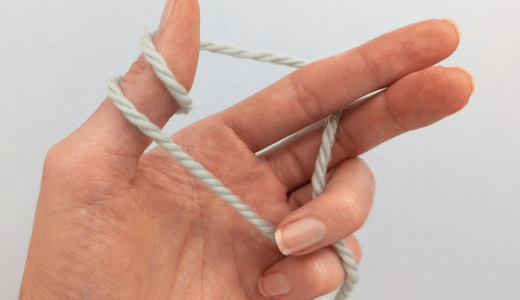
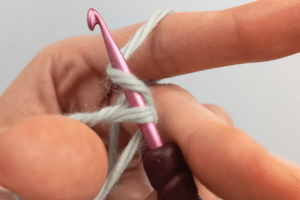
Step 1: Loosely wrap the yarn around your thumb (hold the end thread at the front) and then hold the working thread with your index finger. Find a position that suits you.
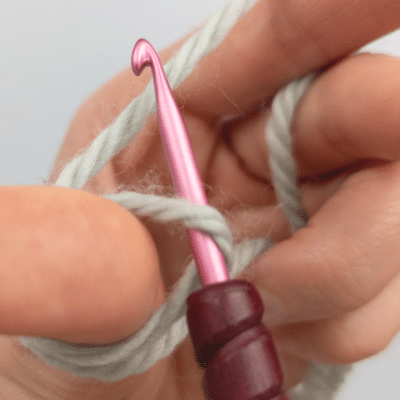
Step 2: Insert the crochet hook from top to bottom along the thumb into the yarn ring (yarns wrapped around the thumb).
Pull the yarn above the ring through the yarn ring with the crochet hook. This creates a first loop on the crochet hook.
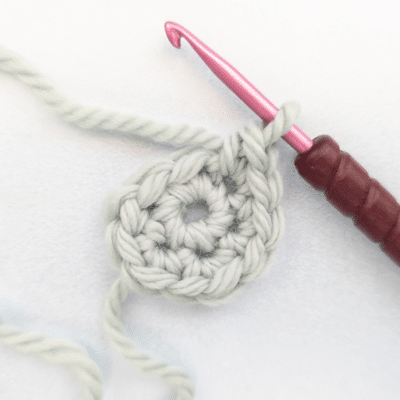
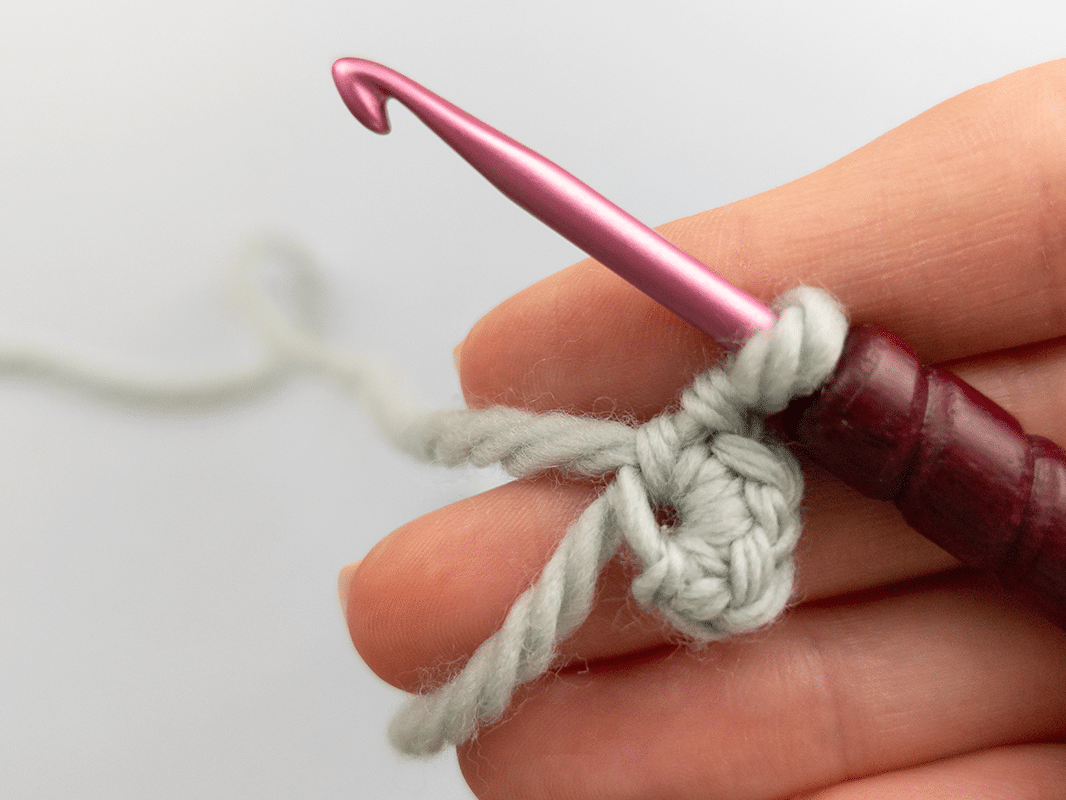
Step 3: Pull the back yarn through the loop again with the crochet hook. Crochet several half treble crochets around the yarn ring (about 6 stitches are needed to complete the circle).
Continue working with the magic ring
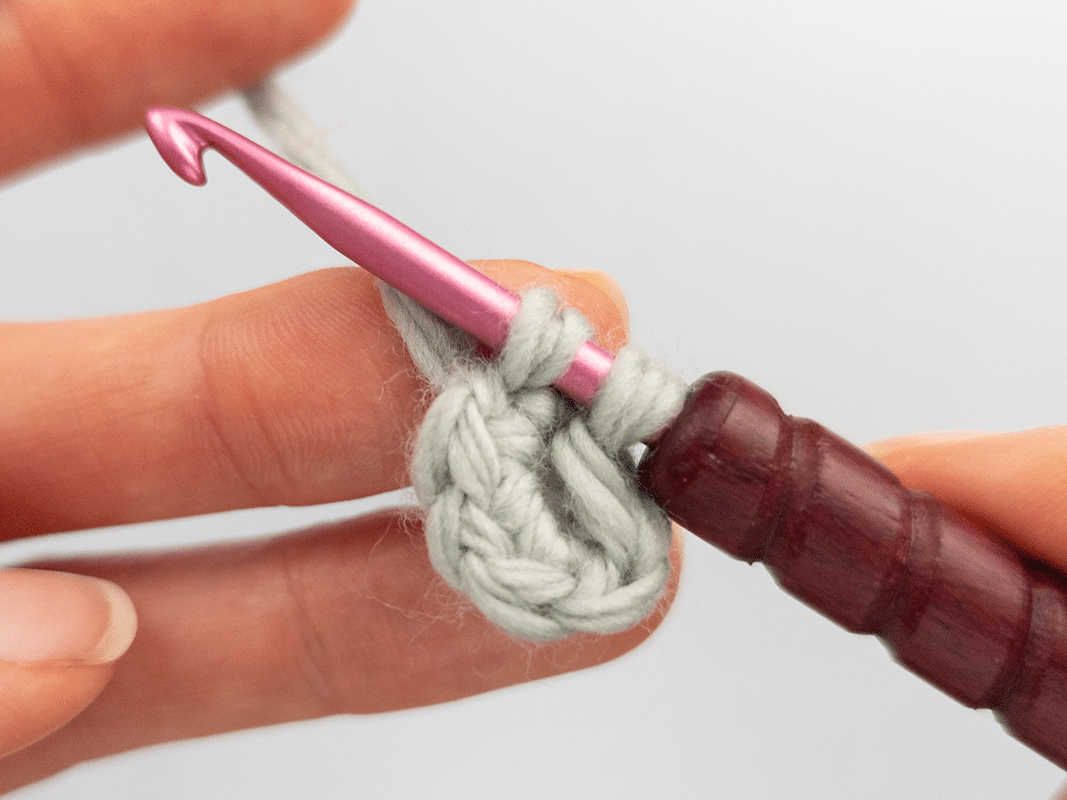
Step 4: Work stitches in the magic ring according to the instructions. Crochet around both yarns.
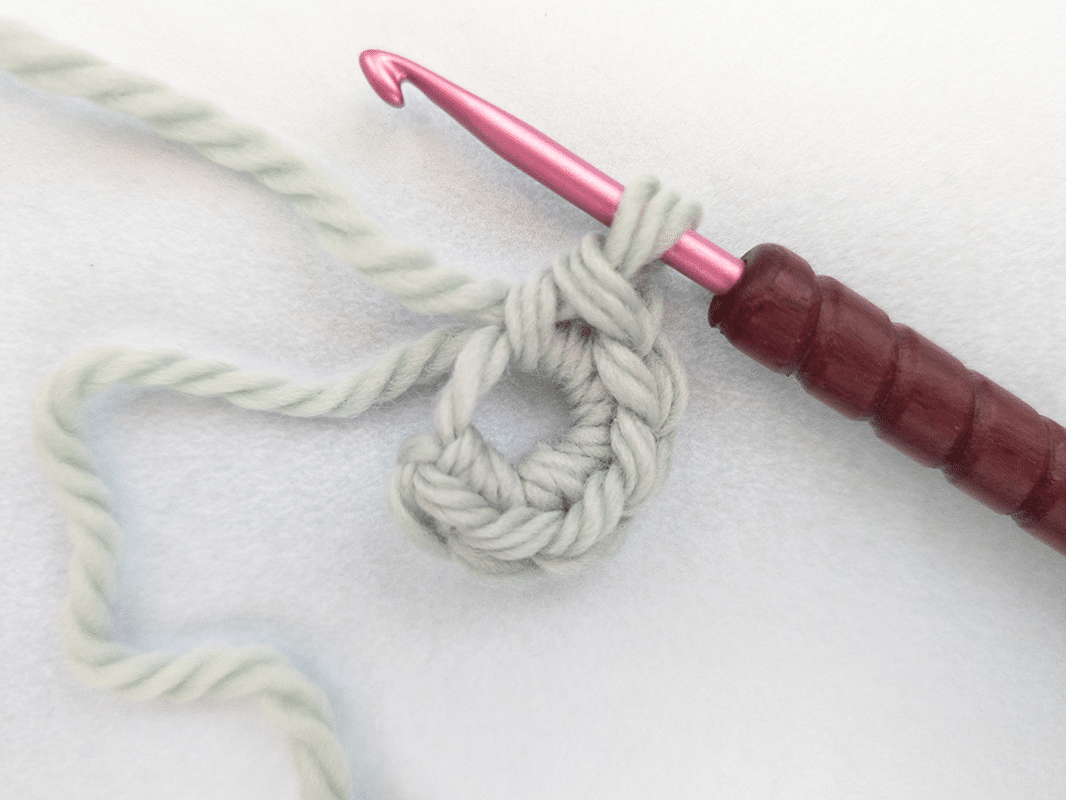
Step 5: Once the desired number of stitches has been reached in the yarn ring, lift it from the thumb. Pull it together and finish the ring with a slip stitch.
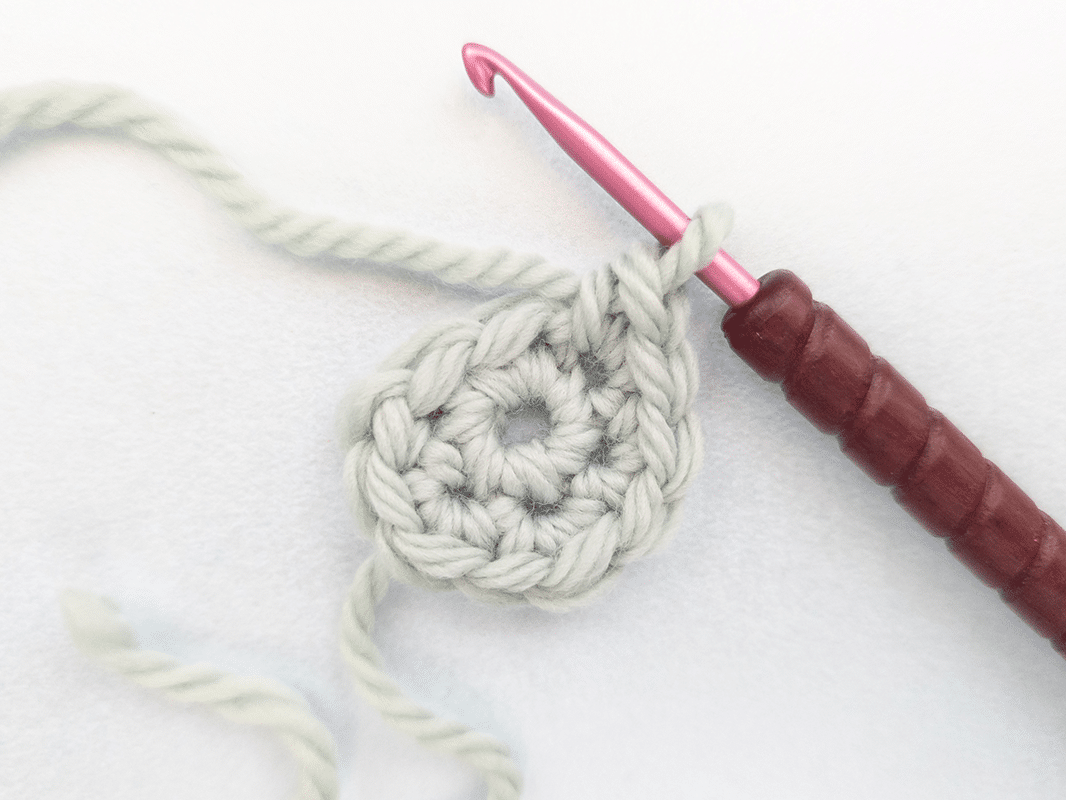
Step 6: To close the yarn ring into a circle and continue crocheting according to the instructions, you can now crochet into each of the 6 stitches worked in the yarn ring.
Tip: Depending on the tutorial, you can also crochet other stitches in the yarn ring, such as double crochet.
Magic Ring (MR)
– step by step
Step 1: Loosely wrap the yarn around your thumb (hold the end thread at the front) and then hold the working thread with your index finger. Find a position that suits you.
Step 2: Insert the crochet hook from top to bottom along the thumb into the yarn ring (yarns wrapped around the thumb).
Pull the yarn above the ring through the yarn ring with the crochet hook. This creates a first loop on the crochet hook.
Step 3: Pull the back yarn through the loop again with the crochet hook. Crochet several half treble crochets around the yarn ring (about 6 stitches are needed to complete the circle).
Continue working with the magic ring
Step 4: Work stitches in the magic ring according to the instructions. Crochet around both yarns.
Step 5: Once the desired number of stitches has been reached in the yarn ring, lift it from the thumb. Pull it together and finish the ring with a slip stitch.
Step 6: To close the yarn ring into a circle and continue crocheting according to the instructions, you can now crochet into each of the 6 stitches worked in the yarn ring.
Tip: Depending on the tutorial, you can also crochet other stitches in the yarn ring, such as double crochet.
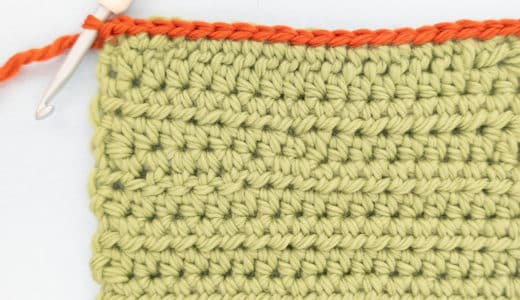
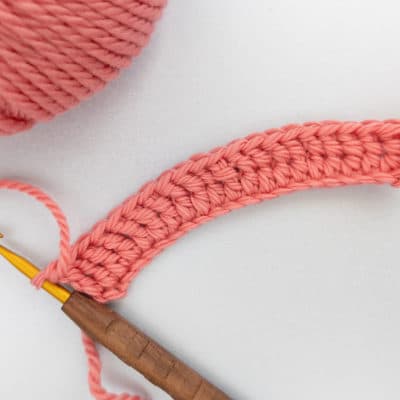
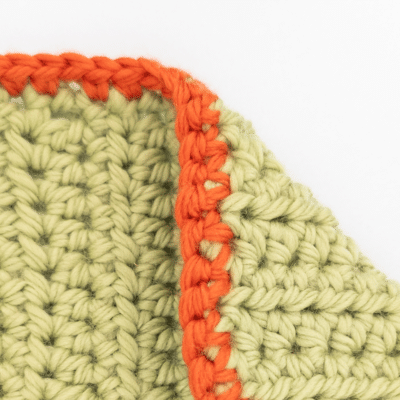
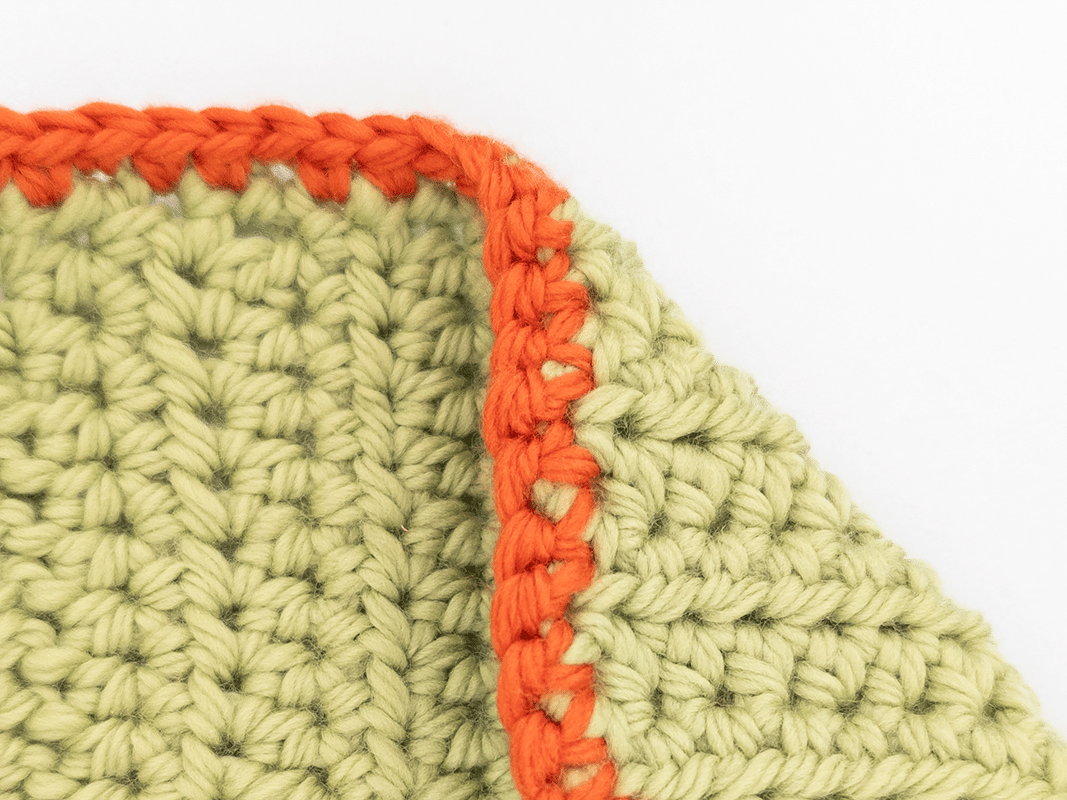
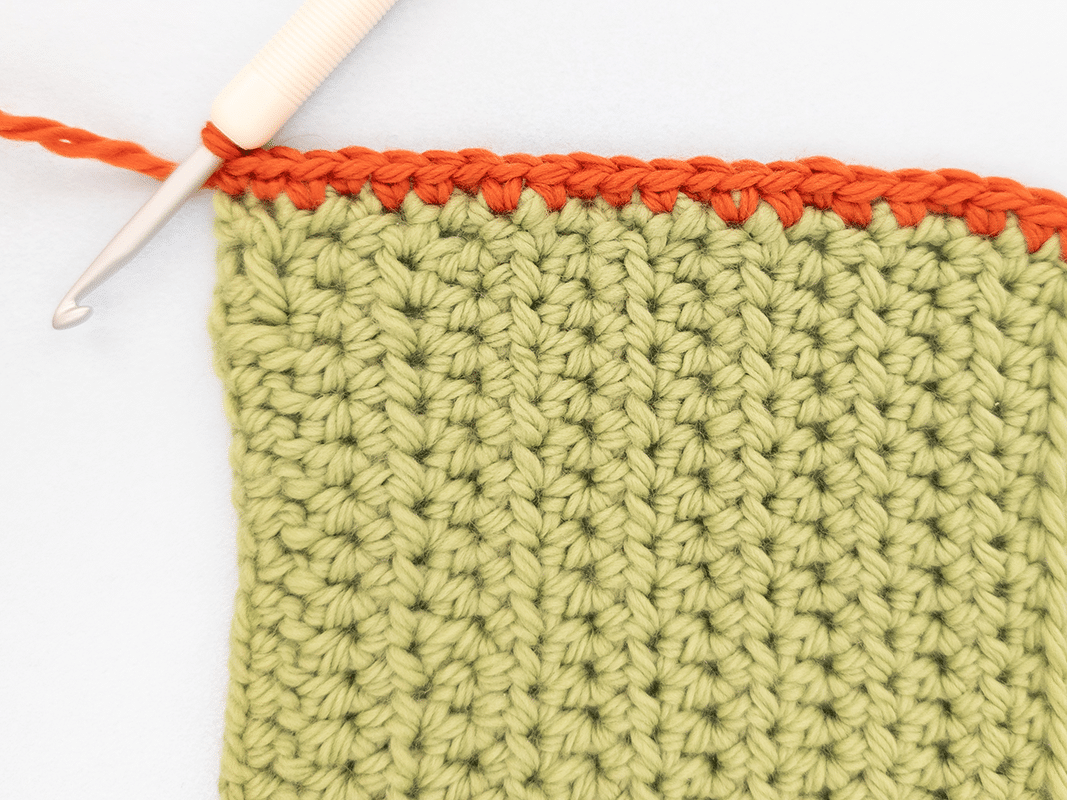
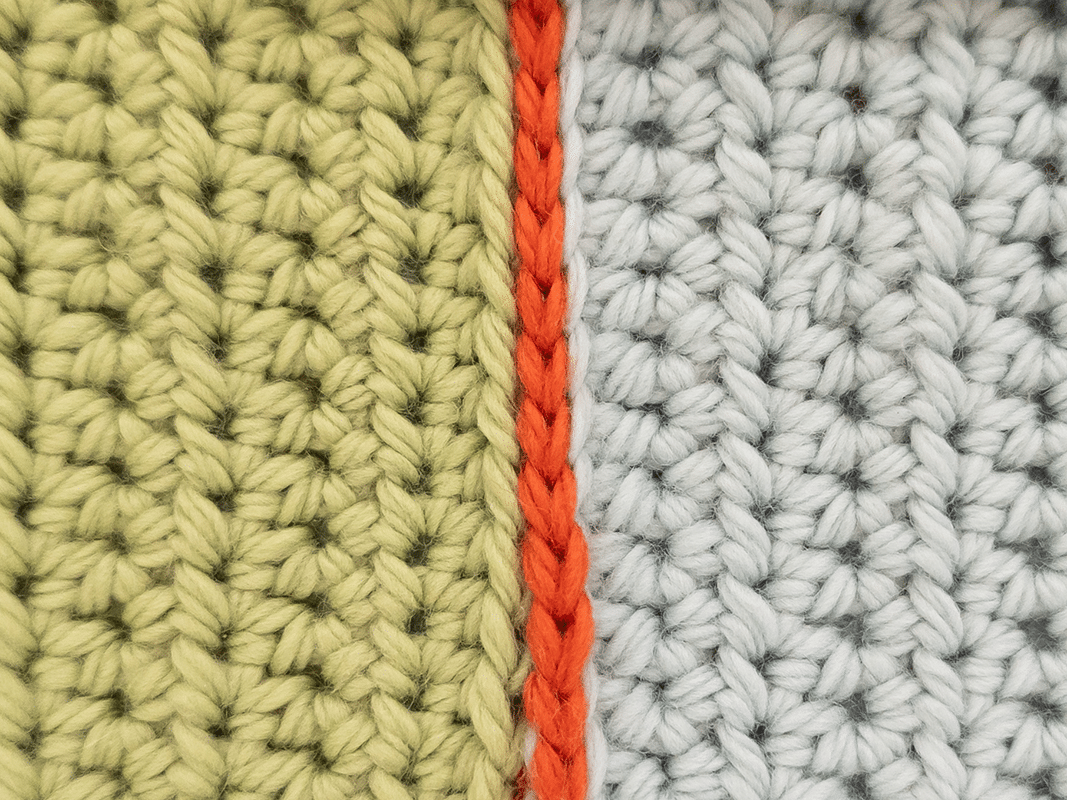
Edge stitches - beautiful edges with crochet
The edges and borders of crochet projects can be edged decoratively by crocheting around them, e.g. in the color of the project or with a contrasting color, especially on the side edges.
Combining several crocheted pieces, such as granny squares, can also be done quickly and beautifully by simply crocheting them together.
Several crochet techniques and stitch types can be used for this.
Crochet around edges
– step by step
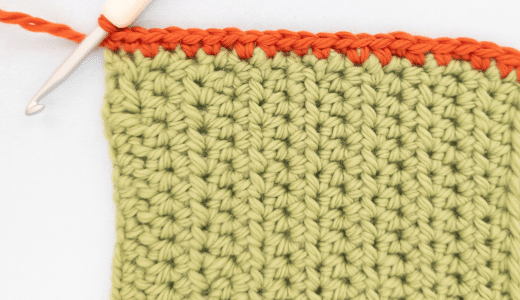
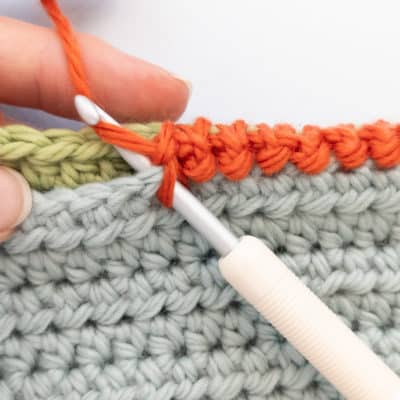
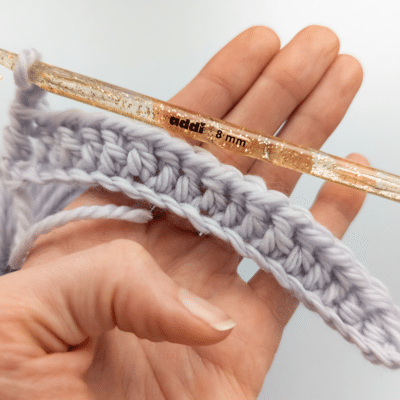
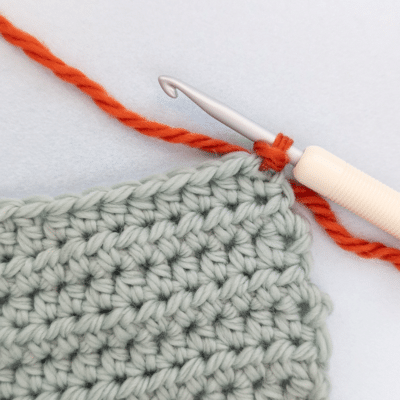
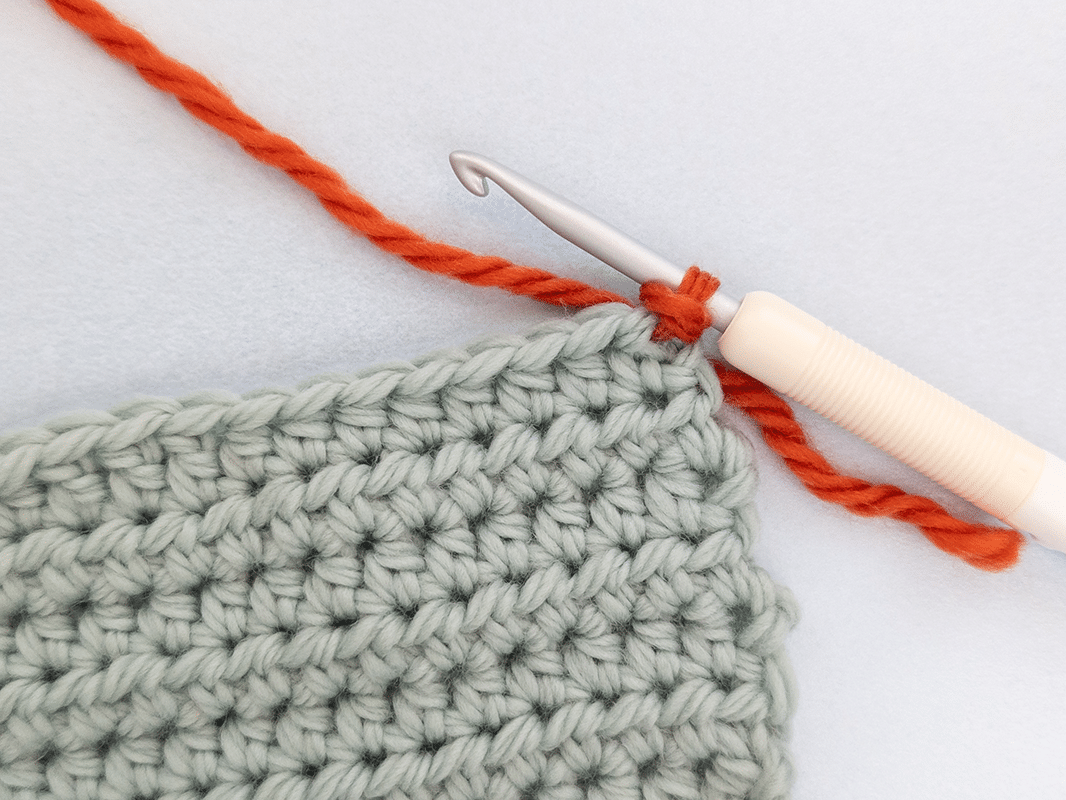
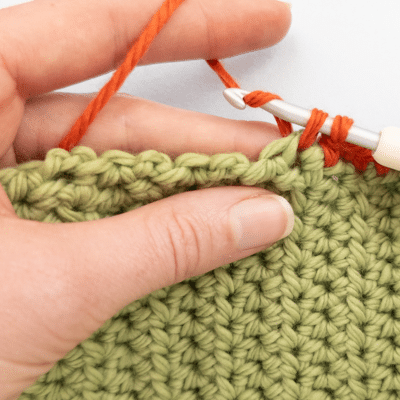
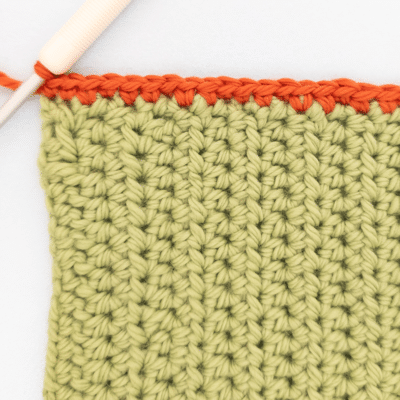
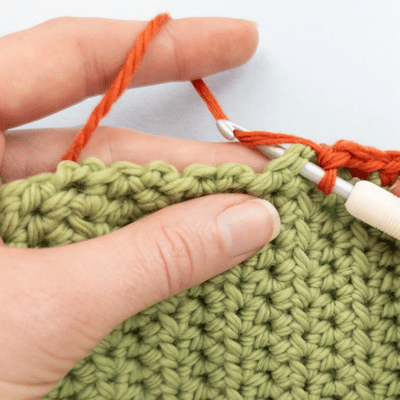
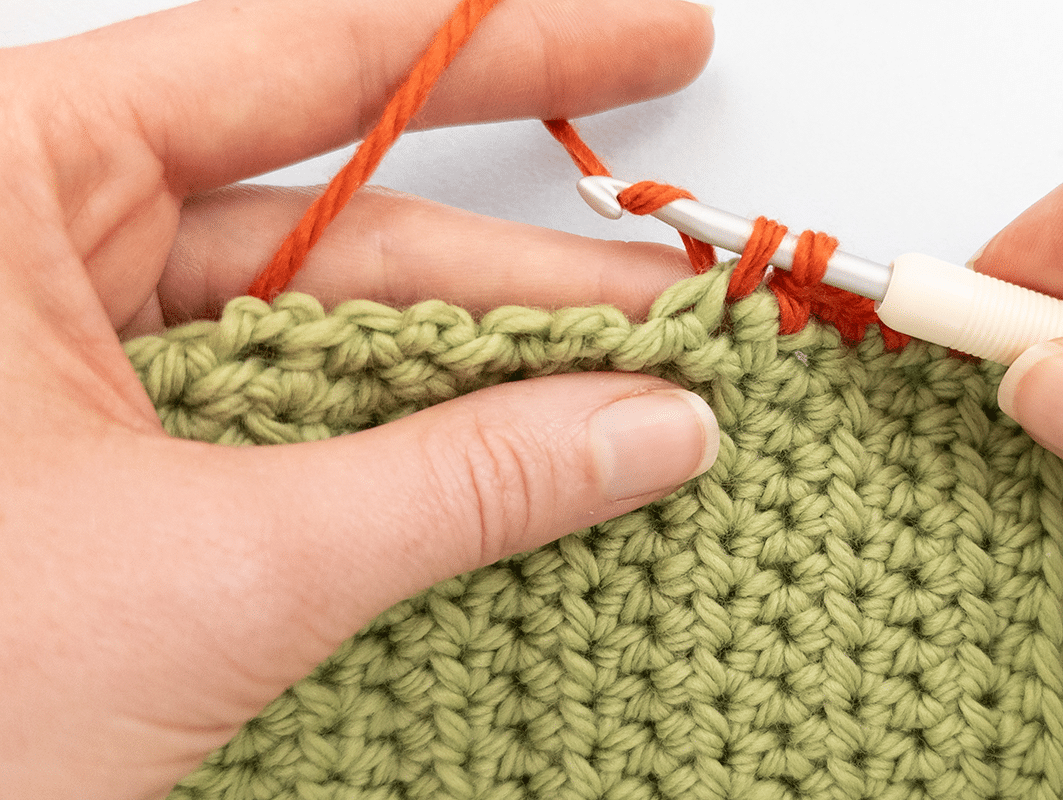
Edge made from half treble crochet:
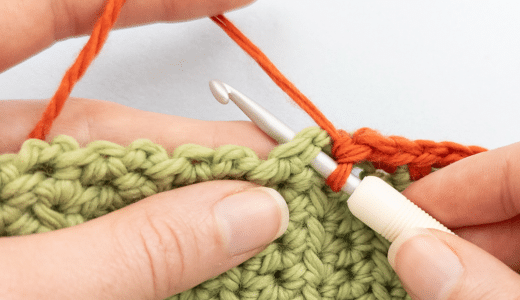
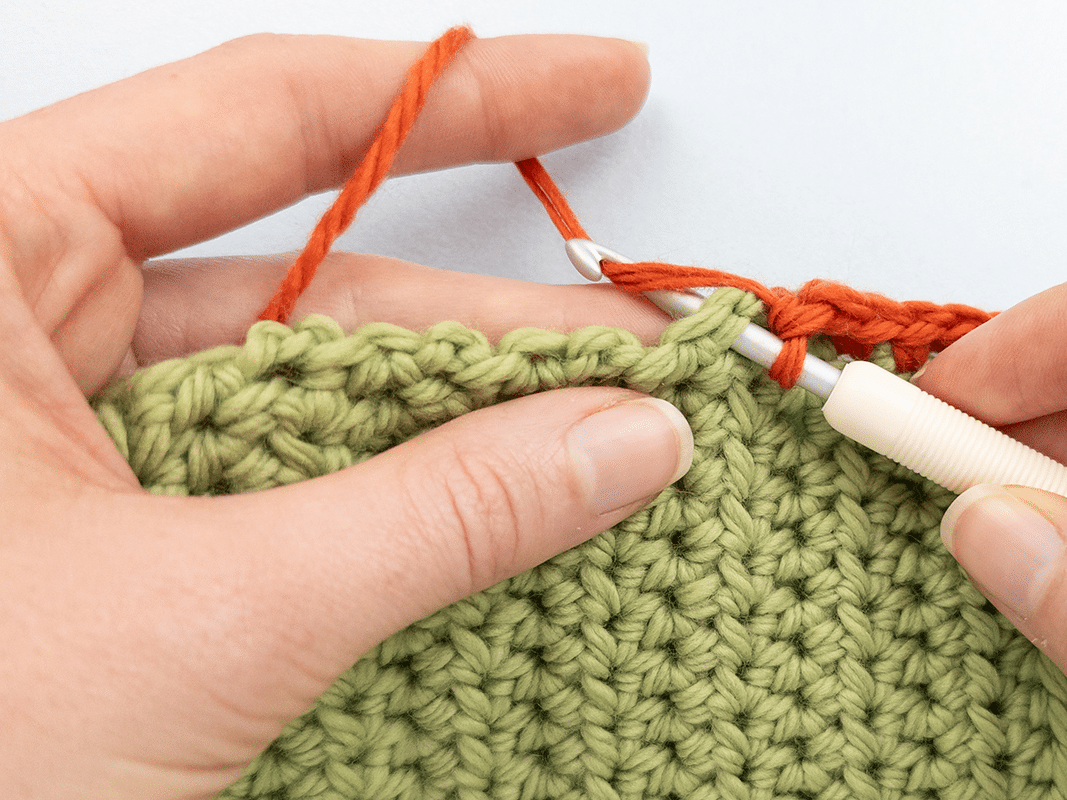
Step 1: Insert the crochet hook from front to back through the edge of the crocheted piece. Do not pierce a specific stitch, but the entire edge. The needle should be inserted about 2-3 mm from the edge.
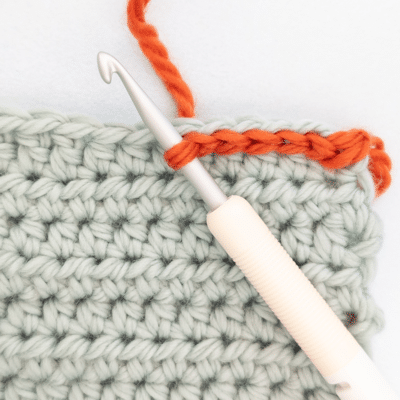
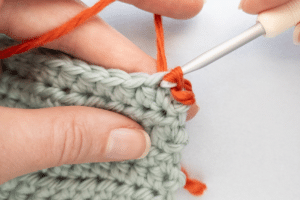
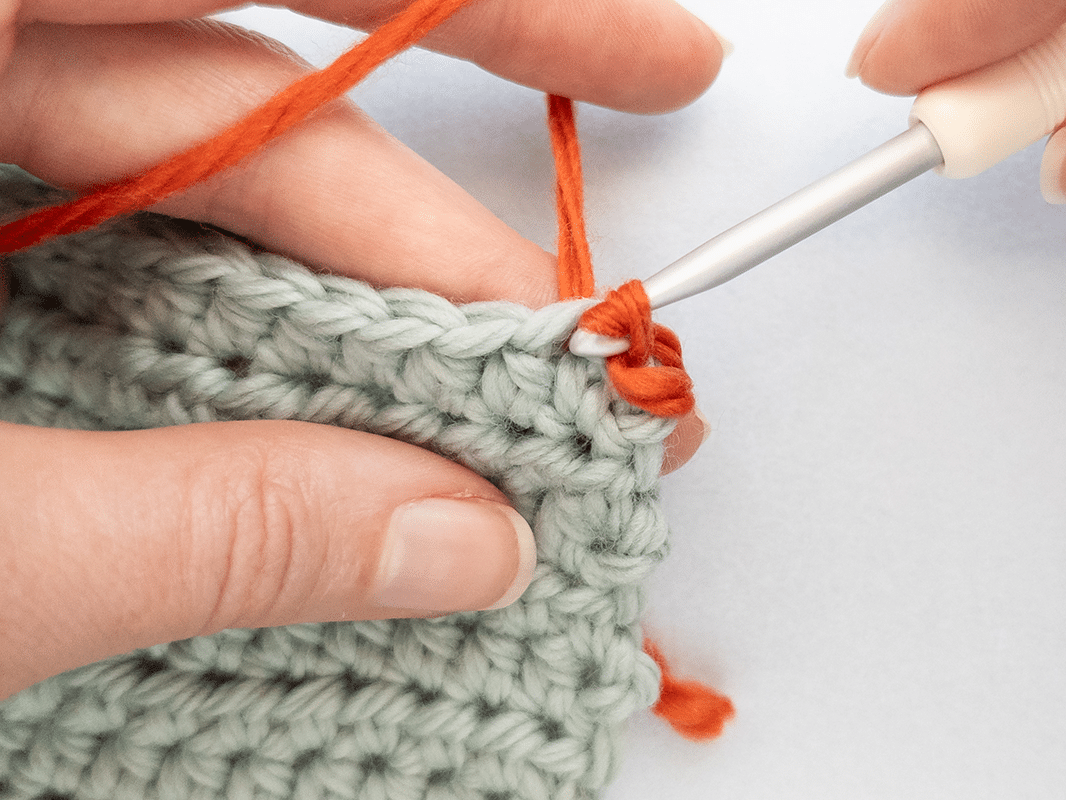
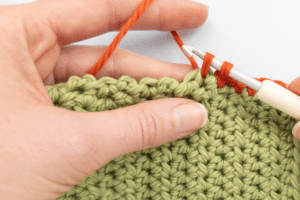
Step 2: Pick up the yarn
Place the working yarn around the crochet hook and pull it forward through the edge. There is now a loop on the hook and another loop that has been pulled through the edge - a total of two loops on the crochet hook.
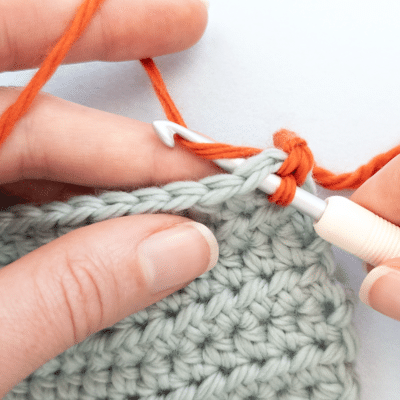
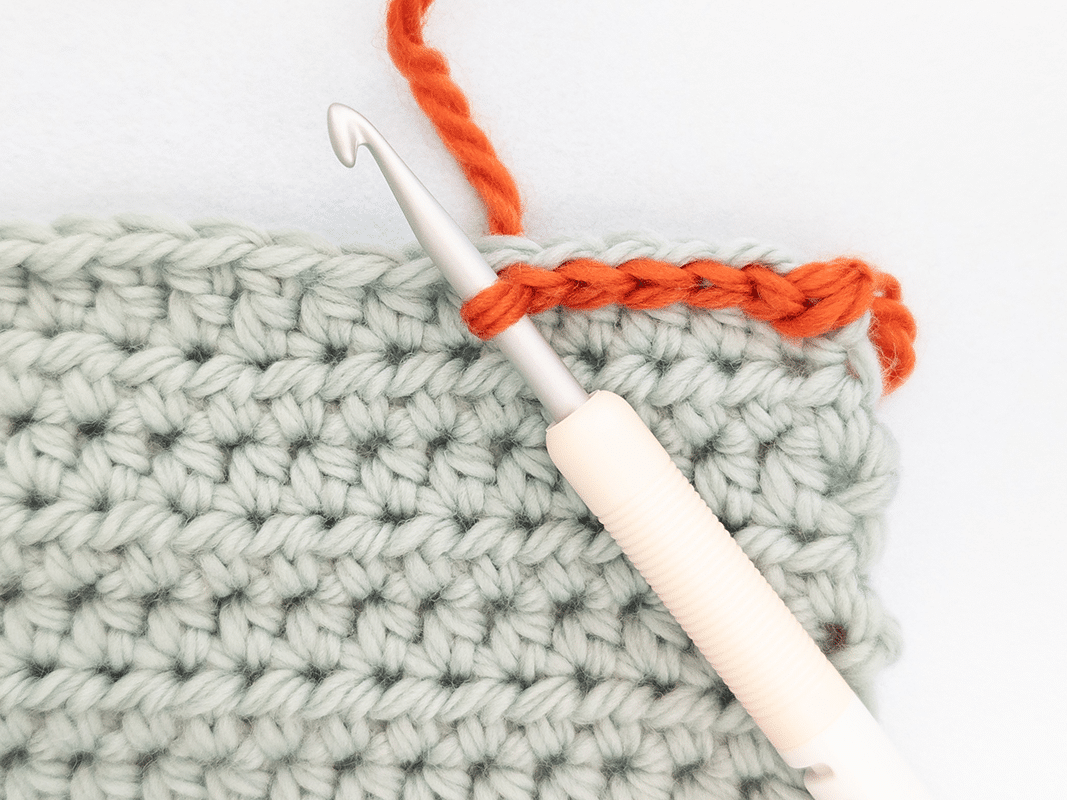
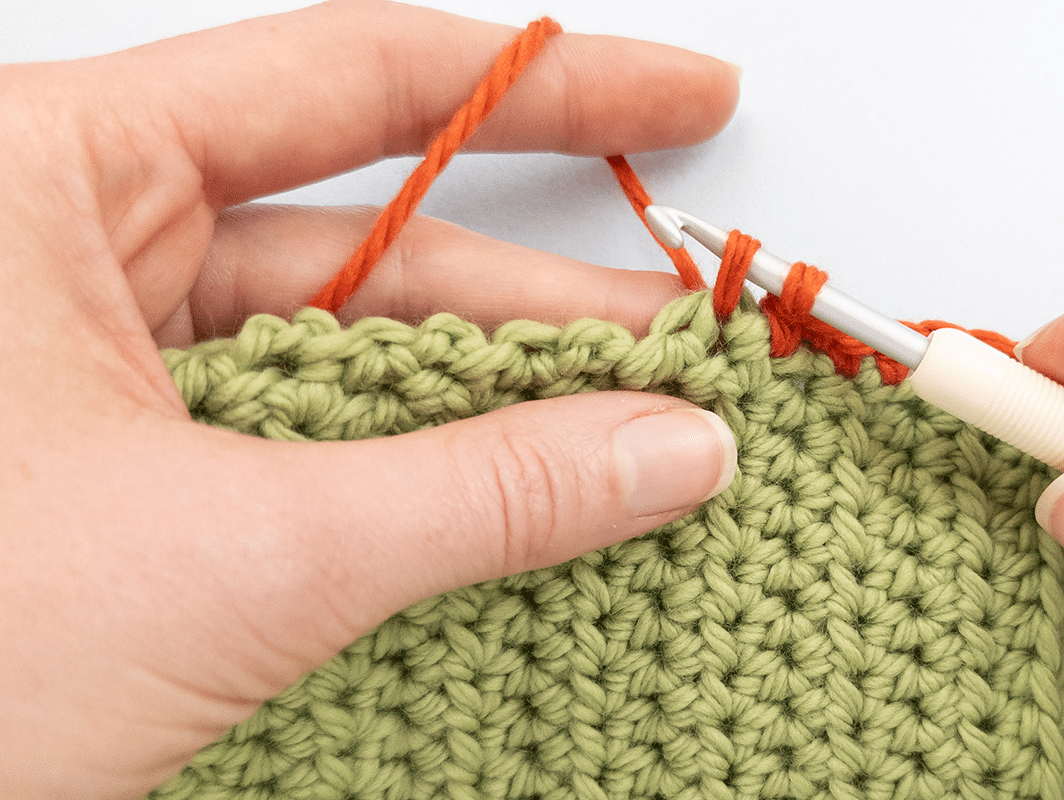
Step 3: Pick up the yarn again and pull it through both loops on the hook.
Repeat along the entire edge, making sure that the stitches are evenly spaced.
Tips for more edge stitches:
Edge stitches with different looks can be created by using other types of stitches. How to do this and how it can look is described in the article:
Crochet around edges
– step by step
Edge made from half treble crochet:
Step 1: Insert the crochet hook from front to back through the edge of the crocheted piece. Do not pierce a specific stitch, but the entire edge. The needle should be inserted about 2-3 mm from the edge.
Step 2: Pick up the yarn
Place the working yarn around the crochet hook and pull it forward through the edge. There is now a loop on the hook and another loop that has been pulled through the edge - a total of two loops on the crochet hook.
Step 3: Pick up the yarn again and pull it through both loops on the hook.
Repeat along the entire edge, making sure that the stitches are evenly spaced.
Tips for more edge stitches:
Edge stitches with different looks can be created by using other types of stitches. How to do this and how it can look is described in the article:

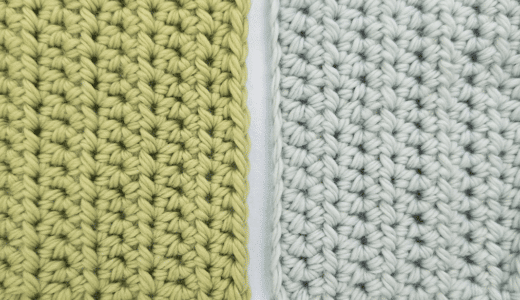
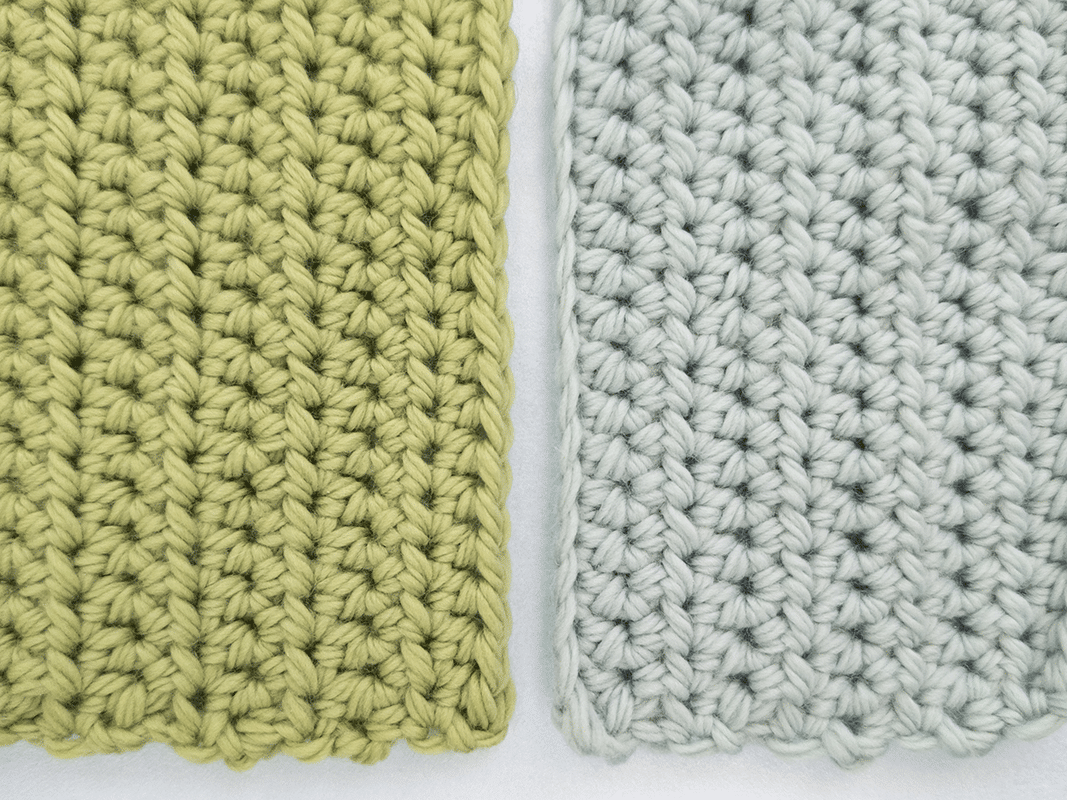
Crocheting pieces together
Once granny squares, individual pieces for a garment or pattern pieces have been crocheted, they need to be joined together.
This is very easy and relaxed with a crochet hook and a matching yarn or a contrasting color as a highlight.
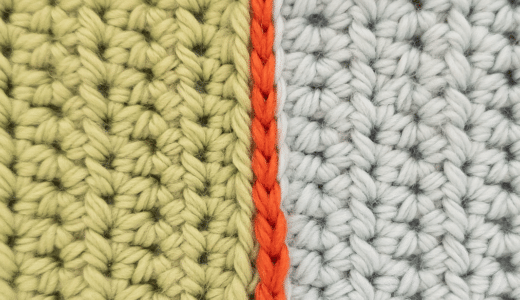
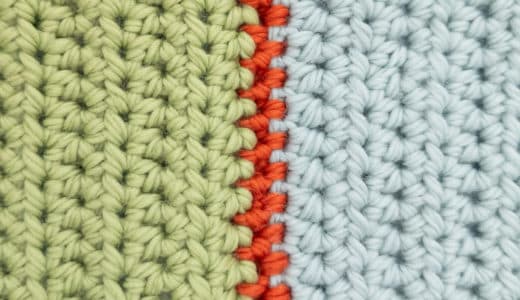
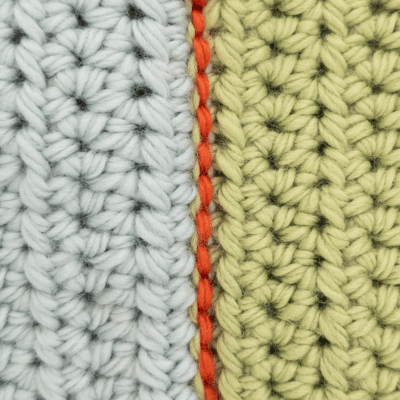
The connection with slip stitches results in a flat and sturdy connection.
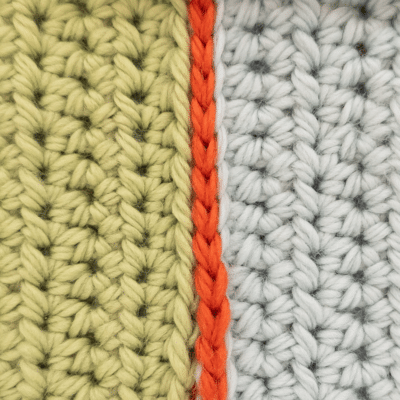
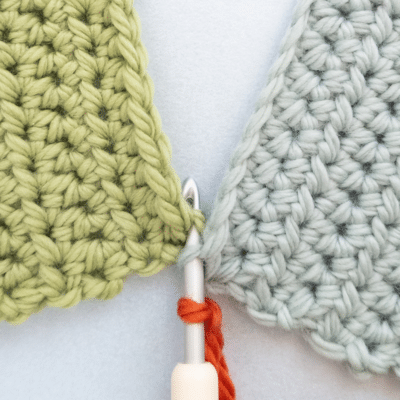
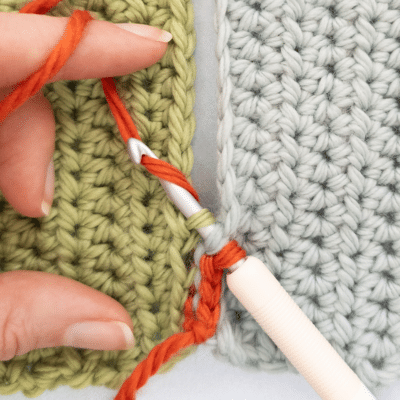
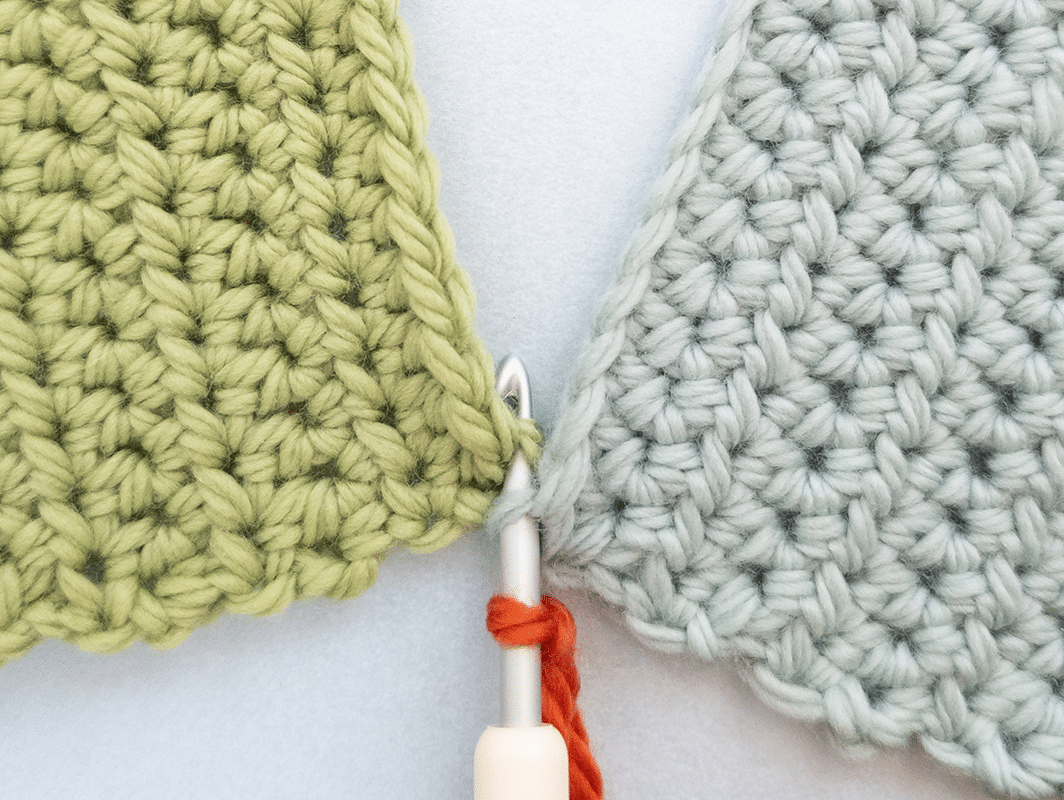
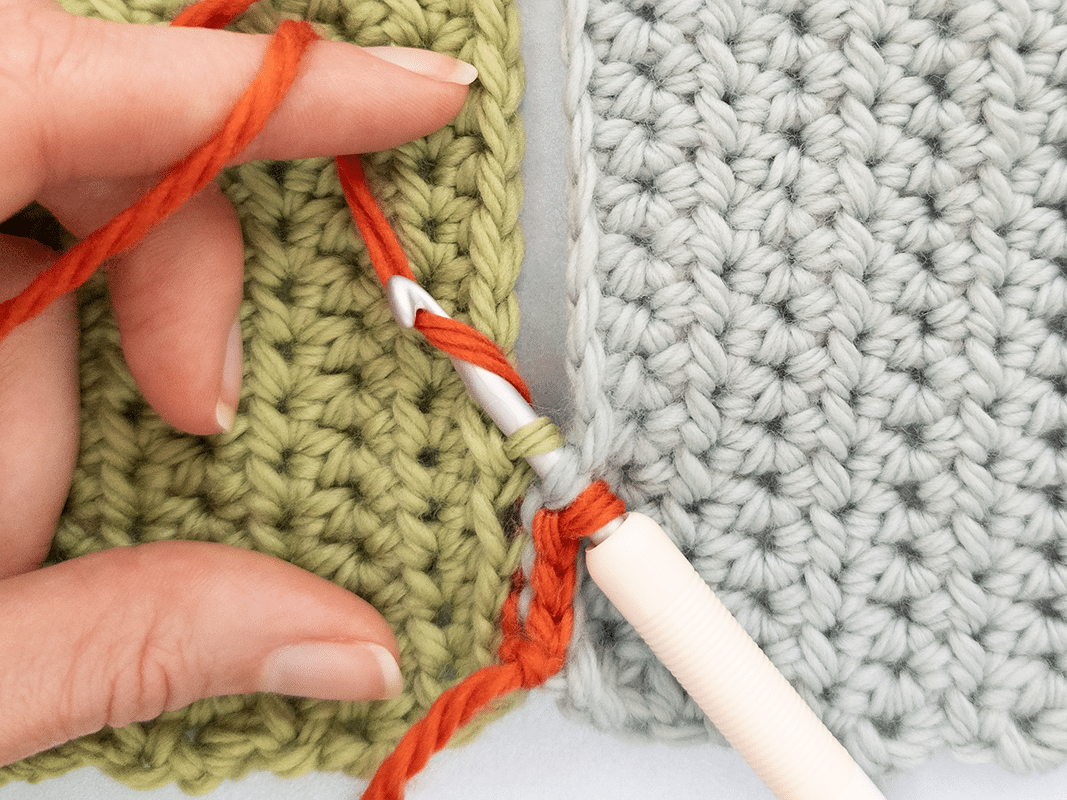
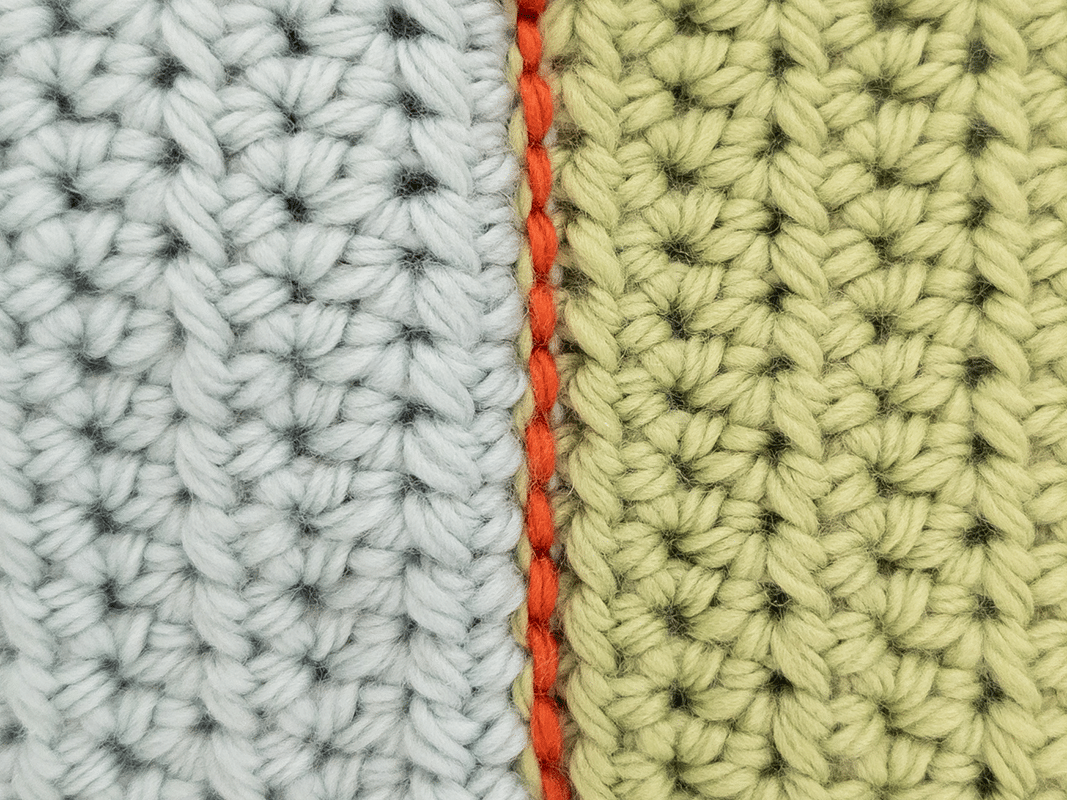
Crocheting pieces together
– with slip stitches
This makes it easy to join two parts together:
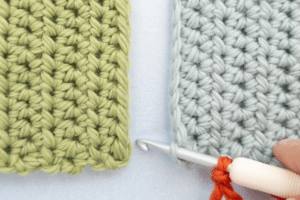
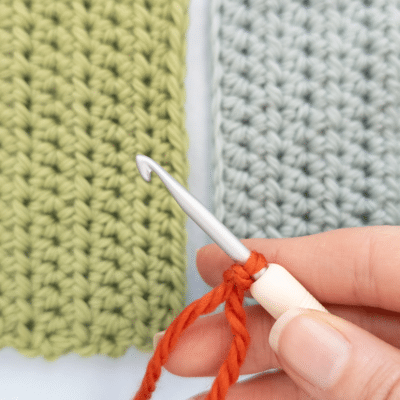
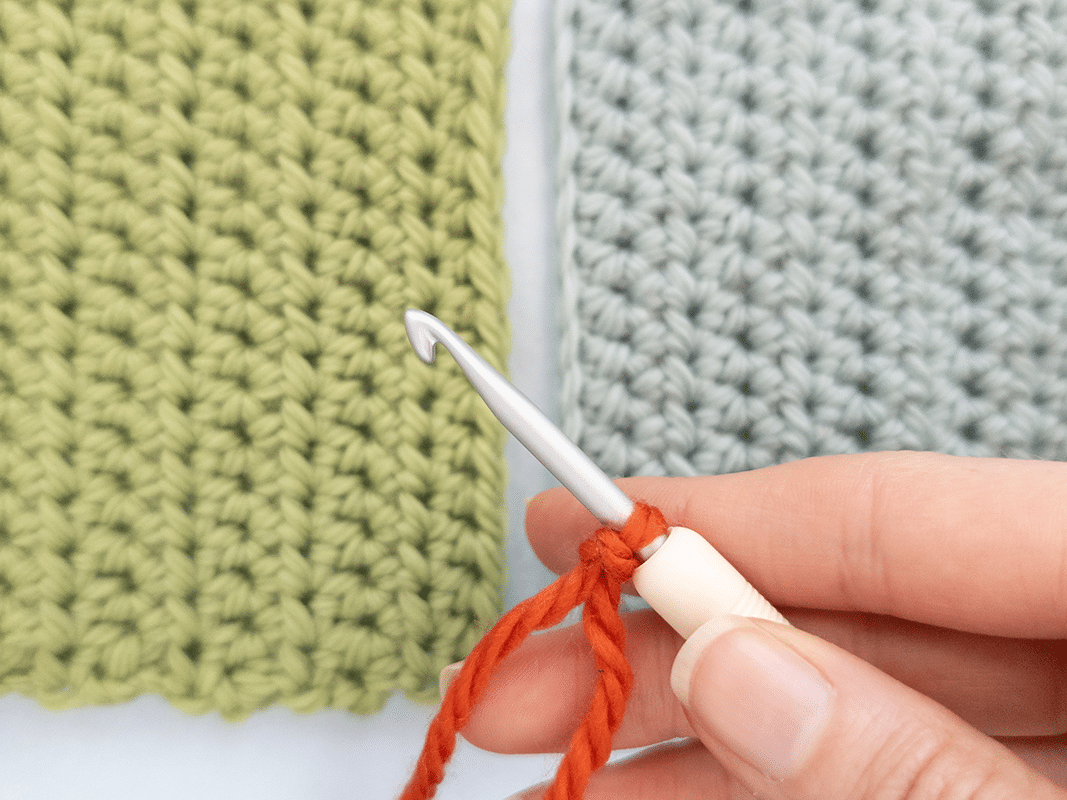
Step 1: Place the two crochet pieces that are to be joined next to each other.
Step 2: Place the starting loop with the connecting yarn on the crochet hook.
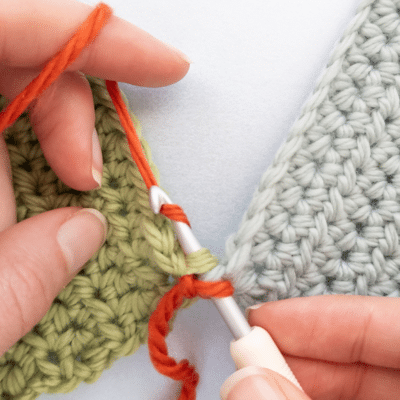
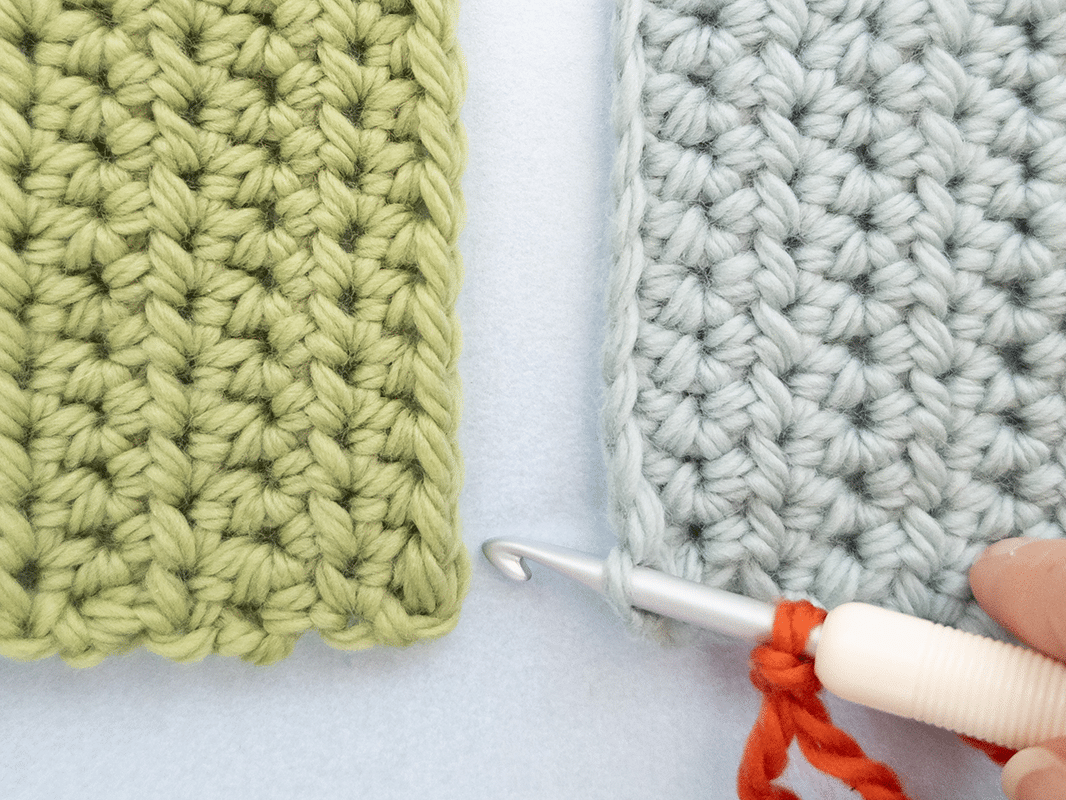
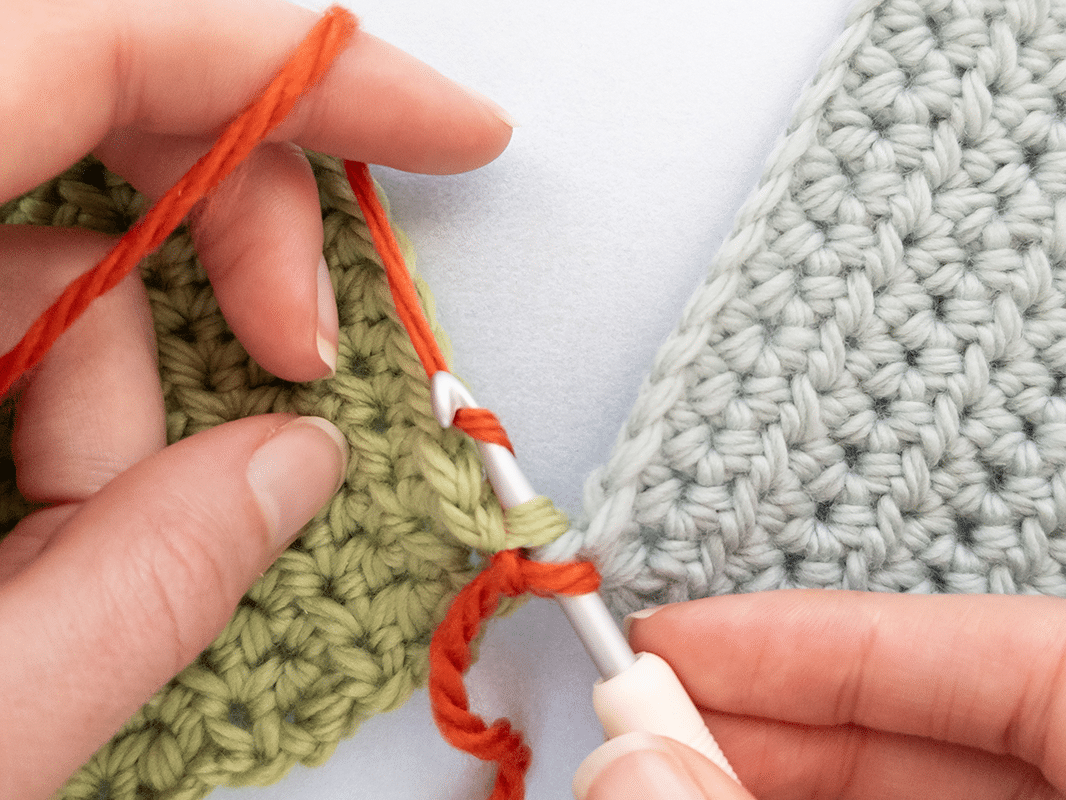
Step 3: Insert the crochet hook from top to bottom into the back yarn of each edge stitch.
The yarn is always pulled behind the stitches and the parts to be joined.
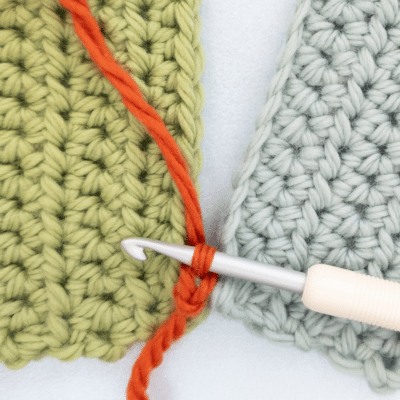
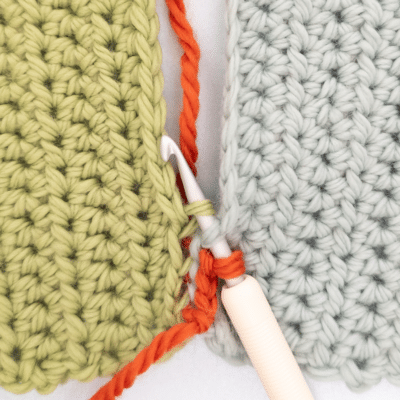
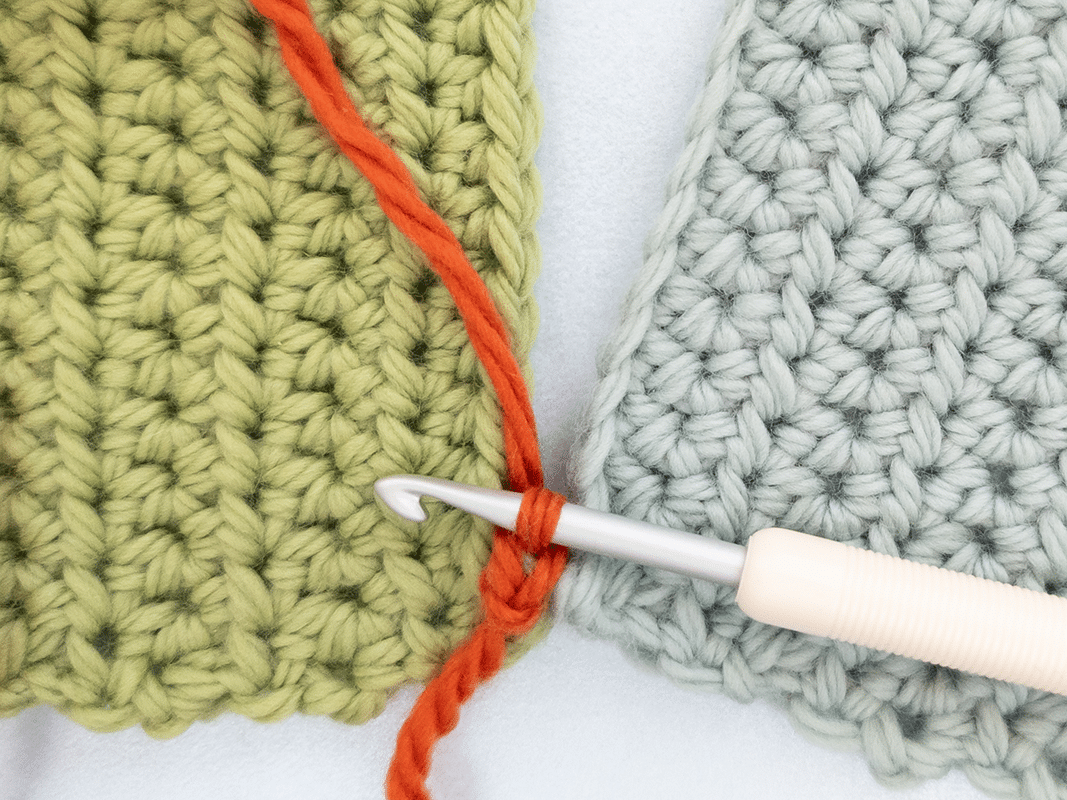
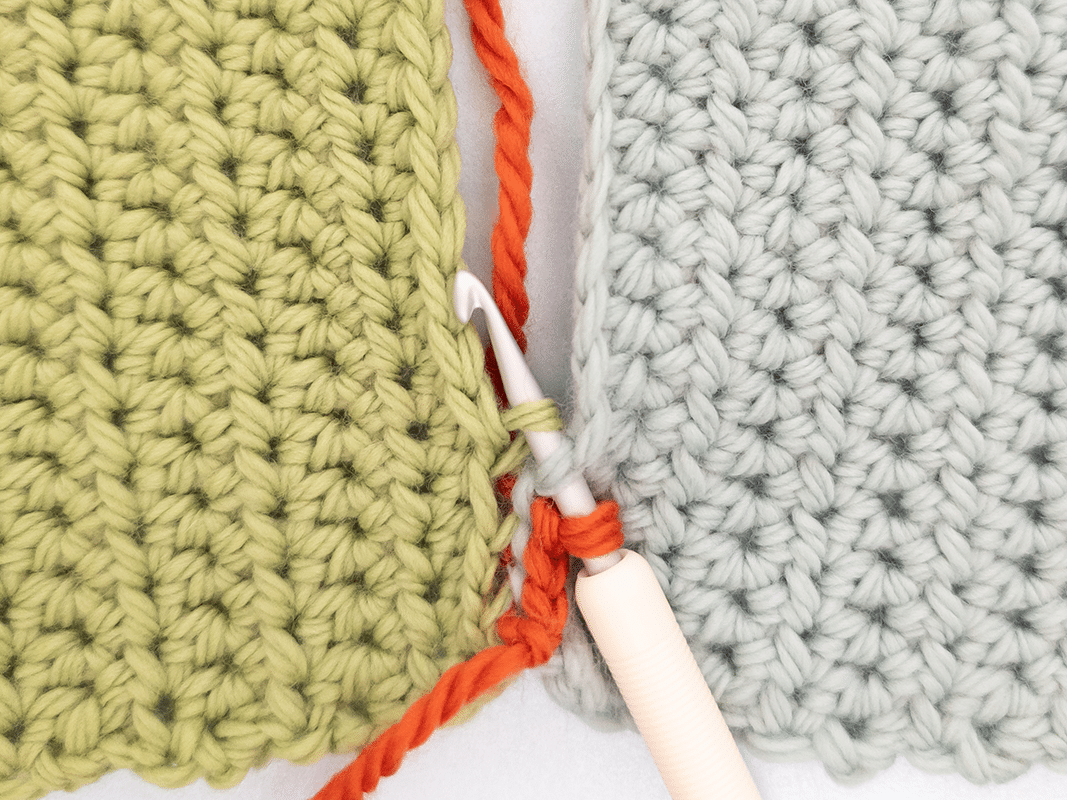
Step 4: The yarn is placed around the crochet hook and pulled through all three stitches on the hook.
These steps (1-4) are continued along the entire edge to be joined until both parts are completely joined together.
Tips for other types of joining with the crochet hook:
Joining two pieces with a crochet hook can be created by using other techniques. How to do this and how it can look is described in the article:
Crocheting pieces together
– with slip stitches
This makes it easy to join two parts together:
Step 1: Place the two crochet pieces that are to be joined next to each other.
Step 2: Place the starting loop with the connecting yarn on the crochet hook.
Step 3: Insert the crochet hook from top to bottom into the back yarn of each edge stitch.
The yarn is always pulled behind the stitches and the parts to be joined.
Step 4: The yarn is placed around the crochet hook and pulled through all three stitches on the hook.
These steps (1-4) are continued along the entire edge to be joined until both parts are completely joined together.
Tips for other types of joining with the crochet hook:
Joining two pieces with a crochet hook can be created by using other techniques. How to do this and how it can look is described in the article:
Learn to crochet easily with creative instructions for beginners
Getting started with crochet can sometimes seem confusing with the first instructions - but don't worry! With a little practice and patience, the basics can be learned quickly and more challenging projects will soon be within your grasp.
To make it easier to get started, we offer simple, free crochet instructions that guide you step-by-step through the process.
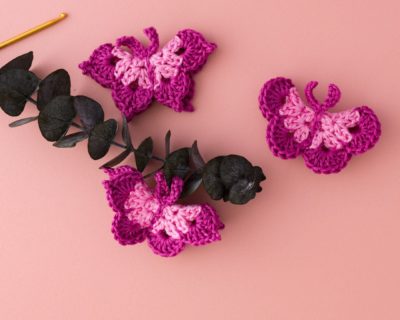
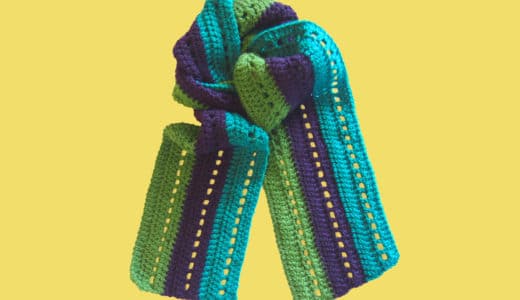
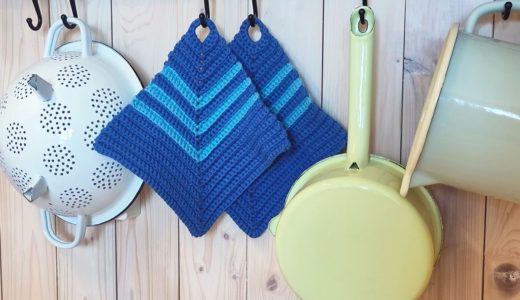
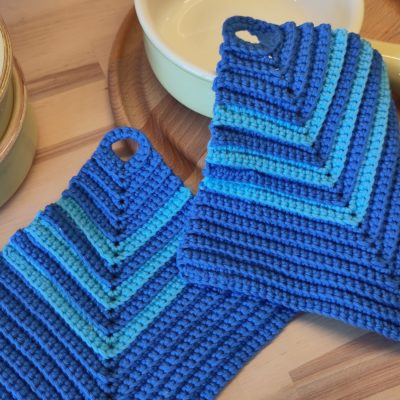
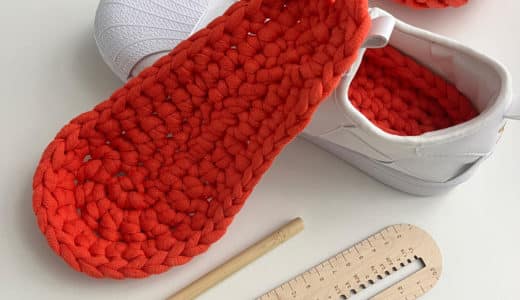
A simple scarf, which is ideal for cooler days, or a classic potholder in a ribbed pattern are popular first crochet projects. If you want to try making accessories, you can follow the instructions to make a headband or crochet practical insoles - perfect for warm feet in winter!


Frequently asked questions about learning to crochet
What is easier? Learning to knit or crochet?
When getting started with needlework, many people find crocheting easier than learning to knit. The reason for this is that there is usually only one stitch on the needle when crocheting. Even if the stitch is lost, it can be easily restored. Shapes are thus created very freely.
In comparison, knitting with two needles and many stitches on the needles requires more coordination skills, practical practice and planning. The stitches are all cast on at the beginning and knitted in rounds or rows.
Is crocheting or knitting faster?
As a rule, crocheting is faster than knitting, although this also depends on the individual working method and the project. Knitting can be time-consuming and requires patience, especially for complex projects such as sweaters. In addition, knitting stitches are usually smaller than crochet stitches, which is why progress often seems slower when knitting. However, crochet often requires more yarn than knitting. Therefore, advanced crochet projects with high yarn consumption can sometimes take longer than comparable knitting projects.
How long does it take to learn to crochet?
Learning to crochet is a quick process that only takes a few hours or days for most beginners to understand the basics. After about two weeks of regular practice, simple stitches can be confidently mastered and the first small projects can be completed. The learning speed varies according to individual skill and frequency of practice. Patience, continuous practice and the use of crochet instructions are crucial for progress.
What are typical mistakes for beginners when learning to crochet?
When crocheting, beginners often encounter various challenges that can affect the success of their projects. The most common mistakes are usually caused by uneven stitch tension, which is either too tight or too loose and therefore produces unsightly results. Many newcomers also underestimate the importance of choosing the right yarn and use material that is not ideal for their project. Another typical problem is neglecting to count stitches, which unintentionally changes the shape and size of the crocheted piece.
You can find more useful information and helpful tips in our detailed article “Most common mistakes in crochet and how to avoid them.„